The Jenter comb is a unique device in beekeeping. It was invented by the German beekeeper and scientist Karl Jenter at the end of the 20th century. The device facilitates breeding of queens and offers a number of other advantages. You can make the honeycomb yourself at minimal cost.
Design Features
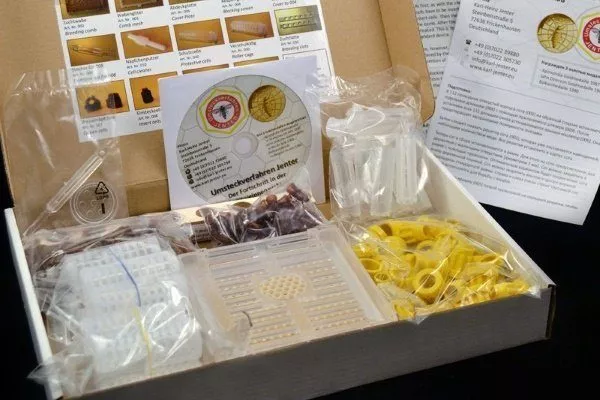
The jenter comb is made of plastic. It consists of a cassette, a set of cells (shaped like "curlers"), bases for the grafting frame, and holders for the mother cup, as well as the bottoms and cups themselves. The kit includes a tool for removing the cups from the cassette and a separate cleaning device. Some models have grafting bars.
The cassette, in turn, consists of a honeycomb mesh replicating natural honeycomb. The mesh is coated with a thin layer of wax, ensuring the bees' acceptance of the device.
The cassette is double-sided. The front side is covered with a separating grid, serving as a queen isolator, while the back side accommodates the bottoms and bowls. The separating grid has a lid for the queen to pass through.
The video below explains what the original Jenter queen comb consists of:
Varieties
| Name | Type of construction | Equipment | Case size |
|---|---|---|---|
| Quick start | Kit | Bowl holders, queen cells, cup removal device | Not specified |
| Extended standard | Kit | Bottom plates with bowls (115 pieces), grafting strips, plug for cleaning cells, queen cells (30 pieces) | 12 cm |
The jenter honeycomb comes in a number of variations. The basic design is the "Standard" model. There are also the following varieties, which differ only in their configuration:
- "Quick Start." This kit is extremely convenient, featuring special cup holders on the grafting bar. The kit includes queen cells and a cup removal tool.
- "Extended Standard." Additionally included are bottoms with bowls (115 in total), grafting bars, and a plug for cleaning the cells. Queen cells (30 in total) are also included. The difference lies in the size of the housing. It is square, but with sides measuring 12 cm.
Jenter honeycombs are regularly upgraded, and kits are supplemented with additional accessories. Kits come with a DVD containing video instructions.
Manufacturer, cost
| Name | Price |
|---|---|
| Standard | 6,100 rubles |
| Extended standard | 7,000 rubles |
| Quick start | 5,700 rubles |
Jenter's honeycomb is manufactured by Karl Jenter (Germany). The price of the device depends on its model:
- “Standard” costs approximately 6,100 rubles;
- “Extended standard” costs on average 7,000 rubles;
- The cost of "Quick Start" is about 5,700 rubles.
These Jenter honeycomb varieties are available for purchase not only as a set, but also as individual components. Any component in the set can be purchased separately. This allows you to expand the set or replace faulty parts as needed.
Advantages and disadvantages of using
The popularity of the Jenter honeycomb is due to a number of its advantages:
- larval acceptance is almost 100%;
- convenient transplantation of larvae in large quantities with minimal losses;
- accurate determination of age larvae;
- the correct shape of the queen cells and their large size ensures large queens;
- loyalty of bees to the queen bred in this way;
- it is possible to organize the simultaneous exit of queens from the honeycomb;
- ease of use – this method is well suited for beginners in beekeeping and people with poor eyesight;
- easy to care for;
- reusable.
The Jenter honeycomb also has some disadvantages:
- price – many beekeepers consider the main disadvantage of the device to be its high cost;
- the impossibility of breeding a large number of queens - only 99 holes are provided, and not all of them are sown;
- Large apiaries require several sets of Jenter honeycomb.
Instructions for the use, breeding and raising of queens
The Jenter honeycomb should come with instructions. After assembly, follow these steps:
- In the late afternoon, insert the comb into the hive. This is done by inserting the comb into one of the frames. Use screws to secure it. It is recommended to apply a small amount of honey to the jenter comb – this speeds up the process and reduces the risk of rejection by the bees.
- A day before egg collection, place a frame of comb between the brood frames (at least 1 cm apart). It's best to choose the central part of the hive. The bees will immediately begin working on the plastic base, covering it with a wax layer and preparing the cells.
- After a day, remove the frame from the nest. Cover the jenter comb with a mesh lid with a hole in the center with a plug for introducing the queen.
- The queen must be young but fertile. She should be placed in a Jenter comb and capped. The frame should be returned to the hive.
- Under isolation, the queen will begin laying eggs in the bottoms of the combs. The design of the Jenter comb allows nurse bees to easily enter. For this purpose, narrow slits are provided in the lid—they are too small for the queen to escape.
- The queen is released from the comb. The frame is returned to the hive.
- After three days, the youngest larvae are transferred to grafting frames. To do this, the bottoms are removed from the Jenter comb and inserted into cups, which in turn are placed into holders.
- The frames are placed in the foster colony, where the queen is first removed and absolutely all queen cells are destroyed.
- After 3-4 days, an inspection is carried out to determine how many larvae the family has accepted for upbringing.
- Before the emergence of new queens, the queen cell is closed with a cage.
To ensure a 100% queen hatch, it's important to select the right larvae. They must be healthy and at the right age. A minimum of 20 larvae per frame is required. The caps containing the selected larvae must be carefully removed and capped.
- ✓ The minimum number of larvae per frame is 20 individuals.
- ✓ The optimal age of larvae for transfer is no more than 3 days.
The grafting frame should be prepared in advance. It is equipped with plastic fasteners, which are necessary for securing the larval cups.
Open air is harmful to larvae, as they quickly dry out. A damp towel placed over the grafting frame will help prevent this from happening while transferring them to the grafting frame.
After all the necessary preparations, the grafting frames should be installed in the new bee colony, where the rearing will take place. It's important to consider the colony's capacity—two frames are sufficient for one bee colony, meaning 40 future queens. The colony will provide for the completion of the queen cells, shaping them, feeding and rearing them, and supplying them with food. bee bread.
The instructions for the Jenter Cell provide a specific diagram for properly launching the process. All steps are scheduled, allowing you to plan the entire process and achieve maximum efficiency. In total, the process takes 30 days. The main timeframes are as follows:
- the queen must be kept in the prepared structure for at least 3 hours, it is recommended to keep it there for 15-20 hours to ensure that the eggs are laid;
- It is recommended to check the laying of eggs the next day at 9-11 o'clock; if the attempt was unsuccessful, it should be repeated;
- the larvae are placed in the foster family after 3 days;
- After another 3 days, begin preparing the nuclei and bee colonies to replace the queen;
- After 8 days, transplant the queen cells into nuclei and provide the insects with a 2-week rest period;
- After the dormant period, check the honeycombs - if there are fertilized cells, then the new queen is ready to replenish the family.
When introducing larvae to a nurse colony, it's important to have a reserve. Larval rejection is possible, so their feeding and development should be monitored. If rejection occurs, replace the larvae with a reserve and tighten monitoring.
Watch a video tutorial on how to breed queen bees using Jenter's comb:
DIY Jenter's Honeycomb
Beekeepers consider the main drawback of the Jenter comb to be its high cost. This makes it a good idea to make one yourself. To do this, you'll need:
- plywood – thickness no more than 10 mm;
- drill and suitable drill bit;
- file;
- wax – cells are made from it;
- template with a diameter of 5 mm;
- drawing.
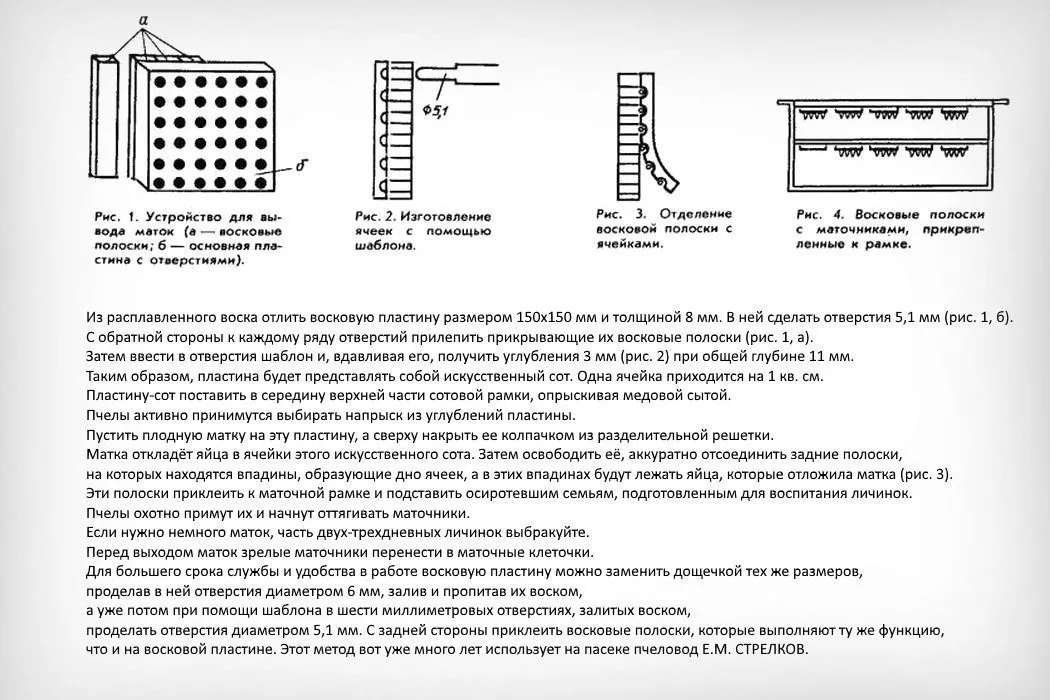
Plywood is used for making honeycombs ourselves, as it's very difficult to construct such a structure from plastic. The process follows this algorithm:
- Cut a square piece of plywood with a side of 15 cm.
- Mark the frame to drill the holes. The gaps between the holes should be even, with a diameter of 8 mm. For ease of marking, it's recommended to create a grid of 1 cm squares on the plywood frame. Drill the holes at the intersections of these grids.
- Using a drill, make holes 5 mm deep.
- Melt the wax and fill the prepared holes with it.
- Attach a wax strip to each row of holes.
- Drill holes using a pre-prepared template. The depth should be 3 mm and the shape should be conical. The diameter corresponds to the pre-prepared template.
Further steps should be followed according to the instructions already described. The comb should also be treated with honey and placed in a frame. The wax plate should be removed after the queen lays eggs in the cells. This must be done carefully. The removed plate is attached to the queen frame.
Above is one of the Jenter honeycomb designs. Here's another:
Product care
One of the advantages of Jenter's honeycomb is that it can be reused repeatedly. This is largely due to the use of plastic in its construction, which is easy to clean.
To clean a Jenter comb, treat it with sugar syrup and place it with the bee colony. The bees will do the rest. They'll clean the structure in about two hours. This method is also suitable for other plastic parts.
Another cleaning method is to rinse all parts in water at 65 degrees Celsius. This is hot enough to melt the wax without damaging the plastic parts. Do not add any detergents to the water!
When making Jenter honeycomb yourself, reusing it is pointless. Construction costs are minimal, so it's easier to make a new frame.
Jenter combs allow for convenient and efficient queen rearing. The process must be organized according to a specific algorithm. Jenter combs can be purchased in various configurations or made by hand. The latter option allows for significant savings.