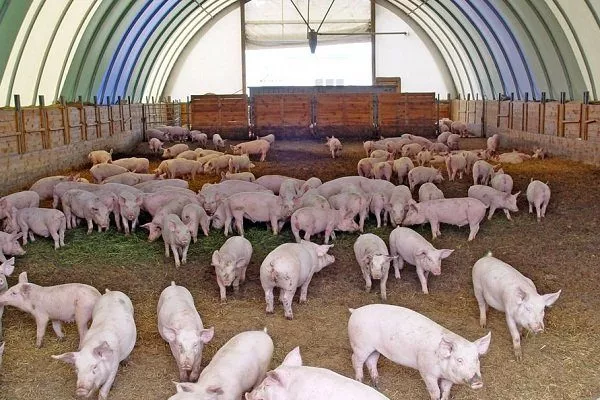
Once you've determined the number of pigs you'll raise and the purpose of keeping them, you can begin designing and building the pigsty. Available standard drawings and instructions will help you build a clean, dry, spacious, well-lit facility where the animals will feel completely safe and comfortable.
How to calculate the size of a pigsty?
To properly design a future building, it's necessary to determine its dimensions. We'll discuss how to calculate the area and height of a shed separately.
Square
It's generally accepted that each animal should receive approximately 3-5 square meters of space. So, if a pigsty for 10 animals is required, its area should be at least 30-40 square meters. However, for a more accurate calculation of the space, it's advisable to consider the age of the animals, as well as their type of housing—breeding or fattening. Standard requirements are provided in the table:
| Livestock | Number of animals in the pen | Machine area | |
| during breeding maintenance | when kept for fattening | ||
| Boars | 1 | 8 sq. m | 8 sq. m |
| Sows: | |||
| single and pregnant up to 2 months | 4 | 3 sq. m | 3 sq. m |
| pregnant women at 3 months | 2 | 6 sq. m | 3.5 sq. m |
| suckling piglets | 1 | 10 sq. m | 7.5 sq. m |
| Piglets: | |||
| young animals up to 5 months | 10-12 | 0.6 sq. m | 0.5 sq. m |
| breeding boars aged 5-8 months | 2-3 | 1.15 sq. m | — |
| fattening piglets aged 5-6 months | 20 | — | 0.7 sq. m |
| fattening piglets aged 6-10 months | 15 | — | 1.0 sq. m |
The room must also be provided with transverse passages 1.4-2.1 m wide and feed and manure corridors 2 m wide.
As an example, let's calculate the optimal barn size for 100 pigs. Let's assume the herd has 5 sows, 90 piglets, 1 stud boar, and 3 breeding gilts. The piglets are expected to farrow at least twice a year, so they need to be housed in pens of varying sizes. Based on this data, the calculation is as follows:
- Calculate the area for each animal category:
- for sows with piglets – 5x10 sq. m = 50 sq. m;
- for a boar – 1x8 sq. m = 8 sq. m;
- for older and younger piglets – 45x1 sq. m + 45x0.5 sq. m = 67.5 sq. m;
- for young pigs – 3x1.15 sq. m = 3.45 sq. m.
- Add up all the obtained values – 50+8+67.5+3.45 = 128.95 sq. m.
- Calculate the length and width of the area used for the pens. Let's assume that pens, each 3 m deep, will be arranged in two rows, with aisles along the walls—two longitudinal and one transverse. To calculate the length of the pig barn, divide the calculated area by twice the depth of the pen and add the width of the aisles: 130/(3x2)+1.5 = 23 m. As for the width, the calculations are as follows: 3x2+2+2 = 10 m.
Thus, the optimal area of a pigsty for 100 heads is 130 sq. m, the length and width are 25 m and 10 m, respectively.
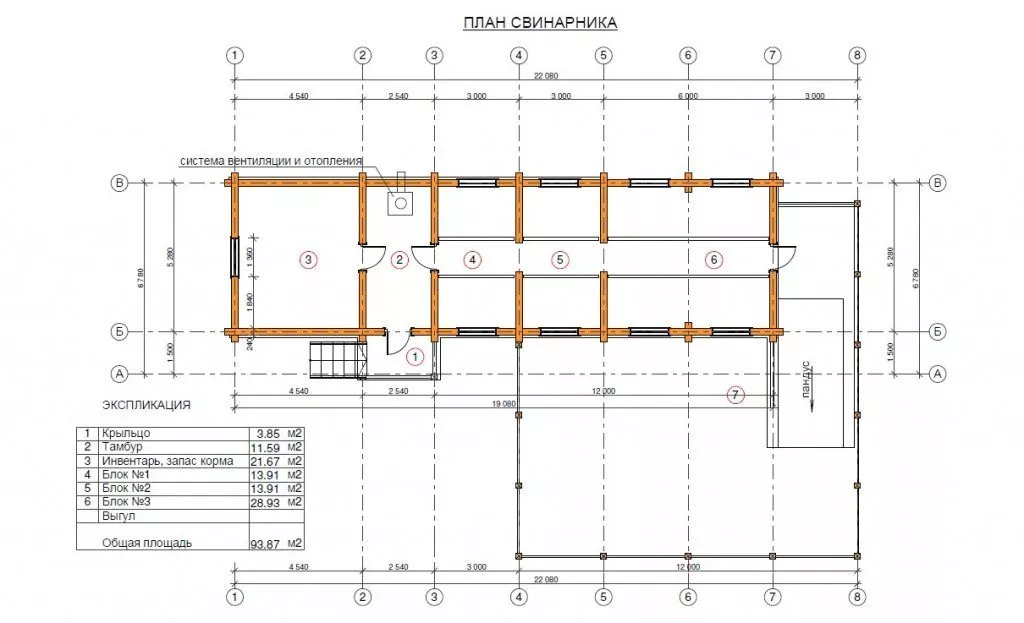
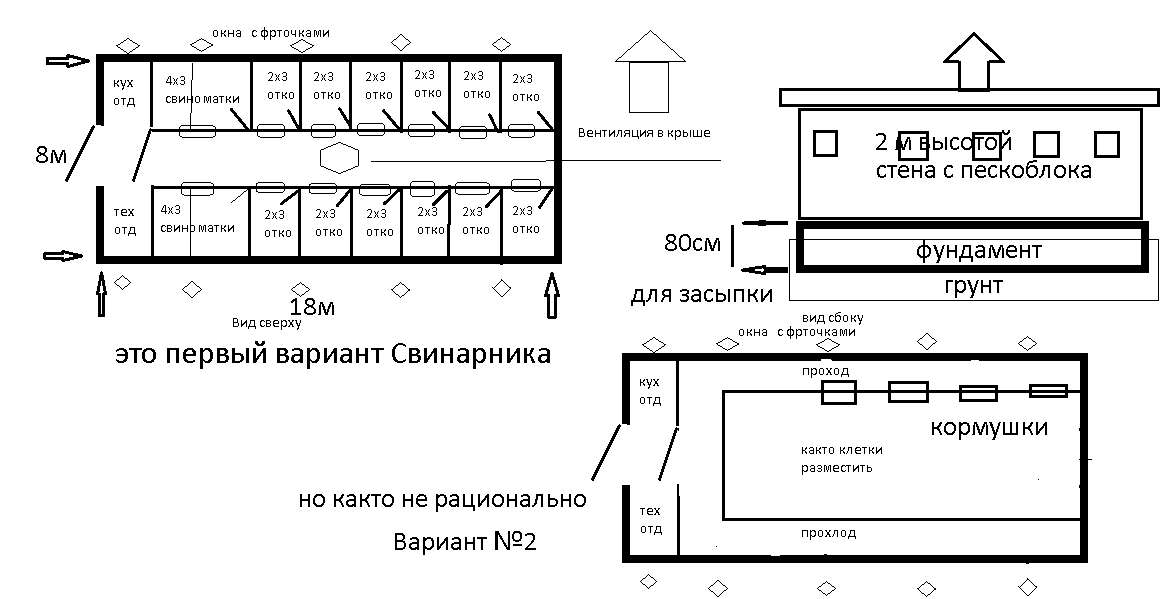
Here are some examples of pigsty drawings:
Height
When determining the height of a room, the following nuances must be taken into account:
- If the building is planned to be constructed without a ceiling with open beams, the maximum height of the walls is 2.6 m;
- If thermal insulation is laid under the roof for insulation purposes, the optimal height of the room at the walls up to the beams is 1.8 m;
- If the ceilings are flat, they must be installed at a height of at least 2.2 m.
In any case, the height of the pig barn's exterior walls cannot be less than 1.6-1.8 m, otherwise the air in the room will be poorly ventilated. The highest point of the ceiling should be 2.2-2.6 m. The roof itself is best with a single or double slope.
Learn how to correctly calculate the dimensions of a pigsty to build it from planks in the video below:
Requirements for the premises
To properly design such a structure, it is necessary to take into account a number of rules:
- Before entering the pigsty, you can set up a covered area for the animals to walk on. It should be spacious, providing approximately 10 square meters of space per pig. For 10 pigs, the optimal area is approximately 100 square meters.
- Provide space for the installation of waste pipes through which all waste will be discharged.
- The sow's pen should be located away from cold walls so that the newborn offspring are warm and comfortable.
- The walls of the pens should be higher than the height of the animals. The optimal height is 180-190 cm. Their normal depth is 2.5-3 m, but in limited space, the pens can be made shallower, located on only one side to avoid creating a passageway.
Experienced farmers do not make many pens of different sizes, but organize two pens - one 3x4 m in size for keeping the entire livestock and one 4x4 m in size for fattening.
- If you plan to build not one, but several machines, be sure to provide a passage between them that is at least 1.5 m wide.
- Equip the walls with 1-2 windows, but no more, as too much bright light will disturb the animals. To provide moderate lighting in a 10-head pigsty, two medium-sized windows are required.
- To retain internal heat, especially in harsh climates, reinforce the walls with insulation and a vapor barrier layer.
- Pay special attention to the floor so that it is both warm and durable.
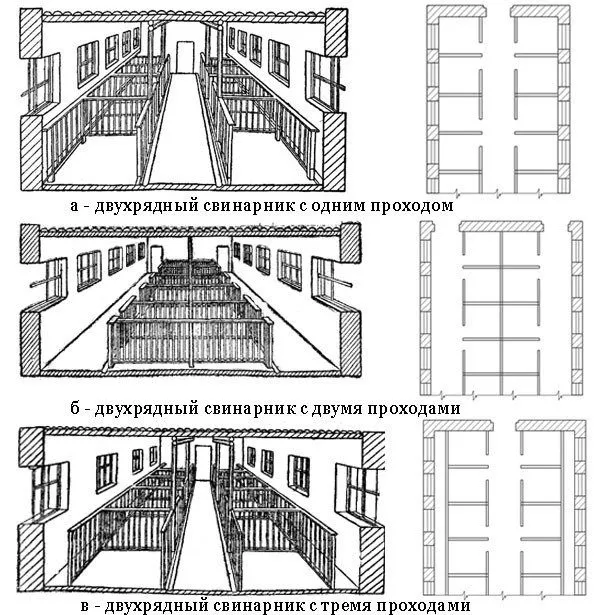
Once you've determined the dimensions and layout of your pigsty, you need to prepare a blueprint. Here are diagrams of double-row barns with varying numbers of aisles—from one to three:
Choosing a location
When choosing a location for the entire farm complex, you need to consider not only its size and the availability of walking space, but also the following rules:
- The site must be level and dry, protected from moisture. Moisture is dangerous for the building, as it creates a favorable environment for the growth of bacteria and fungi. For this purpose, it is advisable to build the pigsty on a raised site. If lowlands predominate, they must be raised and embanked. Otherwise, the pigsty and run may flood during rain or melting snow, leading to the death of the young animals.
When choosing a location, avoid areas that are prone to waterlogging or flooding from floods, sewage or groundwater.
- The site should be protected from cold winds, ideally near a forest-steppe zone. Even-toed ungulates are extremely sensitive to drafts, especially when combined with excessive moisture. To create the most comfortable conditions for them, fast-growing shrubs or other bushes should be planted around the perimeter of the site.
- The distance from residential properties to the pig barn should be at least 15 meters. This distance should be adjusted depending on the direction of prevailing winds that carry odors and the slope of the terrain, which affects the flow of slurry and liquids.
Pigs are noisy animals, so it is not advisable to place their house near residential buildings or a barn with poultry.
What materials and tools will be needed?
For each element of the building you need to prepare your own material:
- Foundation and floorCement and sand are often used to pour the foundation. The coating itself can vary:
- WoodenIt's made from 50mm-thick edged boards. They are nailed together tightly or with a small gap. This type of flooring is non-slip and warm, but it absorbs odors and urine, and swells in high humidity, quickly deteriorating.
- ConcreteThis is an ideal option because the surface of such a floor is smooth, doesn't absorb water or odors, is easy to clean, and is resistant to high humidity. A disadvantage of concrete is that it doesn't retain heat well, so it needs to be insulated for the winter with boards or roofing felt. The floor can also be heated (using hot-water heating or electric cables) or multi-layered (with insulating layers).
- AsphaltThis type of surface is non-slip, warm, and durable, but it's porous and difficult to clean, so dirt particles remain in the pores. Over time, acids and alkalis corrode the floor, causing it to become sticky.
- EarthyThe only advantage of this type of flooring is its low cost. It has many disadvantages: it's cold, quickly absorbs urine, mixes with manure, and retains an unpleasant odor. It's also important to consider that pigs love to dig, so they might dig between the wall and escape. Therefore, a dirt floor can only be a temporary solution, and installing a different type of flooring will require removing a significant layer of soil to eliminate the manure smell.
- BrickThis type of roofing retains heat better than concrete, while still offering all the advantages. Its downside is its high cost, so to save money, recycled bricks can be used. They are laid tightly together in a herringbone pattern on compacted soil, and the gaps between them are filled with soil.
- WallsThey must be constructed from a material that does not allow heat to pass through. The most popular options are brick, rubble stone, thick beams or logs, and aerated concrete blocks. Modular or sandwich panels can be used for quick construction of piggeries; however, their purchase and installation will significantly increase the final cost. To calculate the amount of material required for the walls, use the formula K = ((Lc x hc – Pc) x tc) x ((1,000,000 / (Lb x bb x hb)), where:
- Lс – length of walls;
- hс – height of walls;
- Рс – area of window and door openings;
- tс – wall thickness;
- Lб, bб and hб are the length, width and height of the blocks, respectively.
Unique parameters for calculating wall materials- ✓ Take into account the thermal conductivity coefficient of the wall material when calculating additional insulation in regions with harsh winters.
- ✓ Add 10% to the estimated amount of materials for scrap and cuttings.
The inside walls can be insulated with hardwood boards, but they must first be tarred, otherwise they will absorb a lot of moisture and odor.
- Roof. The best roofing material for a building is slate, as it adheres easily and securely to the rafter system. To calculate the optimal number of sheets, divide the length of the slope by the width of the slate section, and then multiply the resulting value by dividing the slope width by the length of the slate. The ceiling can also be covered with reinforced concrete slabs and boards, and sawdust and sand make good insulators.

Once you have sorted out the materials, you need to prepare the tools and fasteners:
- a bayonet shovel for digging a trench and a shovel for leveling the concrete:
- axe;
- hacksaw;
- hammer and nails;
- saw;
- screwdriver, screws, bolts, screws;
- metal corners;
- hammer drill;
- a building level and a tape measure.
Step-by-step instructions for building a pigsty
The technology for constructing a pig barn is similar to building a regular insulated barn. This process can be divided into stages, each of which will be discussed separately.
Creating the foundation and floor
Construction of a pig barn, like any other structure, begins with preparing the foundation—the primary support for all supporting structures of the future building. When completed, it should rise 0.2-0.6 meters above ground level. In wet and clayey soils, the foundation should be laid below the frost line. Typically, it is constructed using a strip foundation rather than a monolithic one, as the load from the walls and animals on it is low.
The general scheme of work is as follows:
- On the surface of the site, mark the contours of the future trench, along the perimeter of which remove all vegetation and debris.
- Dig a trench to a minimum depth of 0.5 m and reinforce.
- Fill in a layer of sand and crushed stone, then pour concrete or install stones, iron blocks, etc.
- Along the outside of the plinth, create a 0.7-meter-wide apron using well-compacted clay, concrete, asphalt, or other materials. It should slope downwards from the plinth to the ground so that water that falls on the walls drains into the ground.
- Lay roofing felt or roofing felt on the foundation to prevent capillary moisture from getting the walls wet and damaging them.
The nuances of creating a floor depend on the specific technology, the most popular of which we will consider separately.
Solid floor
This is a simple option to set up, but the farmer will have to put in a lot of effort when cleaning the pigsty. To make this process easier, a trench should be built along the stalls, and the floor should be sloped toward it (2-5°). The trench is best laid out of brick and plastered. It should then be drained into a holding tank, which should also have a slope to allow proper drainage.
The collected masses can be removed by a special vehicle or poured into pits for rotting and fermentation, ultimately producing fertilizer.
Typically, a solid floor is made of concrete and insulated. The work is carried out in the following order:
- Remove a 40 cm thick layer of soil from the area, and level and compact the bottom of the pit.
- Add a 5 cm layer of crushed stone and compact it well, then repeat the same steps. The final result should be a 10 cm thick, crack-free layer of crushed stone. Add a 5 cm layer of sand, water it, and compact it thoroughly to eliminate footprint marks.
- Lay a waterproofing layer (such as thick polyethylene film) on top and add insulation such as expanded clay or granulated foam glass. The latter option is more expensive, but it's also three times warmer and doesn't absorb moisture. Compact the insulation, but not as thoroughly as a bed of crushed stone and sand.
- Pour grade B20 concrete (cement, sand, and crushed stone ratio 1:2:4, respectively). The minimum layer thickness is 3 cm. When pouring the concrete, create the required slope toward the ditch.
The finished concrete floor should be immediately covered with plastic film and left for 2-3 days so that it matures better and forms a smooth surface.
Slotted floor
The principle behind this type of flooring is to evenly distribute cracks through which fecal matter and waste will drain, significantly simplifying maintenance. It's essentially a double floor:
- At the bottom, a solid concrete floor is made, like a trough, with a slope towards the ditch.
- A slatted floor is laid on top, either over the entire surface or only in certain areas where the pigs will go to defecate.

Depending on the materials used, slatted floors can be:
- plastic, metal - the best option for piglets, since the gaps in them are made small, and the surface of the bedding is slightly ribbed and rough;
- concrete – produced in series, characterized by relatively small openings and wide crossbars in order to minimize injuries;
- wooden ones - are inferior to the previous options, since the cracks are wide, so pigs often catch on them and tear out thick boards.
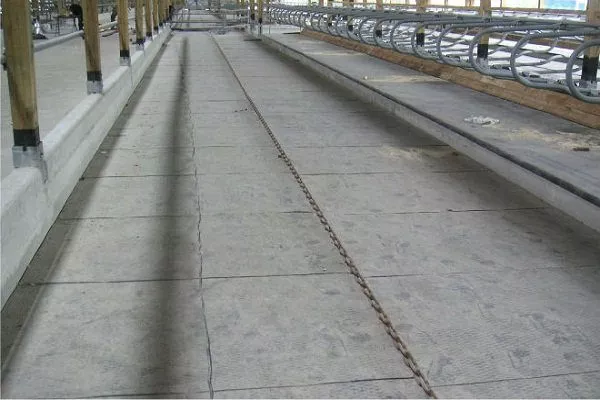
Floor with self-propelled manure removal system
This technology is used on modern pig farms because it allows for the maintenance of all sanitary and hygienic standards and the environmental safety of the area surrounding the building.
The idea is to construct concrete basins—deep depressions running the entire length of the room. These basins will collect all the manure. These basins, in the center of the floor, slope toward a drain hole leading to the sewer system. A special plug is provided for this drain.
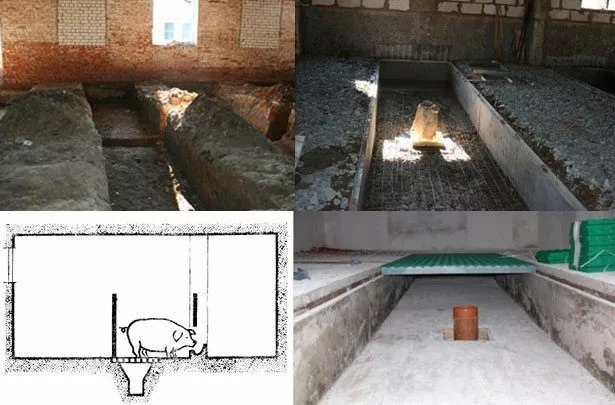
These tubs should be emptied of waste every two weeks. To do this, simply remove the drain plug, allowing the waste to flow by gravity through the sewer system to a dedicated tank outside the farm. Sewage pipes can be installed at the tub outlet to speed up the cleaning process.
A manure removal system is feasible if the pig barn floor is slatted. If it is solid, such a system will need to be supplemented with a hydraulic flush. However, this solution has two significant drawbacks:
- a large amount of water is consumed;
- Constant drafts penetrate the room through the system's ducts, which are dangerous to the health of the livestock.
So, in the case of a solid floor, it is better to refuse to install such a system.
Construction of walls and window installation
They are often constructed from wooden structures as follows:
- Prepare the wood by treating it with a preservative, staining it, and applying at least three coats of varnish. This will double its lifespan.
- Erect supporting pillars and intermediate supporting structures.
- Install the lower trim, supports and upper trim.
- Attach the bracket using metal brackets and screws. This can be reinforced with additional rigid triangle-type fastening.
- The interior walls should be covered with boards, leveled with plaster, and whitewashed. An additional layer of insulating material can be installed.
The acceptable thickness of wooden walls is 0.18-0.25 m. If bricks are used for their construction, it is better to maintain 0.51-0.64 m.
A pig barn must have a window for natural light. Its area should not be larger than the floor area, as excessively bright light will make the animals aggressive. Subdued lighting is the best option for them.
The window should be installed at a height of 1.5-1.7 meters. It should open at least halfway to ensure adequate ventilation. It's important to prevent drafts. To achieve this, either install double glazing in a wooden frame or install a plastic window.
Laying the ceiling and roof
If winter temperatures drop below -20°C, a ceiling is essential for additional insulation in the pig barn, creating a thermal insulation layer between it and the roof. This can be made of planks or reinforced concrete slabs. The ceiling should be whitewashed underneath and insulated above with sawdust, chaff, sand, or other readily available material.
The roof itself is best combined with an overhang to protect the structure from precipitation and sun. It can be single- or double-pitched, covered with slate, and insulated with roofing felt. The roof should be insulated with sawdust or mineral wool. It's best to avoid foam plastic and other artificial materials, as they are practically impermeable to moisture, making the room too stuffy and allowing condensation to accumulate, which gradually damages the roof and walls.
The attic can be used to store bedding and roughage. In this case, a special hatch in the ceiling is recommended for added convenience.
Carrying out finishing works
To avoid missing important details when decorating the interior, this process should be divided into several parts.
Lighting
Natural light in short-daylight conditions will be insufficient to meet pigs' light requirements, which influence their biological processes. Therefore, artificial lighting is essential. When laying wires and installing lamps, consider that one 60-watt lamp adequately illuminates 3 square meters.
Breeding sows with piglets require an 18-hour daylight period with an illumination of about 15 lux, while for fattening animals a 12-hour day with an illumination of 5-8 lux is sufficient.
Ventilation
The pigsty must be equipped with a system ventilation, following these instructions:
- Install large diameter exhaust pipes (40-50 cm) almost under the ceiling at a rate of 2 pieces per 10 heads.
- Install supply air openings 20 cm above the floor.
- Install dampers (discs for opening and closing the opening) on the pipes, and flaps in the form of metal grates on the inlet openings.
- Install additional fans in the air intake openings. They should only be turned on during the hottest weather.

This type of ventilation operates on the principles of natural air circulation: warm air rises and is removed, while cold air enters from below and fills the vacated space.
Some people neglect to install dedicated air intake ducts, believing that windows can serve their purpose. This isn't the best solution—the windows in the pig barn are located quite high, preventing air circulation down below, where the pigs are housed.
Heating
In temperate climates, a pig barn can be built without additional heating, as the animals housed there generate sufficient heat. The key is to properly insulate the space.
In areas with harsh winters, it's still a good idea to provide additional heating. This can be done using air heaters, a stove, or any other heating method. Special heating lamps should also be provided for the piglets.
Machine tools
The interior of the pigsty can be divided into stalls using two types of materials:
- 5 cm thick edged board and timber for posts made of hardwood;
- metal pipes, sheets, corners.
The height of such partitions is approximately 1 m. Each pen should have a separate entrance. Gates should close securely, so simple bolts should be reinforced with additional pads.
The following video explains how to build a pig barn yourself:
When raising pigs, the first step is to decide where they will be kept. A farmer can build a pigsty themselves, first calculating its optimal size based on the number of pigs in the herd. Various materials and technologies can be used, so everyone can choose the option that suits their needs and budget.