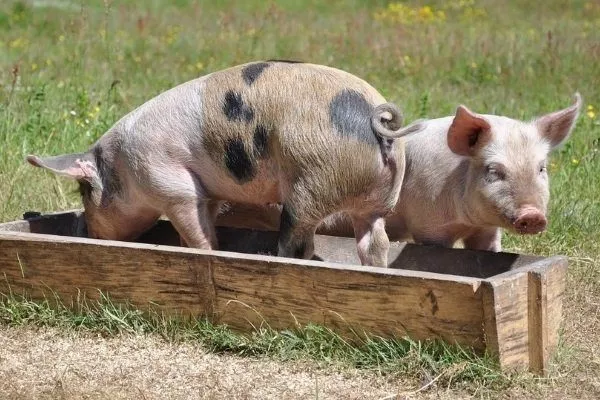
A properly constructed feeder is the key to successful pig farming for a farmer. Its proper construction also directly impacts the labor intensity of the pig farming process.
Basic requirements for the product
Farmers should remember that a well-made product significantly reduces costs. After all, a good feeder will be difficult to spill (which pigs love to do), it won't rot, causing wet feed to leak, and, most importantly, it will be extremely easy to use.
Critical errors in the design of feeders
- ✓ Sharp edges without bending or stripping (risk of injury up to 87% of cases)
- ✓ No separation of areas for dry and wet food (cross-contamination +32%)
- ✓ Inadequacy of the side height for the age group (excess feed consumption of 15-40%)
Before creating a feeder, you should study a set of unspoken, but extremely important sanitary rules, otherwise the animals will get sick, the products will break, and the farmer's business will suffer enormous losses:
1Feeders must be kept clean.
This is a key requirement, so how easy it is to clean the feeders after the pigs have eaten is crucial. It's important not only to be able to easily reach hard-to-reach areas, but also to thoroughly clean the product of food debris, other dirt, etc. Therefore, the material of the feeder should also be given serious consideration.
2Pigs should not be able to get into the feeding compartment.
This applies even to small piglets, otherwise they will deposit waste products, dirt, or debris into the feed. This means a 100% risk of bacteria, worm eggs, and much more.
A good way to keep pigs out of your feeder is to carefully consider the height of the front wall. Because of their short legs, pigs are not prone to jumping, so this approach will significantly reduce the boars' desire to climb into the feeder and make a mess.
3The food should not spill.
Therefore, it's necessary to create a certain recess in the feeder and protect the food with the side walls to prevent animals from scattering it. However, this is just an example; a more precise structure will be created in the drawings.
It's also important to remember that liquid feed compartments must be airtight. Leaking liquid will increase humidity in the room. Such situations negatively impact the pigs' health and, consequently, cause losses for the farmer.
4Pigs should have maximum free access to feed.
A feeder with cut/beveled corners works well. A completely round feeder is the ideal solution.
However, stability may be an issue (there aren't many ways to achieve this in such conditions). On the other hand, while a round feeder is stable, it's also likely to be heavy. This means it will be more difficult to wash, clean, transport, etc.
5Other nuances
It's best to have the feeder sloped. This will allow leftover food to accumulate in one place rather than scattered all over the place.
The product must be made of a material that will not deteriorate when exposed to sunlight and/or heat. There's nothing worse for animals than melted plastic or rusted metal. It's also important that it doesn't release any toxic substances during use: this is critical for young piglets and sows.
The edges of the structure must be completely safe for animals. The risk of injury is 100%, as pigs are not particularly neat animals, nor are they clumsy.
Feeders, if used for different types of feed, should be divided into sections: one for dry feed and one for liquid feed. If water needs to be provided for the pigs, separate structures—special drinking bowls—should be created for this purpose.
The best solution would be a size and design that would allow several piglets to feed at once. Also, different sized containers are needed for young piglets and adult boars.
It's impossible to raise a piglet into a mature sow using just one size feeder. There must be several: an adult pig won't be able to fit its snout into a small hole, just as a small piglet simply won't be able to reach the food in a large bowl.
For piglets, you can make a feeder with a canopy: due to their small size, they will have easy access to food, which is not possible for adult pigs.
Required dimensions
To build a pig feeder yourself, you need to determine the dimensions of the structure. These vary greatly and depend on many factors:
- number of heads;
- type of pigs (piglets, adult pigs, sows, young pigs, etc.);
- pig breed (directly affects the size and height of the sides in the feeders);
- the dimensions of the premises where animals are bred, etc.
On average, it is recommended to focus on these sizes width in feeders:
- adult pigs: 500 mm for dry feed, 400 mm for liquid feed;
- weaned piglets: 300 mm for dry feed and 250 for liquid feed;
- suckling piglets: 150 mm for all types of feed with a front side height of 100 mm.
As for lengths, it depends on the age of each individual:
- suckling piglets – 150 mm;
- young animals up to 5 months – 250 mm;
- young animals from 5 months – 300 mm;
- sow – 400 mm;
- adult boar – 450-500 mm.
For a large number of birds, it's best to use a single long feeder. This will ensure continuous feeding and ease of consumption.
Wooden trough for pigs
One of the most environmentally friendly materials for making a bird feeder is wood. It's inexpensive and can be made with minimal tools.
Third-grade boards can also be used, as a wooden trough is disposable—it lasts literally for the life of a single piglet, i.e., from seven months to a year. To ensure disinfection, such a trough is then burned. A new trough is made for each new piglet.
The main disadvantage of wooden feeders is their poor moisture resistance.
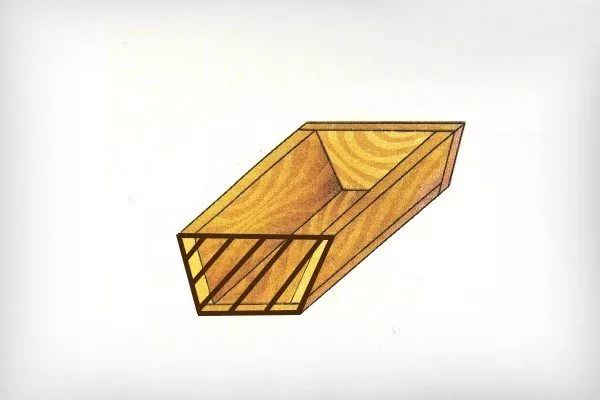
The first version of a wooden trough
To make a wooden trough you will need:
- front and back wall: board 1 m long, 20 cm wide and at least 3 cm thick – 2 pcs.;
- side walls: board 40 cm long, 20 cm wide and at least 3 cm thick – 2 pcs.;
- bottom: board 1 m long, 25 cm wide and at least 3 cm thick – 1 pc.;
- self-tapping screws, nails;
- screwdriver, hammer;
- saw (circular or hand), jigsaw, jointer, plane and similar tools.
Technology for extending the service life of wooden structures
- Treatment with hot drying oil in 3 layers with intermediate drying for 24 hours
- Impregnation with a 7% solution of copper sulfate (protection against fungus)
- Coating wooden utensils with food grade varnish
Here is a drawing of the trough with dimensions (in mm):
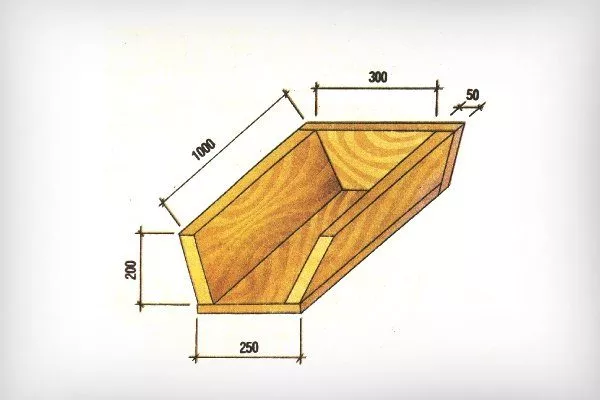
Work order:
- For the boards intended for the front and back walls, remove the gussets from the longitudinal edges to create mitered corners.
- Place the long edge of the bottom board against the beveled edge of the side wall and secure with screws. For added strength, secure with nails.

- Screw the second (front) wall in the same manner. The resulting structure resembles an inverted isosceles trapezoid.
- Take one of the side wall boards. Place it against the end of the previously created structure and draw the outer outline of the trough. Do the same with the second board.
- Cut off any excess to obtain pieces that are exactly the right size.
- Install the end pieces and screw them together. If you used wider end boards and they end up higher than the trough, you can shape them into an arch using a jigsaw.
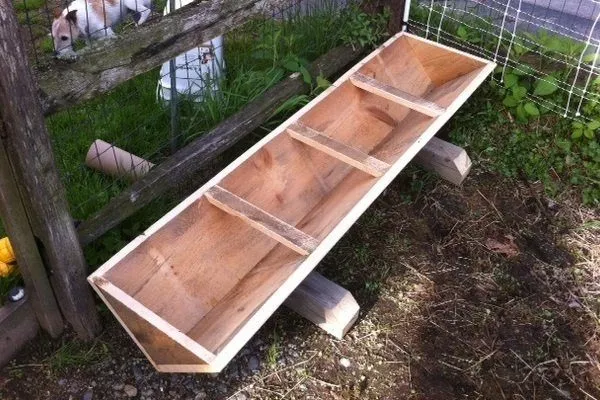
This trough is designed to hold two buckets of feed for two piglets. For added strength, attach a crossbar in the middle.
You can learn more about the technology used to make this feeder by watching the video below:
To prevent the trough from leaking, you can lay twine in the joints during assembly.
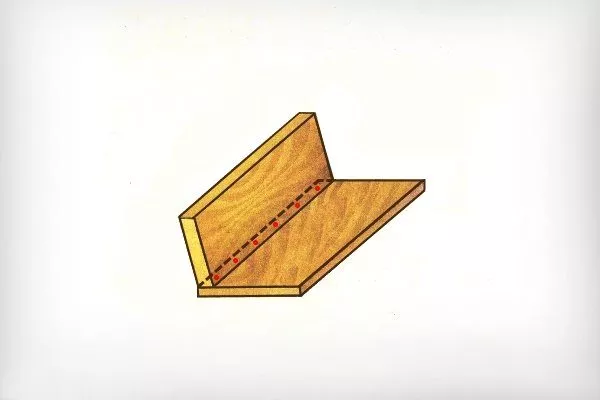
The second version of a wooden trough
A pig feeder can also be made from two boards joined at an angle:
You will need:
- 2 rectangular edged boards of the same length;
- 2 triangular pieces that will be the end walls of the feeder;
- 3 bars with a cross-section of 20x50 mm, equal in length to the width of the finished trough;
- 2 beams 50x100 mm for support.
Assembly sequence:
- Join two long boards together to form a right angle. Secure with nails or screws.
- Attach triangular pieces to the ends of the trough, securing them with nails or screws.
- To increase the strength of the product, and also to serve as upper limiters, secure the crossbars at equal intervals, having first formed their ends at an angle of 45 degrees.
- You can use two beams as a support. Cut a groove in each of them to accommodate the trough. Place the trough on the supports.

The feeder is ready!
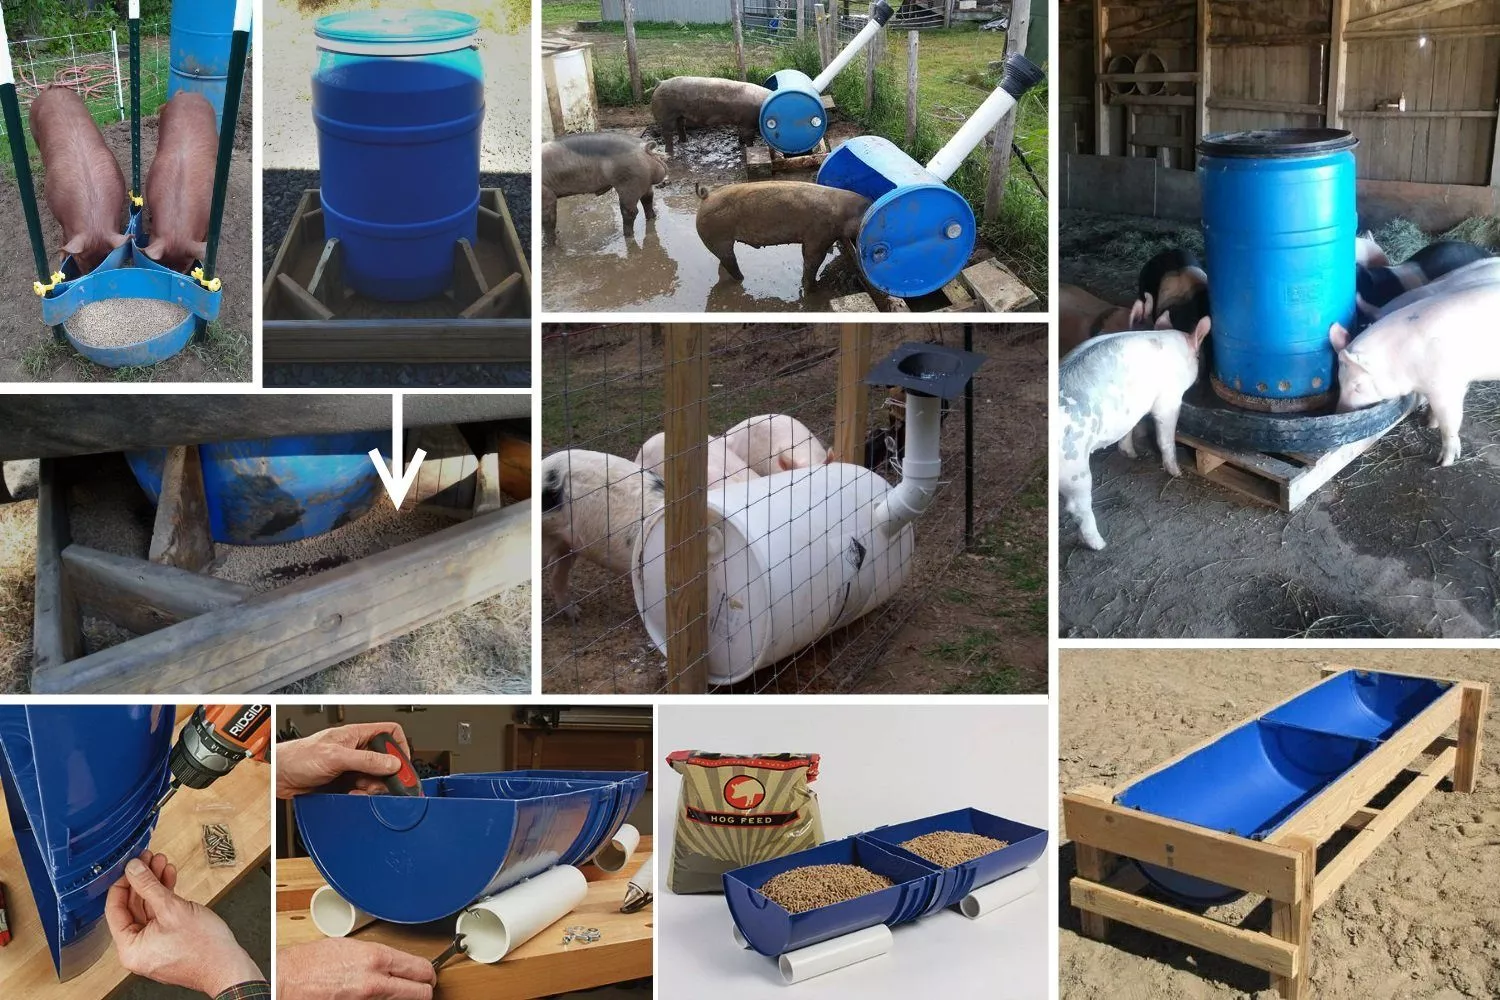
Feeder made from a plastic barrel
Industrial companies purchase the necessary equipment and containers from suppliers, but for a small herd of pigs, you can make a feeder yourself.
And best of all, it's completely free, except for the tools. One of the simplest options is a feeder made from a plastic barrel.
You can make a wonderful pig feeder using an old barrel. However, first, make sure the plastic barrel hasn't been used to store toxic or poisonous substances (removing chemical residue will be incredibly difficult). If the barrel is made of food-grade plastic, that's a huge plus.
Manufacturing option
The bird feeder design is very simple and consists of just a few steps, which can be completed in just 1-2 hours. You'll need:
- marker and ruler;
- saw, jigsaw or grinder;
- wooden blocks;
- screwdriver and screws;
- sandpaper.
Manufacturing process:
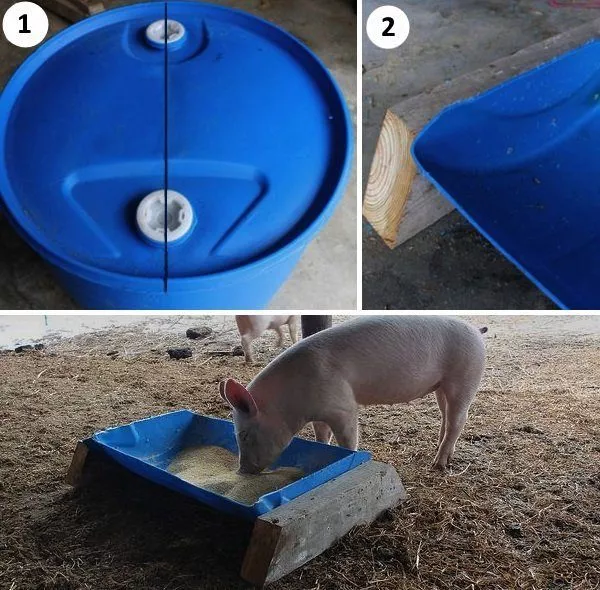
- Using a ruler and marker, you need to apply markings to the barrel.
- Using a saw, jigsaw or grinder, cut the barrel in half according to the markings.
- The cut pieces should be secured to wooden blocks with screws. This will significantly increase the stability of the future feeder.
- Sharp edges must be sanded down to prevent animals from getting hurt.
Pros:
- the easiest way to make a pig feeder;
- minimum costs;
- ease and efficiency of use;
- easy to carry and clean.
Cons:
- pigs can easily climb into the feeder entirely;
- very unstable;
- Plastic can release harmful gases when exposed to the scorching sun (it is necessary to take a responsible approach to choosing a location for installing such a feeder).
Feeder from a gas cylinder
Another, similar method for creating a bird feeder is using a gas cylinder. It's no coincidence that this type of feeder is listed separately: compared to plastic or wooden alternatives, the cylinder is made of ultra-strong metal. Welded to an iron frame, this structure will last 20 or even 30 years.
Required tools:
- grinder or hacksaw for metal;
- welding machine;
- other materials as needed.
Manufacturing process:
- The first thing to do is to open the valve completely to make sure there is no gas left in the cylinder.
This point should never be ignored, otherwise an explosion may occur when cutting the container. Observe safety precautions when creating feeders: even a piece of wood can fly off when using a saw and hit vulnerable areas of the body (eyes, throat).
- Then the valve is cut from the cylinder using a grinder or hacksaw.
- After these steps, fill the cylinder with water and rinse it several times to remove any condensation. It's best to drain the rinse water away from people and animals, as gas condensation can have a strong and unpleasant odor. To ensure maximum protection for bystanders from toxic fumes, pour the water directly down the drain.
- Next, the gas cylinder must be cut with a grinder into 2 equal (for adults) or unequal (for boars and piglets, respectively) parts.
- Additionally, metal rods can be welded across the container - they will prevent the pigs from climbing into the confines of the feeder.
- To increase stability, it is enough to weld a metal (or knock together a wooden) frame.
Safety precautions when working with gas cylinders
- ✓ Checking the residual pressure with a pressure gauge
- ✓ Soaking in a 10% soda solution for 48 hours
- ✓ Control flush with water under 2 atm pressure
- ✓ Use of spark-proof tools

It is better to weld the feeder from a gas cylinder at a slight angle to make it easier for the pigs to consume the feed.
Another way to make a pig feeder from a balloon is shown in the video below:
Advantages:
- significant structural stability;
- durability;
- variability in creation (you can add or change many details without worrying that the structure will break);
- complete immunity to sun rays or excessively high/low temperatures.
Flaws:
- may rust if not cleaned properly;
- difficult transportation;
- Without special skills, it will be extremely difficult to make such a feeder;
- At high temperatures, the metal heats up and can cause burns when touched (but if installed under a canopy, the problem is solved).
Bunker metal (welded) feeder
This type of feeder consists of a hopper for the feed and a tray into which it is evenly distributed. This design is somewhat complex to manufacture. However, the advantages of this type of hopper feeder are:
- The farmer's time spent on livestock maintenance is reduced (feeding occurs in a semi-automatic mode, since the feeder refills itself, and feed is added only when the hopper is empty);
- The metal is easy to wash and can be easily disinfected with special agents.
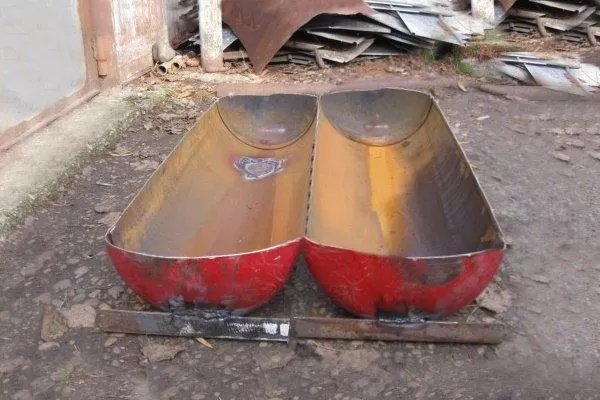
The first version of the feeder
To make it you will need:
- 2 iron pipes with a diameter of 310 mm (or two old gas cylinders);
- 4 pieces of metal to make the ends of the trough;
- metal corner for legs;
- metal reinforcement for crossbars;
- Bulgarian;
- welding machine with electrodes.
Sequence of work:
- Cut one pipe, 1 m long, lengthwise into 2 equal halves.
- Place these halves next to each other and weld them together along the long side.
- Cut semicircles for the ends from separate metal sheets and weld them on.
- For stability, weld on legs. You can secure them to the floor with anchors to keep the feeder in place.
- Weld sides along the edges to prevent pigs from injuring themselves on sharp edges while feeding, and to prevent pigs from scooping feed out of the trough and spilling it on the floor.
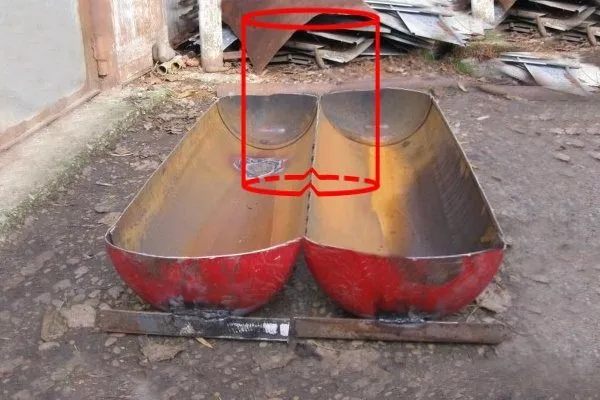
- Place the second pipe vertically in the center of the weld seam of the halves of the first pipe.
- Use a grinder to cut a groove so that the second pipe fits onto the partition. Weld it in place.
The size and shape of the groove can be adjusted to control the flow of feed into the trough. Choose the best option for you.
- To prevent pigs from climbing into the feeder, it is recommended to weld crossbars in the middle.
The following video shows a mini version of such a feeder:
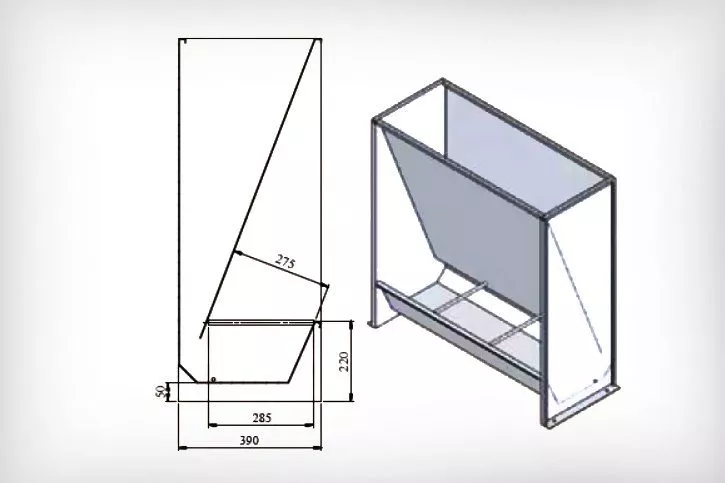
The second version of the feeder
Necessary materials and tools:
- steel or aluminum sheets about 3 mm thick;
- a metal pipe 1 m long and at least 60 cm in diameter, otherwise the container will be too shallow;
- Bulgarian;
- welding machine with electrodes.
Here is an approximate drawing of this feeder:
Stage 1.Make a metal trough:
- cut the pipe in half lengthwise;
- Secure the plugs to the ends using welding.
Stage 2. Next, build a bin (it should hold at least 40 kg of feed). The bin walls should be sloping so that the feed flows down them under its own weight:
- Using a grinder, cut out 4 parts for the bunker from a metal sheet according to the diagram.
- Weld 3 sides of the bunker.
- On the fourth wall, make a "ball" - a special rod that, when touched by pigs, moves and breaks up the caked feed in the bunker:
- Weld 2 flat nuts onto the inside of the bunker wall in the center at the top and bottom, and weld a nut on each end of the nut.
- Thread the rebar through the nuts.
- Weld 2 transverse sections onto it.
- Bend the lower part of the reinforcement into a hook; it will be located in the feeder.
- Assemble the bunker by welding the last, fourth wall with a roller.
The video below shows how the bunker is assembled:
Stage 3. Weld the bunker to the trough. Secure the feeder to the wall or floor, otherwise the pigs might tip it over. Done!
Ceramic pipe feeder
Feeders made from such pipes are not subject to corrosion or decay.
Materials and tools:
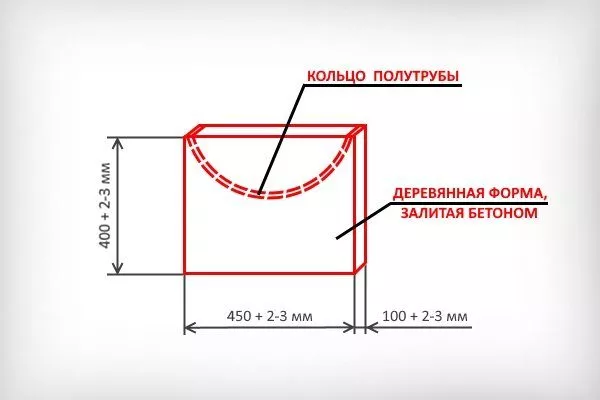
- ceramic pipe with a diameter of 450 mm;
- concrete: cement M500, sand and crushed stone in a ratio of 1:2:3;
- cement mortar: cement M500 and 5 buckets of sand;
- boards for molds for concrete supports;
- reinforcement bars with a diameter of 15 and 20 mm (for the fencing grid and holders, respectively);
- 2 plastic plugs for pipes (e.g. external ones for transporting pipes with a diameter of 450 mm);
- Bulgarian;
- welding machine with electrodes;
- tape measure, marker for marking.
Mistakes when working with ceramic pipes
- ✓ Cutting without water cooling (94% cracking risk)
- ✓ Using regular cement instead of sanitary cement
- ✓ Absence of expansion joints in concrete supports
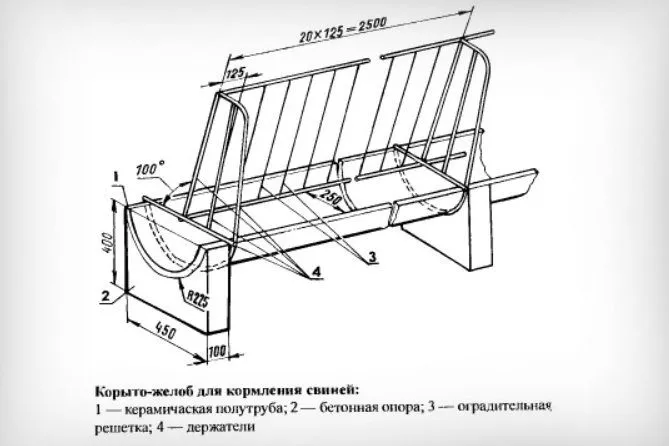
Dimensions in mm
Manufacturing procedure:
- Carefully cut the pipe in half lengthwise.
- Cut off a 100mm wide ring from the sides.
- Make two rectangular molds from wooden planks according to the dimensions shown in the drawing above, with a 2-3 mm overlap. Fill each mold with concrete, avoiding any air pockets. To compact the mixture and remove any air bubbles, use a metal rod to tamp the concrete over the entire surface at intervals of 5-10 cm.
Place a plastic sheet on top and lay the half-pipe ring. Press the ring down to remove any excess concrete.
- After 1-2 days, when the concrete has dried, remove the wooden formwork from the product.
- Place the half pipe on concrete supports.
Making the supports can be simplified. Fill a strong plastic bag with concrete and tie it tightly. There should be two or more supports (depending on the length of the ceramic pipe). Line up the bags of concrete and place the half-pipe on top, pressing it down slightly to shape the bags. After the concrete has dried, remove the plastic bag.
- Cap the ends of the half-pipe. If you can't find ready-made pipe caps, you can fill a strong plastic bag with cement mortar, tie it, and place it at the edge of the half-pipe, shaping the mixture to form the end.
- To ensure the trough is watertight, seal all seams with cement mortar.
- To prevent pigs from climbing into the feeder, weld a grate from rebar to the dimensions shown in the drawing. Secure it to the trough.
The feeder is ready!
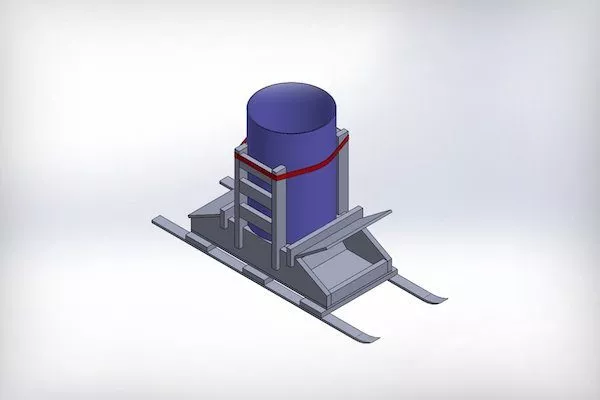
Mobile bunker feeder (winter version)
This is an excellent option for keeping a large herd of pigs outdoors during the winter. This feeder is easy to move because it slides on the snow. The only requirement is that it must be snowy in winter.
You will need:
- plastic barrel with a capacity of 200 l;
- a pair of old alpine skis;
- plywood about 12 mm thick (you will need pieces of 1250 x 600 mm - 1 piece, 355 x 500 mm - 2 pieces, 550 x 600 mm - 1 piece and 420 x 600 mm - 2 pieces);
- 1 board 50 mm x 350 mm x 2.5 m;
- 1 board 50 mm x 180 mm x 2.1 m;
- 1 board 50 mm x 130 mm x 1.2 m;
- 1 beam 50 mm x 150 mm x 1.4 m;
- 1 beam 50 mm x 80 mm x 5 m;
- hammer and nails;
- screwdriver and wood screws;
- jigsaw;
- two sets of door hinges with a width of 7 cm;
- ratchet belt.
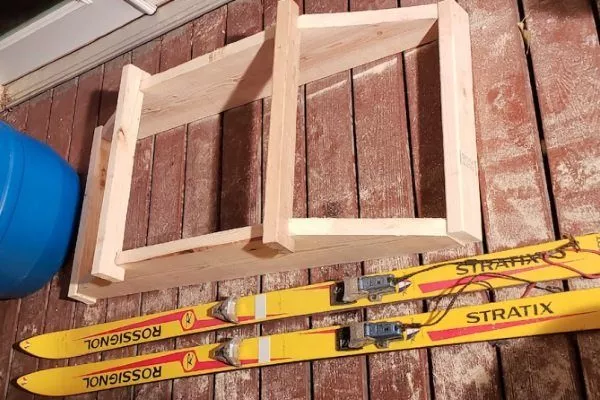
Manufacturing sequence:
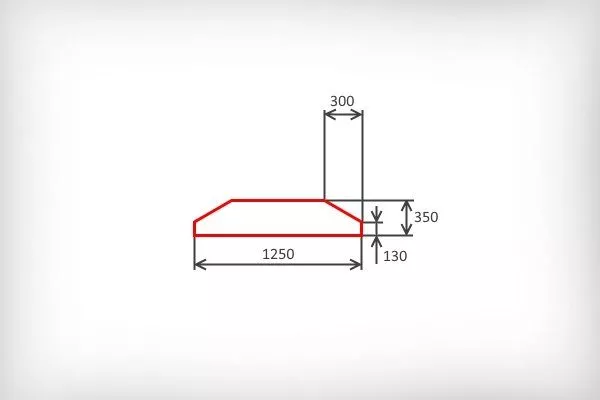
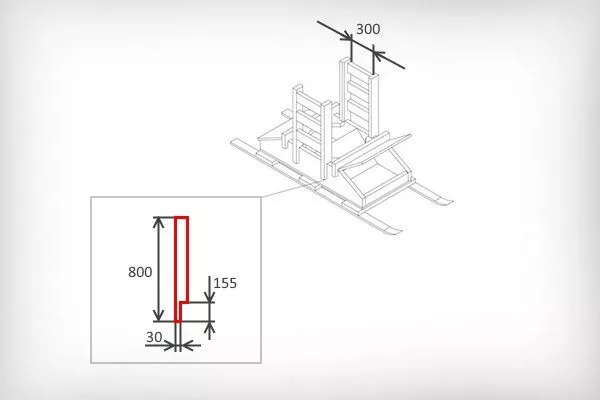
- Cut a 350 mm wide board into two equal pieces, each 1.25 m long. Cut the corners on both sides according to the diagram to create a trapezoid. Do the same with the other piece of board. You'll end up with two trapezoids like this:
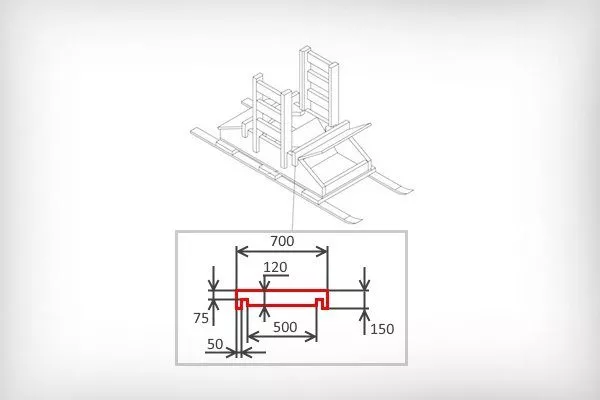
- Take a 50 x 150 mm beam and cut it into two pieces, each 700 mm long. Cut grooves in each piece as shown in the diagram below:
- Take a 50 x 130 mm board and cut it into two pieces, each 600 mm long. Connect the two trapezoids together by nailing a piece of board to each end. Install the crossbars, which were cut from the timber in the previous step, into the grooves.
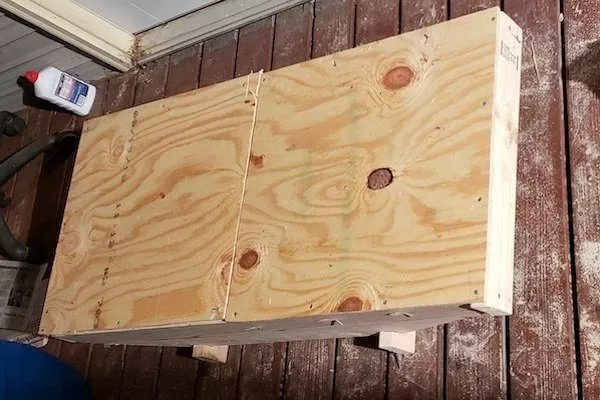
- Turn the structure over and nail a sheet of plywood measuring 1250 x 600 mm to the base.
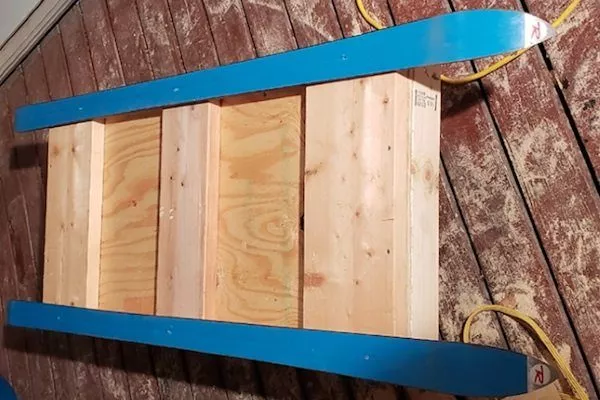
- For rigidity, attach crossbars to the bottom: on both sides and in the center. The boards should extend slightly beyond the edges of the feeder. They can be any width, but the wider they are, the more stable the structure will be. In this case, three boards measuring 50 x 180 mm, each 700 mm long, were used.
- Remove the bindings from the skis. Screw the skis to the bottom of the feeder (secure them at three points near the crossbars).
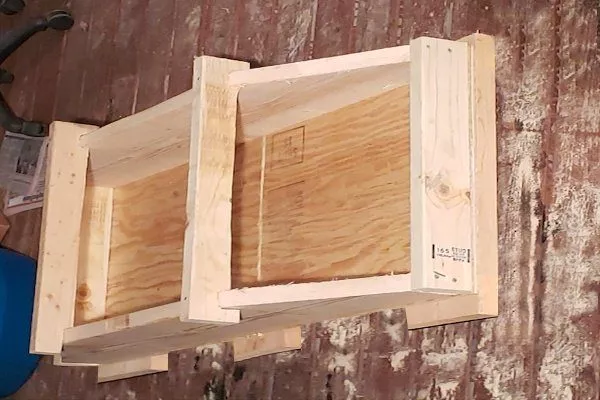
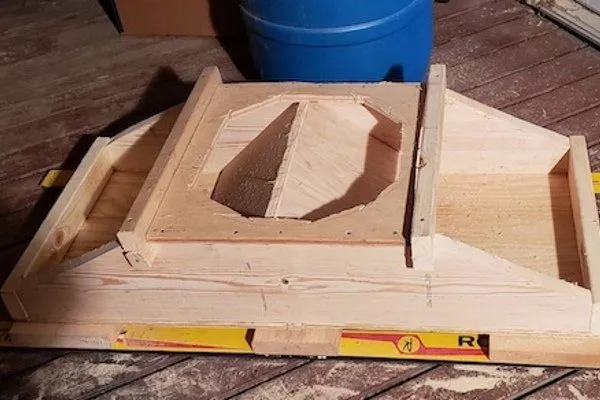
- Make an "L" shape by gluing two pieces of plywood (355 x 500 mm each) together at right angles using furniture glue and attaching it to the center of the feeder with the angle facing up.
- Apply furniture glue to the ends of the structure created above and secure it to the center of the feeder (see photo below). Let the glue dry.
- Seal all seams in the feeder with silicone and leave overnight to dry.
- Attach a piece of plywood (550 x 600 mm) with a circular slot in the center to the top using nails. The diameter of the slot will match the bottom diameter of the plastic barrel.
In the photo, the slot is made in a rough form. Then, using a jigsaw, we finished the hole to perfection.
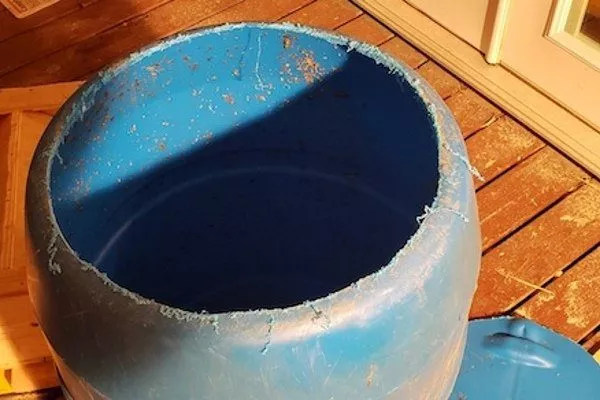
- Cut off the bottom of the barrel, leaving a bend at the bottom for better grain movement.
In the photo, the edges of the barrel have not been cleared of shavings and still have unevenness.
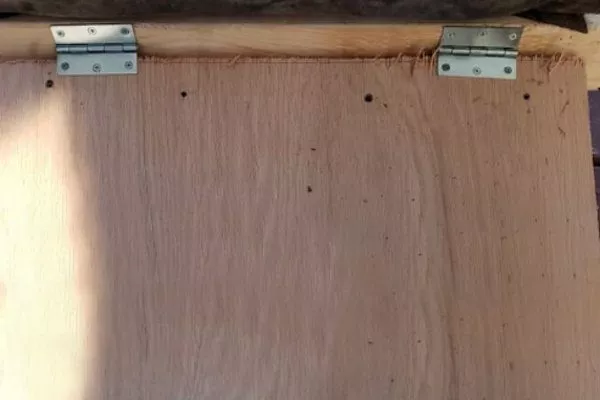
- Cut a 420 x 600 mm plywood lid for the feeder and attach it to the hinges. Do the same on the other side.
- Attach the barrel to the feeder. Seal the joint between the barrel and the feeder with silicone caulk. Additionally, wrap the bottom of the barrel with roofing waterproofing or another moisture-resistant material.
- To prevent pigs from knocking over the feed bin, install side supports at least 2/3 of the way up the barrel. To make these supports, you'll need 50 x 80 mm lumber. Cut it into the following lengths: 4 pieces 800 mm long and 6 pieces 300 mm long. Cut the grooves to the dimensions shown in the diagram below:
- Connect the supports with a ratchet strap (tie the remaining end of the strap around the ratchet and tie it so that it doesn't move on its own). To prevent the strap from slipping, secure it with wooden blocks and screws.

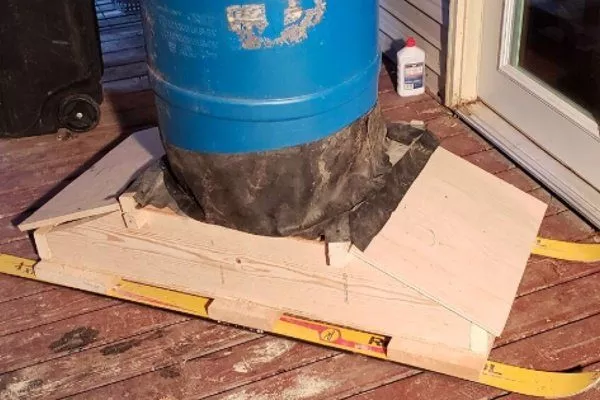

The feeder is ready!
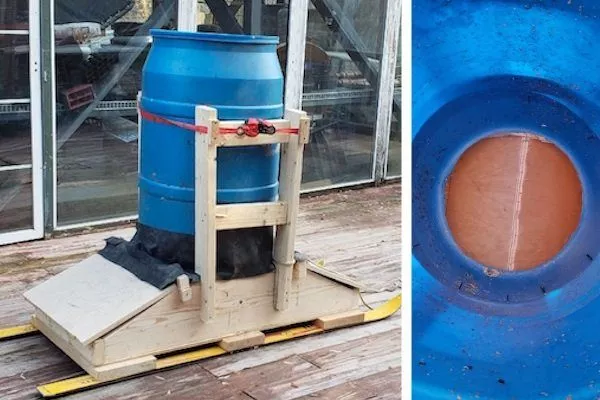
General view and top view (if you look into the barrel)
Other feeders
Pig houses can be made from a variety of materials. PVC (polyvinyl chloride) water pipes have proven themselves to be excellent:
- are created using the technique mentioned above;
- you can measure the length of the future feeder in centimeters;
- cheapness of material;
- ease of creation and operation.
However, the most common type is the hopper feeder. They are purchased on large farms as professional equipment, but creating such a design yourself is quite challenging.
This type of feeder is distinguished by its rather complex structure: a container for storing food, automatic feeding (with a regularly set dosage), multiple protective walls made of durable plastic (completely safe for people and animals; resistant to corrosion), etc.
Purchasing the raw materials alone to create a hopper feeder will cost a pretty penny. And if the structure is constructed using inferior metal or plastic, the first negative effects on the pigs will soon appear. Does a farmer want sick pigs? Absolutely not.
That's why it's much more cost-effective to buy such a feeder and create simpler designs by hand.
If you approach the process of creating pig feeders responsibly, any materials that are safe for animals will do. A competent farmer will always anticipate all negative consequences and then minimize the risk. And simple feed containers, although seemingly silly, do a flawless job of feeding pigs.
I would like to see more options for bird feeders and drawings for making them...
We've expanded the article to include several more pig feeder options. Thank you for reading!
Thank you! I found suitable options for myself!