Commercially available waterers don't always meet all a farmer's needs and requirements. To ensure the comfort of their nutria, breeders often resort to creating their own designs from readily available materials. Various types of equipment for nutria keeping, as well as detailed instructions for making waterers, are presented in this article.
The main types of drinking systems for nutria
| Name | Type of construction | Material | Mounting method |
|---|---|---|---|
| Simple drinking bowl | Open | Plastic/Metal | Attachment to the cell wall |
| Vacuum drinker | Closed | Plastic/Metal | Vacuum valve |
| Nipple drinker | Closed | Plastic | Nipple system |
All nutria drinking systems can be classified into several types, each with its own characteristics, advantages, and disadvantages. The main varieties include the following three types:
- Simple drinking bowl. It's easy to make and suitable for outdoor exercise areas. Plastic or metal troughs are used for bathing and drinking in open areas, while for caged animals, a drinking bowl made from a plastic bottle attached to the cage wall is also suitable. Disadvantages: the bottle needs to be frequently refilled.
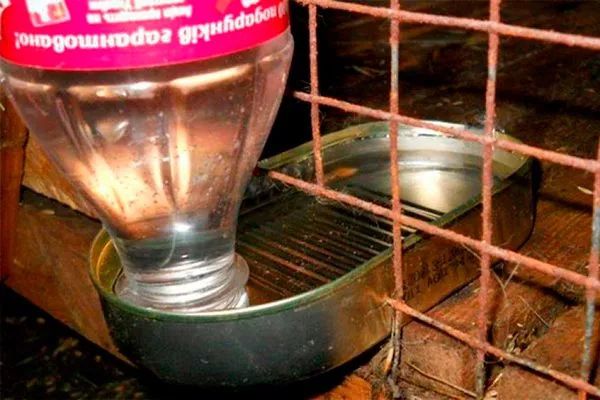
- Vacuum (automatic drinker). It consists of a vertical reservoir for liquid storage and a horizontal vessel from which the animal drinks directly. A simple version is made from a bottle and a metal bowl. Water continuously fills the bowl, preventing overflow thanks to the vacuum created in the bottle.
- Nipple drinker. The design ensures economical water consumption. It includes a reservoir and a nipple system, often purchased separately. Water enters the cage only when the animal lifts the nipple ball. This prevents splashing and ensures the reservoir remains clean at all times.
Advantages: Water saving, liquid purity, ability to add medications to water without dispersion.
Requirements for a drinking bowl
When selecting or making nutria waterers, it's important to carefully consider the key criteria these devices must meet. Key aspects in this context include the following:
- Drinking bowls should be appropriate for the size of the nutria herd, providing them with free access to water.
- Since nutria are rodents, using wooden bowls will cause rapid wear due to tooth wear. Aluminum, clay, and ceramic bowls are preferable options.
- Choose models with splash guards. This not only saves water but also ensures animal health by preventing the liquid from mixing with dirt and feces.
- The design of the drinker should provide easy access to every part during cleaning.
- For stability in enclosures, water bowls must be securely fastened. Mounts are provided to ensure they are durable.
- ✓ Use only food-grade plastics to avoid the release of harmful substances into the water.
- ✓ For metal drinkers, choose stainless steel or aluminum to prevent corrosion.
Making a DIY nutria waterer
To build a nutria waterer yourself, you first need to choose a design and select the appropriate materials. The process itself doesn't take much time or effort.
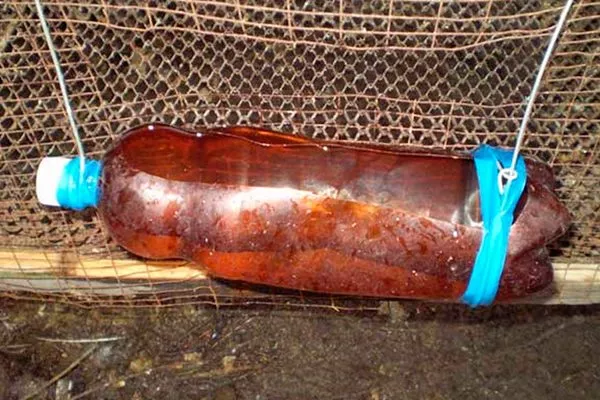
A simple drinking bowl made from a plastic container
To make a simple waterer, you'll need a 500 ml plastic bottle and some string (copper wire or another fastener can be used). First, find the center of the bottle and mark it. Then follow the instructions:
- Make a mark in the center of the bottle at a distance sufficient for the animal's muzzle to pass through.
- Using a sharp knife or other tool, cut a hole in the bottle. Make sure it's large enough for the animal to easily access.
- Insert the finished water bottle through the hole in the cage so that the animal's muzzle passes through the hole and the bottle is held in an upright position.
- Use a cord to securely attach the bottle to the cage. Ensure it is securely fastened to prevent the bottle from shifting or becoming damaged.
- Make sure the drinker is securely fastened before use.
- Make sure water flows freely from the bottle, ensuring your animal has access to water.
This waterer is intended as a temporary solution, so check its condition regularly.
DIY Vacuum Drinker
A vacuum waterer for nutria is considered one of the best and simplest options. Its construction requires no skills or knowledge.
Materials:
- a large plastic bottle (for example, 2-3 liters);
- flexible plastic hose, transparent and odorless;
- vacuum valve (available at gardening supply stores or pet stores);
- plastic glue or silicone sealant;
- drill with bit for cutting holes;
- tool for cutting plastic hose.
Step-by-step instructions:
- Select a location on the bottle to install the vacuum valve.
- Using a drill and bit, make a hole the size of the vacuum valve.
- Insert the vacuum valve into the hole so that it fits snugly against the bottle.
- Secure the valve with plastic glue or silicone sealant. Make sure the connection is airtight.
- Measure the length of the plastic hose so that it's long enough to reach the water level in the cage. Use a plastic hose cutter to cut the hose to the required length.
- Connect one end of the plastic hose to the vacuum valve. Make sure the connection is tight.
- Place the bottle in the cage with the vacuum valve facing out and the plastic hose facing inside the cage.
- Fill the bottle with water through the opened vacuum valve. Make sure the liquid fills the plastic hose.
- Check that water does not leak from the vacuum valve when closed.
- Make sure the nutria can easily drink from the waterer when they come into contact with the end of the plastic hose.
If necessary, you can adjust the water level by adding or pouring water from the bottle.
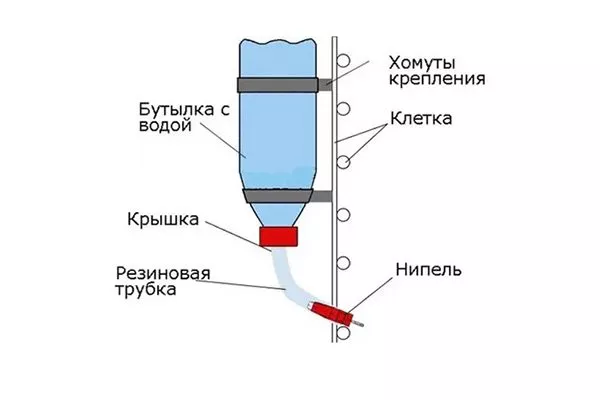
Nipple drinker
By hand-crafting this feeder, you'll be sure to enjoy it for years to come. Daily watering will be the only maintenance required. This homemade waterer will prevent excess humidity in the room, ensuring your pets' comfort and well-being.
Necessary materials and tools:
- a plastic bottle or canister with a capacity of 1.5-2 liters;
- hose;
- nipple drinker.
- drills;
- silicone or sealant;
- drill;
- knife;
- wire.

Step-by-step instructions:
- Using a drill, drill a hole in the cap of a plastic bottle, 0.5-1 mm smaller than the diameter of the hose.
- Seal the edges of the hole with sealant or silicone.
- Insert the hose into the hole so that it fits snugly and does not leak.
- Cut off part of the top of the bottle, leaving enough for easy filling with water.
- Drill a couple of holes in the top of the bottle using a larger diameter drill bit.
- Insert the nipple drinker into the hose. Insert the wire into the top of the bottle.
- Attach the waterer to the outside of the cage. The tube with the nipple drinker should be attached to the grate with a spring.
- ✓ Ensure the hose diameter matches the size of the nipple drinker to prevent leaks.
- ✓ Check the tightness of the connections before installing the drinker in the cage.
Homemade designs offer the ability to adapt to the specific needs of nutria and conserve resources. Despite these advantages, it's important to regularly check the condition of the waterers, keep them clean and functioning properly, thereby ensuring the animals are cared for with care.