If a novice horse breeder doesn't know how to harness a horse properly, they shouldn't use the animal, as failure to follow the rules and techniques can injure both the horse and the rider. There are many methods for harnessing. The choice depends on the purpose—riding, pulling a cart or sleigh, hauling cargo, etc.

Basic elements of harness
A harness is selected individually for each animal—it should not cause pain or discomfort. It contains several components that perform specific functions.
| Name | Type | Material | Purpose |
|---|---|---|---|
| Bridle | Metal | Metal, leather | Horse control |
| Halter | Leather | Leather | Controlling a horse without harness |
| Blinders | Leather | Leather | Limited visibility |
| Rein | Leather | Leather | Horse control |
| Clamp | Wooden | Wood, fabric | Traction power transmission |
| Shafts | Wooden | Tree | Direction of movement |
| Guzhi | Leather | Leather | Fixing the shafts |
| Saddle and girth | Leather | Leather, felt | Securing the shafts |
| Muzzle and collar | Leather | Leather | Horse control |
Bridle
This is a complex structure consisting of several parts:
- The bit is placed on the curve of the horse's mouth. This is a metal rod with rings at the ends.
- A chin strap extends from the rings, located under the chin. These reins are quite long, so the middle of them is always in the rider's hands.
- The bridle is held in place by a headband (two straps running in front and behind the ears).
- ✓ The length of the chin strap should allow free movement of the horse's jaw, but not be so long that control is lost.
- ✓ The material of the bit must be selected taking into account the individual sensitivity of the horse’s mouth to metals.
Halter
This element functions as a bridle, but only when the horse is unharnessed. A halter is a strap that encircles the animal's muzzle at the top and bottom. A ring is attached to the bottom of the halter, onto which the lead rope is attached. The halter is removed when harnessing the horse.
Blinders
The main purpose of blinders is to limit the horse's side vision. They are placed on the outside of the eyes, positioned slightly below the level of the visual apparatus. They are secured with clips. It is especially important to use blinders when riding on the highway. This reduces the risk of frightening the horse.
Rein
The reins are used to control the horse. They are attached to the bit and held by the driver.
- ✓ The length of the reins should be adjusted so that the driver can freely control the horse without having to tighten or loosen them too much.
- ✓ The reins material must be resistant to moisture and abrasion for durability.
Clamp
The collar is only used when the horse is to pull a cart, as its primary purpose is to transfer the horse's traction force to the cart. The collar is made from the following parts:
- Two extremely strong elements (wooden pincers) that are fastened together at the bottom. They are placed on the horse's head. To do this, the lower section is pulled apart and then connected with a splint.
- To prevent wooden pincers from rubbing against the animal's body, a collar (lining) made of elastic and soft fabric is placed underneath them.
- A harness, consisting of straps that encircle the horse's body in various directions, is attached to the collar. The harness is positioned as follows: two straps on each side, one on the upper surface of the horse's croup, and two more vertically. This is necessary to prevent the collar from shifting in unexpected situations.
The collar should fit snugly against the horse's body, yet still allow the horse to breathe freely. This design utilizes the horse's strength most effectively and eliminates vibration when the cart moves over uneven surfaces.
Shafts
These are wooden guides that are attached to vertical arches in a semicircle shape. The shafts are directly connected to the clamp.
Guzhi
The towlines are the strap loops that tie the shafts to the yoke. The towlines ensure precise alignment of the shafts (preventing lateral deviation), so the length must be uniform.
Experts strongly recommend lubricating horse-drawn parts with tar, which will prevent moisture from accumulating in them (which causes them to deteriorate).
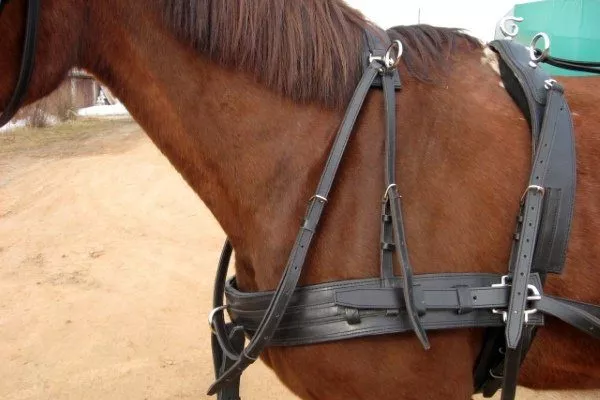
Saddle and girth
The shaft is secured using a girth and saddle. A heavy-duty strap is used, passing through rings (at the top and bottom of the croup) and tied to two shafts. This strap is positioned around the horse's body through the rings—at the top, bottom, and sides. A soft felt pad is always placed at the top to reduce friction. After the saddle is secured, the girth is tightened from below.
Muzzle and collar
These elements are used only when necessary. A standard muzzle is placed on the horse's face from the front and secured with a strap located behind the ears. The collar is attached to the horse's neck and then extended forward. This prevents the animal from looking around.
Types and methods of harnessing
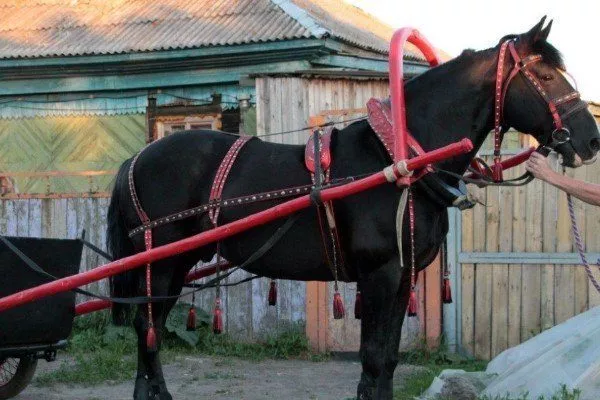
Shaft-bow harness
This method of harnessing horses is ideal for a single-horse Russian cart. To harness, you'll need a collar, harness, britches, a saddle, a saddlebag, and a bow.
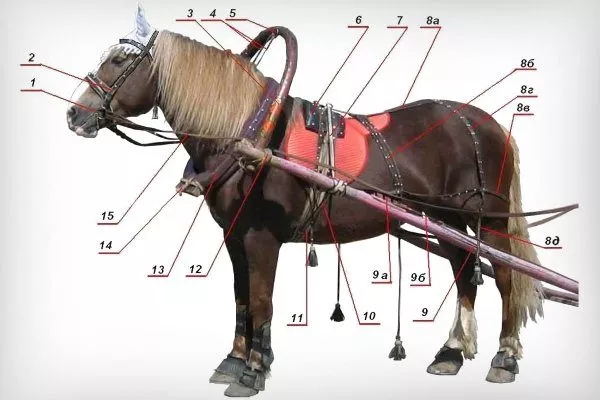
1 — bit; 2 — bridle; 3 — bow; 4 — reins with lanyard; 5 — zga; 6 — saddle; 7 — saddle bag; 8 — harness: 8a — longitudinal strap, 8b — transverse straps, 8c — slope strap, 8d — rim strap, 8d — lobe; 9 — shaft: 9a — comb, 9b — yoke; 10 — belly band; 11 — girth; 12 — reins; 13 — collar; 14 — crotch; 15 — reins
The process of equipping ammunition:
- The first thing to put on is the bridle. During cold weather, iron bits need to be warmed up (first, bring them into a warm room or hold them in your hands for a few minutes). Otherwise, the metal will transfer the cold to the animal's body, which will cause inflammation in the soft tissues.
- Next, grab the harness with your left hand and place the saddle pad and saddlebag in your right. Then place the saddle pad on the horse's back. This should be done in a specific order: place it on the area near the withers, straighten the fur, and spread it across the back. The top part should be at the withers, and the bottom part should be between the 9th and 15th ribs on the back. The harness should hang down to the level of the horse's elbow.
- Next, tighten the girth. Leave a gap of 3-5 cm between the animal's skin and the harness.
- The next step is to apply the collar. Turn it upside down and thread it over the horse's head. At the narrowest point of the neck, flip the collar over, ensuring it's in the correct position. Now it's time to straighten the mane and attach the harness.
- Lead the animal into the shafts, the ends of which should be level with the bridle.
- Attach the saddle to the shaft on the right, and then on the left, using the loops located on the seat.
- Then, the bow is brought from the lower left area under the shaft, bent counterclockwise, and the end is inserted into the loop. Bend the shaft again and place the bow on the collar. Eventually, the tip on the right should touch the shaft on the same side. The loop on the right is handled in the same manner.
- Take the yoke in your hands and pull the yoke by both ends. The two ends should meet. If this doesn't work, you need to lengthen the yoke. Sometimes the yoke closes, but the bows aren't positioned correctly. In this case, the yoke is too long.
- Attach the reins to the bridle. Tip: The reins can be threaded through the middle or outside the curve. The former should be done when the horse doesn't obey the reins.
Helpful tips:
- the tugs should not be in front of the arc;
- the collar is selected according to the individual size of the horse (if it fits exactly, it fits tightly to the shoulders);
- If the clamp you have is large, felt fabric is sewn onto its inner part;
- If the clamp is too small, it cannot be used;
- It is forbidden to apply only a saddle pad (without a sitter) - this is fraught with injury to the horse's skin.
Line-and-drawbar harness (two-horse harness)
This type of harness is used for pairs of horses used in agriculture. A drawbar is a must on the cart. This is a single shaft, located precisely in the center, to which the horses are individually hitched. A breastplate, traces, and a collar are also included.
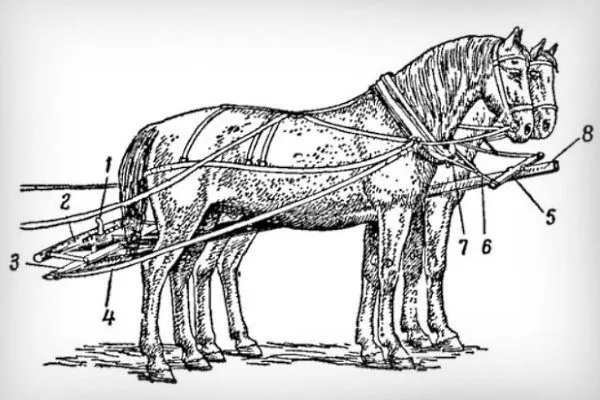
1 — cockerel; 2 — shaft; 3 — roller; 4 — trace; 6 — front shaft; 6 — shoulder strap; 7 — breastplate; 8 — drawbar
Harnessing process:
- put a bridle and collar on each animal;
- place the horses on both sides of the drawbar;
- pull the collar onto the drawbar and secure it to the bibs in the ring;
- fix the clamp, tighten the harness correctly;
- attach the bib to the harness and collar;
- fasten the reins to the bridle.
Line harness
This method of harnessing is considered the simplest and fastest. It requires no drawbar, no bow, no shaft. Therefore, the method is also known as "harnessing."
The range of applications is wide – carts, plows, harrows, and carriages. The harness is similar to a shaft-and-bow harness. It involves placing a harness and fastening the belt to the cart (there's a special ring for this purpose).
There's also a mixed type of horse harnessing, which involves using several different types of harness simultaneously. It's used primarily for carts carrying both cargo and people.
Stages and rules of harnessing
The process of harnessing a horse consists of several stages, each with its own characteristics:
- Bridle attachment. Take the bit in your left hand and approach the horse from the same side. Next, grab the stallion's neck with your right hand and gently pull it toward you. This will rein the animal in. Next, insert the bit into the horse's mouth, lifting the corners of the mouth a couple of folds. Be sure to tighten all straps. The cheekpieces and crownpieces should support the bit, and the carrying and forehead straps should be loose enough to accommodate a couple of a man's fingers. A full fist should fit under the chin strap.
- Fastening the clamp. The collar should be inserted so that it rests against the ridge at the base of the withers. From the side, it rests on the muscles that are located on the front of the shoulder blade. From below the shoulder blade, the collar is placed at the base of the neck above the scapula. Once the collar is secured, insert the palm of your hand edgewise and run it from the top of the shoulder blades and shoulder blades to the inside.
- Saddle mount. It should be laid evenly across the entire back, starting from the lower half of the withers.

- Fastening the harness. The harness is placed on the withers and then straightened out toward the croup. Next, the buckle is fastened to the harness straps and adjusted to the required size. The correct position is to allow the hand to fit freely between the ischial tuberosity and the rim strap.
- Fastening of the saddle and belly. These are different straps attached to a single ring. They must be passed through it to form a loop that fits onto the shaft.
- Establishment in the shafts. You can use different methods:
- step over a pole;
- roll an element onto a horse;
- settle into a detail near the cart.
- Securing the arc. Stand in front of the shafts so the horse's head is facing you. Place the bow against your right leg and grab the reins with your left hand. Stretch them and twist them slightly (if necessary) to adjust the length. Place the reins on the shafts and insert the left end of the bow (raised so the ring is facing away from you) into the rein loop.
Next, you need to pass the end of the arc on the left side of the tether over the shaft, turning it so that the ring is facing forward. This way, the shaft fits into the opening of the arc, which is placed around the animal's neck. Do the same with the second shaft. - Fixing the clamp. To tighten the part, stand to the left of the horse and wrap the pliers with the sling once. Place your feet on the pliers and tighten the sling, wrapping it again.
- Belt refills. For convenience, hold the belt with your right hand (thumb) and press on the pliers on the right with your left. This should create a gap through which you can push the end of the sling down, tighten it until it stops, and then lift it up. Thread another loop through the resulting loop and tighten it again. Wrap it with the sling, folding the end of the sling in half and threading it through the loop.
- Fastening the reins. Cross the leash and tighten it, then place it around the horse's neck. Pass the lanyard through the ring on the bow and tie it to one rein. The length should be sufficient for the horse to stretch its neck, but it shouldn't hang too low.
- Fastening the reins. In some cases, the harness is equipped with rings. In these cases, the reins must be passed through them. If there are no rings, one rein is placed above the harness and the other below it.
Watch the video instructions on how to properly harness a horse:
Peculiarities of paired harnessing
The sled team has always enjoyed great popularity, especially in Russia. It is used for pleasure riding and agricultural purposes. It has its own specific harnessing requirements:
- initially the bibs are aligned;
- after the strap from the clamp (patch);
- then the belts that connect the yoke and the roller (bibs);
- then the collar and bridle are put on;
- the collar is attached to the ring after being placed on the tip of the drawbar or roller in front;
- The traces are first secured on the inner side of the roller, then on the outer side.
How to train a horse to be harnessed?
Every horse needs training, especially getting used to a harness. This can take quite a while, as the process is gradual. Experts recommend following these guidelines:
- The very first thing you need to do is teach your horse to obey its owner. Various commands are used for this. For example, turn right/left, stay, go, etc. Correct horse maintenance and care will help create a favorable atmosphere for learning.
- Before harnessing, you need to put on the saddle and take the horse outside. You'll definitely need an assistant to help you handle an unruly animal.
- Once the stallion has become accustomed to the saddle, you can safely mount it. While riding, try to control it with the reins and commands.
- Be sure to praise your horse for every task completed correctly. Keep your voice soft. You can also give him his favorite treat.
- Riding in the saddle begins with short periods of time. The first time, 10 minutes is enough, the second – 20, and so on.
- When leaving, pay attention to the population of the area - it is advisable that there are no strangers or cars nearby.
- The weather during the races must be favorable.
- Before riding, feed your horse well, but in this case, it's best to feed it hay and a minimal amount of oats. This is necessary to encourage the horse to desire the treat.
- During breaks between rides, gradually accustom the horse to harnessing – put on all the elements carefully and slowly, do not make any sudden movements, and do not allow any discomfort or pain.
- When the moment comes to attach the cart, pay attention to it - it should not rattle, creak loudly and be in close proximity to the horse's legs.

To avoid prolonged pain during harnessing, be sure to study the instructions for how to harness a horse correctly and quickly. If you're a beginner, be sure to hire an instructor to explain and demonstrate how to harness a horse.
How to unharness a horse correctly?
Horses are always unharnessed in the reverse order depending on the method used. Specifically:
- untie and remove the reins;
- remove the straps from the shafts and saddle;
- untie the soup;
- detach the arc and remove;
- remove the animal from the shafts;
- disconnect the harness;
- remove the clamp and saddle.
An important rule is to care for the horse after unharnessing. In hot weather, sweat should be wiped off, and in cold weather, the horse's body should be covered with a blanket. Afterward, the horse should be fed and given a full rest.
Harnessing and unharnessing horses is a lengthy and complex process. But mastering the basic technique is within the power of any horse breeder. Over time, these manipulations will become habitual, and eventually, the person will perform each step automatically. The key is to avoid causing pain or harm to the horse, as it will likely protest next time.