To properly tan rabbit skins, you need to know the entire step-by-step process. In this article, you'll learn how to remove the skin, process it, and stretch it.
Where to start?
To ensure the process goes smoothly, without any complications, and the results exceed all expectations, consider the following tips:
- Breed of rabbits. It is this factor that will lead to success. Fur from breeds such as chinchilla, silver-brown rabbit, and White giantThey were specifically bred to produce extremely thick and beautiful fur. Giant gray sheep and their similar breeds are also used for tanning, provided these individuals have dense fur. This result is possible with a vitamin-rich diet.
- Withstand the time of slaughter. Young animals with fully developed fur are best suited for this procedure, taking into account the shedding period. If this is not taken care of, the material will quickly deteriorate. Adult rabbits are brought to a certain weight—between 3 and 5 kg, depending on the breed chosen. Older animals are completely unsuitable for this purpose.
- The French method is used to prepare the carcass. - Air embolism. Hit the animal behind the ears with a stick. This must be done carefully to prevent hematomas.
- ✓ The fur density level must be at least 30,000 hairs per square centimeter for high-quality skins.
- ✓ The age of the rabbit for slaughter should be between 6-8 months for optimal fur quality.
What tools and materials will be needed?
Dressing a rabbit skin requires certain knowledge, skills, materials, and tools. The process also requires the use of chemicals.
There are several processing recipes available, each using different tools. A rough list of components is as follows:
- lots of water;
- table salt – 10 packs;
- a little more than a liter of electrolyte;
- baking soda – 3 packs;
- formaldehyde, ammonia, chrome alum;
- laundry soap or washing powder;
- to draw out the skin you will need blanks;
- wooden spatula for mixing skins;
- knives: sharp, dull and with replaceable blades;
- table top;
- hammers, nails;
- large bowls;
- rubber gloves.
When working with chemicals, safety precautions are essential. The order of application is also important: acid is added to water. After finishing work, the tool must be cleaned, thoroughly washed, and dried.
How to remove the skin?
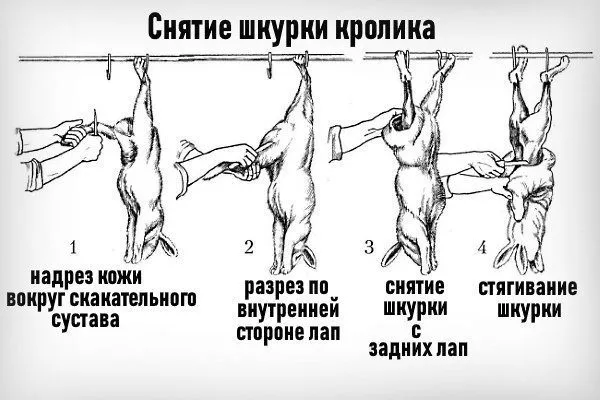
Don't delay skinning the rabbit carcass; it will be extremely difficult later. The most important thing is to keep the fur intact, so the stocking method is the way to go. This process involves several steps:
- Hang the carcass by the hind legs.
- Carefully cut the skin around the joints.
- Make a longitudinal cut along the inside of the paws.
- Remove the tail.
- Slowly and carefully begin to pull off the skin by rolling it, using a knife as a guide.
- The front legs can be removed.
- Trim the skin from the back of the rabbit's head.
- Ensure the room temperature is at least 18°C to prevent the fat from hardening.
- Use only a sharp knife with a blade of at least 15 cm for clean cuts.
Once you've created a skin stocking, quickly peel off any remaining product. This procedure is best done on the countertop with a blunt knife.
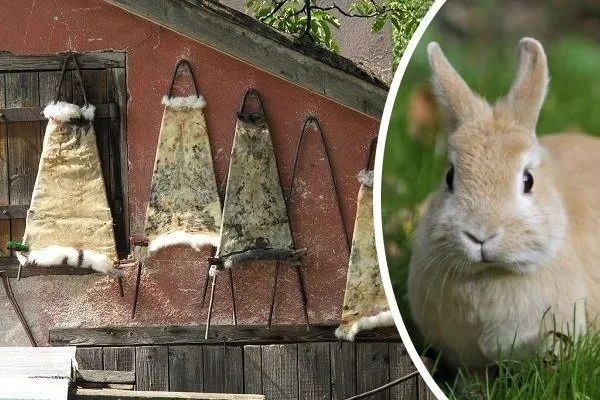
If you don't plan to begin dressing the skin immediately after removing it, dry it. After three days, you can begin preparing the skin in a month. Dry the skin so that the fur is inside the sock, using a special wedge-shaped device resembling the letter "A," at 30°C in a ventilated area.
Step-by-step instructions for dressing rabbit skins
The process involves specific steps that must be followed strictly in sequence.
Soaking in water and solution
It's impossible to soften the raw material without soaking it. Furthermore, ignoring this step can lead to the skin decomposing later. Many people don't bother and just use clean water. But this is also an option.
Place the selected skins in a deep container and cover with water. Use 3 liters of water per 1 kg of raw material. Make sure the skins are loosely arranged in the container. Freshly removed skins soften within 4 hours, while dry skins soak for about 24 hours, changing the water several times during this period.
Another soaking method involves using a solution of certain ingredients. Most commonly, this involves adding a liter of water, a small amount of borax (30 g), carbolic acid (2 g total), and 50 g of salt, and mixing thoroughly. It's best to use a stainless steel container or one with a thick layer of high-quality enamel.
Place the hide in the solution and press it down with something heavy to ensure the mixture completely covers the hide. Stir the contents of the container regularly during soaking to ensure even processing. This process takes anywhere from 6 hours to 4 days, depending on various circumstances.
The treatment includes a composition that protects the skin from colonization by putrefactive bacteria. It consists of 1 liter of water and the following ingredients:
- salts;
- zinc chloride;
- formalin;
- drills;
- crystallized carbolic acid.
Lovers of all things "natural" find it helpful to soak in infusions of oak, willow, and eucalyptus leaves. These ingredients, unlike standard chemical preparations, are safe and equally effective.
The operation is complete when the skins are soft and the residual fat easily separates from the flesh. Gently squeeze them and drain the water. Rinse with clean water and let it drain.
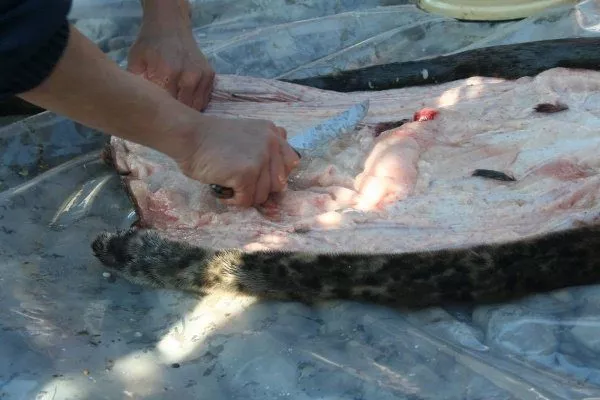
Fleshing
The essence of this step in the tanning process is to thoroughly clean the subcutaneous layer, along with any remaining meat and fat. The result should be a completely clean flesh side. Here's how to achieve this:
- Thoroughly remove any remaining moisture from the wet skin.
- Pull the stocking over the convex object; today, special machines are produced for this purpose.
- Work with your hands, using a dull knife to help you.
- Remove unnecessary elements strictly from top to bottom and from the ridge to the sides (some specialists perform scraping movements in the opposite direction).
- Trim off excess flesh until the skin is uniform.
- Do not overdo it with the tool, do not press too hard on it to avoid tears in the skin.
- At the end of the procedure, lightly tap the knife handle on the entire surface of the canvas to break it up.
Machines specifically designed for this purpose, equipped with magnetic and electric drives, are available for purchase. This tool will be a valuable aid, significantly facilitating and speeding up the fleshing process.
Degreasing
This process is essentially a simple wash of the material. It's best to use soap or shampoo. If you decide to use laundry detergent, be prepared for a long and quick rinse.
Wash slowly and carefully until you feel a characteristic creaking sound under your fingers.
The fur is treated in the same way. Finally, rinse the item under running water and inspect it to ensure there are no soap residues. Shake the skin and wipe it dry. You can proceed to the next step.
Fermentation and pickling
Both processes are intended to strengthen the rabbit skin. The method used depends on personal preference. For pickling, prepare a jelly-like mixture according to the following recipe:
- Add 200 g of flour (you can use either wheat or oatmeal), 3 tbsp of table salt, 7 g of dry yeast, and 500 g of soda to 1 liter of hot water.
- Mix everything thoroughly and let cool. The temperature of the resulting liquid should not exceed 30°C.
- Place the skins (the fur should be inside) in this jelly and leave for two days. The flesh will turn white and smell like bread, indicating the fermentation process is complete.
- Remove the skins, rinse, and let the water drain.
Pickling is a more labor-intensive procedure:
- A solution is also prepared, but with different ingredients (1 liter of warm water, a little 70% vinegar, and salt). The items are placed in it and left to soak until the flesh side becomes white. This will take 48 hours.
- To check if the skin is ready, fold it tightly and run your fingernail along the fold. If a light mark is visible on the skin, proceed to rinsing in the neutralizer.
- You'll need a liter of water and one and a half kilograms of baking soda. Soak the material in it for half an hour, then rinse with clean water and wipe dry.

Use any of the two methods of strengthening the material and get excellent results.
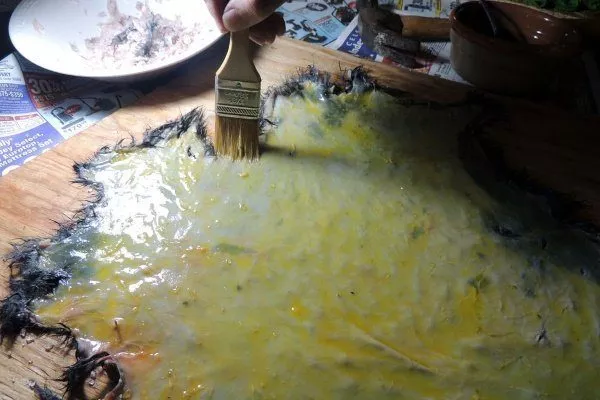
Tanning
Treating the material makes it elastic, waterproof, and quite durable. This can be accomplished using two methods. Water-based wood treatments made from oak and willow are most commonly used. Step-by-step instructions:
- Pour water over the wood.
- Boil for 30 minutes with salt, cool.
- Use a brush to saturate the leather.
- Place the soaked skins so that the fur remains on the outside and leave for 24 hours.
This method is called tannin tanning. Another option is chrome tanning:
- For 1 liter of hot water, take 7 g of chromium alum and leave for the same time as in the first case.
- After tanning, neutralize the material with a soda solution identical to that used for pickling, rinse thoroughly and squeeze lightly.
- Lay the skins out on a surface, smooth them out well, and place them in a press for 2 days. Maintain the proper stacking order: one on top of the other, fur side to fur side, and flesh side to flesh side.
- To check the skin's readiness, use a magnifying glass; it will help you see signs of the finished tanning process—an even, yellowish hue and a velvety texture. Some experts gently clean the finished product with sandpaper.
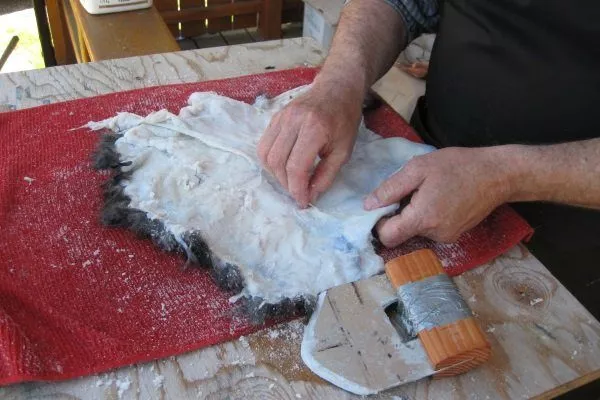
Fattening and drying
The slow and rather complex tanning process is complete. The secret of fatliquoring is that after this final step, the leather becomes very smooth, delicately soft, and waterproof.
Oils such as castor oil or glycerin are suitable for fattening sessions. Step-by-step instructions:
- Soak a cloth swab in one of the substances and thoroughly treat the entire surface of the flesh side with it.
- Leave it for 2 hours, quickly wipe it with a clean cloth to remove excess grease and dry it.
This is the final stage of the entire process. This operation can be performed on any suitable surface. An important detail: dry the garment only with the fur facing up. Ensure adequate air circulation, avoid heating devices, direct sunlight, and low humidity.
Once the skins are completely dry, they are gently kneaded and stretched. This should be done by hand, without the aid of any machinery.
The flesh side is additionally dusted with tooth powder or rubbed with chalk, carefully sanded, and the resulting debris is shaken out. The fur is carefully combed with a soft brush.
A detailed step-by-step process for tanning rabbit skins is presented in the following video:
Alternative dressing options
The process of tanning rabbit skins is the same everywhere. Many artisans adhere to the old methods of leathermaking used by their fathers and grandfathers. Two methods are of particular interest.
Using sour milk
The step-by-step process looks like this:
- Rub the skin generously with salt.
- Turn inside out and leave for 3 days.
- Then carefully shake off the salt, pour a week's worth of sour milk into a container, and immerse the peels in it. Use 1 liter of sour milk for each peel.
- Leave for another 3 days.
- Finish the work by washing the canvases, cleaning the flesh side and drying.
Fresh-dry method
The fresh-dry method speaks for itself. No solutions are used. Step-by-step instructions:
- Place the removed stockings on the rulers. When distributing the fabric, the length should be three times the width.
- Carefully attach the product with small nails.
- Treat the inner and outer skin with sawdust mixed with gasoline, and clean the fur from various debris.
- Wipe everything with a clean cloth and dry thoroughly.
Primary processing of the removed skin and its storage
Basic recommendations for primary processing:
- Don't leave the skin for later after slaughtering a rabbit. Scrape it off, removing any remaining meat and fat. Don't complicate the dressing process. Any remaining fat will cause the skin to rot, and in this condition, it cannot be restored.
- Don't forget about the fur; inspect it and clean it of any debris. Use a dull knife when cleaning the inside, and use your hands to help.
- Stretch the removed stocking on a thick wooden block, working in a circle.
- Try not to damage the skin, but if such an unpleasant incident occurs, carefully stitch up the tears.
- It is better not to delay the dressing of the skin; if circumstances arise that do not allow you to start working immediately, dry it and begin processing when it is convenient.
- To dry the material, select a suitable, well-ventilated area with a temperature of 30°C. Spread the skin on a special drying rack.
- Some craftsmen resort to freezing the canvas, but it's best not to. Excessively high temperatures, as well as extremely low ones, will cause the skin to break and damage the pile.
- High humidity is also undesirable, as it can cause mold to form on the product. This process can take up to 3 days.
- Finish the initial treatment by wiping the stockings with a rag or sawdust. It is recommended to store them in dry, tightly lidded boxes or bags.
- To prevent moths, place a piece of mothballs in the container with the stored skins. Do not store the skins for long periods, no more than 1 month. Begin dressing them before you lose the beautiful raw material for your new creations.
- If you plan to begin dressing the hides immediately, sprinkle them with salt and prepare the necessary materials. This will not harm the canvases in any way.
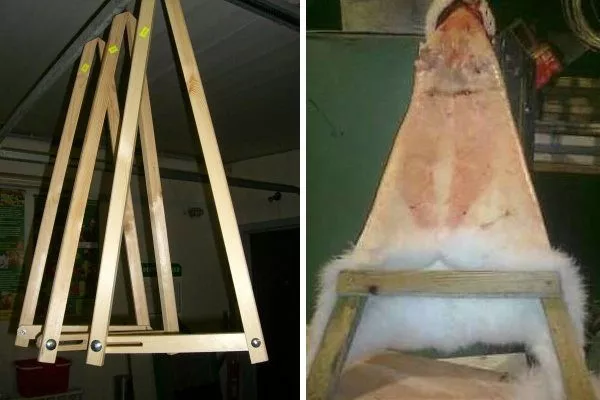
How to stretch the skin?
The skin is processed under tension. Choose a wedge-shaped support or build a sliding structure. The advantage of this is that it can accommodate any size of canvas. Keep in mind a few rules when tensioning the product:
- the fur must be inside;
- the pile should be smoothed and carefully pulled onto the ruler with the skin facing out;
- straighten the stocking thoroughly;
- secure the edges of the canvas - nail the bottom end with nails to prevent the material from curling up;
- Stick to the standard dimensions of the drying device, everything will depend on the size of the skin.
Helpful tips
If you're new to this complex task, listen to the advice of experienced farmers; it will help you cope with the job successfully:
- Pickling can also be done in room-temperature water, without additional heating. In this case, the process takes another 24 hours.
- Pay attention to the thickness of the flesh side, as this will determine the duration of the curing.
- Before you begin cleaning the flesh side, inspect the condition of the fur. Any remaining debris can damage the leather.
- Monitor the condition of the molt; if it is in the initial stage, slaughter is possible within a month.
- Do not use oak bark in the tanning process if the skin is light in color, otherwise its color will acquire a yellowish tint.
- Don't skimp on water; one medium-sized piece uses 3 liters of solution.
- Only animals no older than 3 years old are subject to slaughter; older age means a low quality indicator of the skin.
Don't be afraid to start learning new things if you're new to raising rabbits, processing products, and using them later—learn the right materials. You can handle everything yourself at home.