Before planting an orchid, carefully familiarize yourself with the various cultivation techniques available, as there are a vast number of them. Orchids can be grown both as houseplants and as garden plants, in flower beds. It's important to plan ahead for the necessary tools and containers for planting, seedling preparation, and the growing medium, which has its own specific characteristics.
How to plant different types of orchids?
The method for planting orchids depends on the specific plant species, as each individual case has its own unique cultivation and propagation nuances. These require special attention.
| Name | Growth type | Lighting requirements | Humidity requirements |
|---|---|---|---|
| Phalaenopsis | Epiphytes | Tall | Moderate |
| Wanda | Epiphytes | Tall | Moderate |
| Cattleya | Sympodial | Average | Low |
| Dracula | Epiphytes | Low | Tall |
Phalaenopsis and Vanda
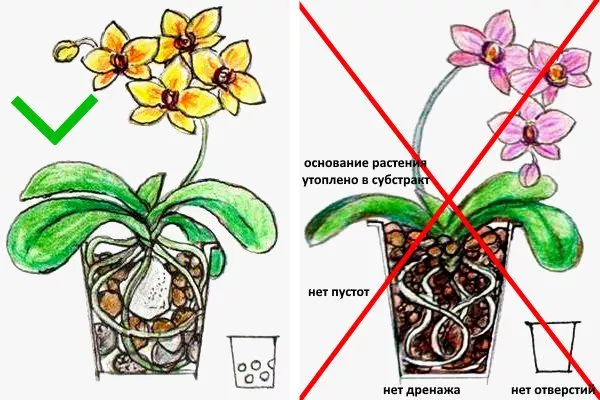
These are epiphytes that can grow with bare roots. Their root system requires light and air circulation, so the best options are a transparent (glass) pot, pine bark, or baskets.
The best filling option for Vanda and Phalaenopsis:
- pebbles or expanded clay for orchids are placed on the bottom;
- the central part is filled with a piece of foam, which will allow excess liquid to be removed;
- on the sides and above – medium and large fractions of the substrate.
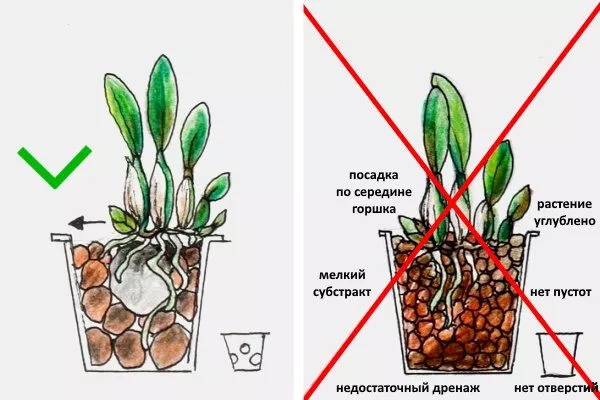
Cattleyas and other sympodiales
The key is to plant the sympodial orchid correctly, as its roots grow horizontally, forming numerous lateral shoots. Therefore:
- position the bush so that the rhizomes are 2/3 above the substrate, and the pseudobulbs are always on the surface;
- plant the plant so that the old bulbs are at the edge, then the new ones will grow freely, appearing nearby and moving towards the opposite side of the pot (for this, the width of the pot must be significant);

- Give preference to large drainage material that does not get wet;
- even pine cones and corks can be used as a substrate;
- Place support sticks until the plant is fully rooted.
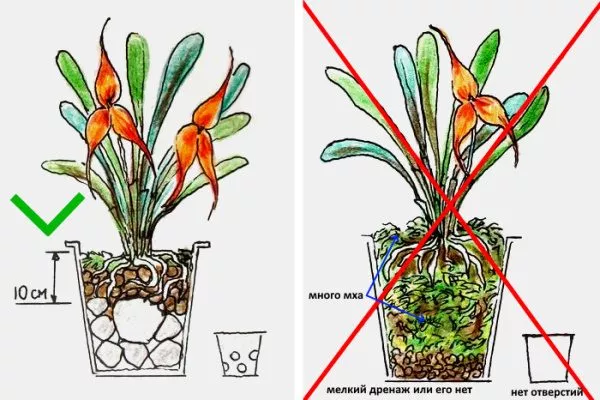
Draculas and other moisture-loving plants
Most often, moisture-loving species are epiphytes, which prefer to keep their rootstocks constantly moist, but avoid allowing the substrate to become waterlogged. These parameters depend more on the quality and planting method than on the type of watering, so:
- Place drainage up to half the pot and not less;
- the substrate layer should be no more than 10 cm (and for bulbophyllums the substrate thickness is made only 2-3 cm);
- Only place orchid moss around the edge of the pot, and only in a thin layer, as it retains moisture like a sponge.
Proper preparation for planting
To plant orchids properly, don't ignore the preparatory steps, which determine successful establishment, growth, development, and flowering. For example, failure to disinfect increases the risk of infectious diseases.
Choosing a pot
Orchid plants don't have specific requirements for pot materials. Plastic, ceramic, glass, clay, and even coconut can be used. Other characteristics are much more important for orchids, such as perforation and transparency, especially for epiphytic species.
- ✓ The optimal pot size should be 2 cm larger than the root ball to avoid excess moisture.
- ✓ For epiphytic species, the pot must be transparent to allow root photosynthesis.
If the plant is above ground, any pots (closed type) can be used. There are some criteria for choosing a container for planting orchids:
- Narrow pots like glasses are unacceptable, since the roots do not grow in depth, but develop only in width;
- Natural glass cannot be used because it is impossible to make holes in it, and glass surfaces, especially round ones (like vases), strongly refract sunlight, which causes root burns;
- size – the diameter of the container should be a maximum of 2 cm larger than the flower's root ball, otherwise too much moisture will accumulate and flowering will be delayed (due to the fact that the plant will use all its energy to fill the empty spaces with roots).
The pot also needs to be prepared for planting the orchid. Here's how to do it correctly:
- Wash the container with warm water and soapy water (it is advisable to use brown laundry soap);
- Rinse under running water.
- If the pot is being used again, treat it with a disinfectant.
Substrate preparation
In the wild, orchids prefer to grow on tree bark, moss, etc., that is, in conditions where the root system remains exposed. Therefore, the substrate for indoor plants should be as close to natural as possible.
The composition, grinding degree, and other parameters depend on the variety of orchis. But it's especially important to determine which orchid bark is best:
- It is best to use pine or spruce;
- It is not advisable to replace it with cedar, thuja or cypress – they decompose too slowly;
- It is acceptable to use bark from deciduous trees, but it usually does not peel off naturally.
How to properly prepare the substrate:
- First, soak the bark pieces in warm water. Place a weight on top to completely cover them. Leave them like this for about three days.
- Once the bark has reached its moisture-absorbing properties, drain the water and dry the bark naturally for 12 hours.
- Chop. Fractions can vary from 1.5 to 3 cm. It is easiest to cut with pruning shears.
- Now, let's get to the moss. Soak it in water for just an hour and a half, then let it dry for five hours.
- Prepare the charcoal. Cut it into 1 cm pieces. Use sharp pruning shears.
You'll also need perlite, expanded clay, polystyrene foam, pumice, humus, and coconut fiber (the ingredients depend on the flower's specific needs). The required moisture capacity also influences the composition. If it's high, combine equal amounts of bark and moss. If it's moderate, use more bark than peat, and add charcoal as well.
Substrate options:
- pine bark – 5 parts, charcoal and sphagnum moss – 1 part each;
- 1 part charcoal, 5 parts bark, 2 parts moss.
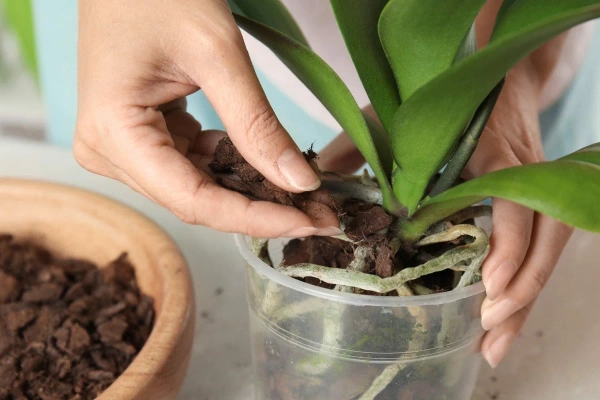
Root system treatment
Before planting, orchids are inspected. The first thing to check is the condition of the above-ground and root parts for rot, mold, dryness, spots, etc. If these are detected only slightly, trim off the affected areas and dust them with activated charcoal. Make cuts no more than 1 cm above the root (to living tissue).
What else needs to be done:
- Rinse the root system under running water.
- Dip in any fungicide for 15-20 minutes.
- Leave to dry in the open air (3 hours is enough).
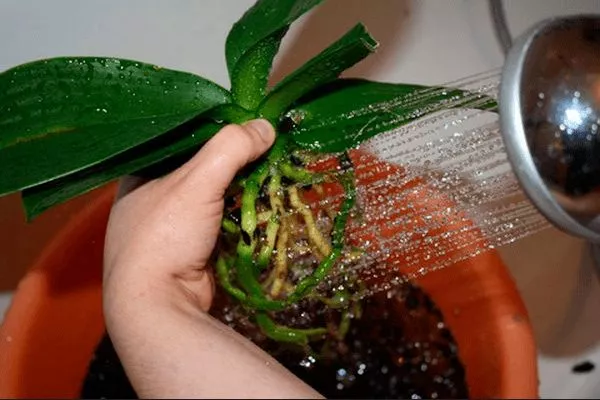
- Rinse the roots under running water to remove any remaining old substrate.
- Treat the roots with a fungicide to prevent infections.
- Dry the roots in open air for 3 hours.
Planting orchids from seeds
Growing orchids from seed requires a great deal of patience, as the first flowering occurs only after 5-6 years. In this case, it is difficult to maintain the variety's characteristics, so this method is rarely used.
If you decide to test your own strength, be prepared for the fact that first you need to pollinate flowers Or buy seeds from a seller. Keep in mind that orchid seeds are so small they're often compared to dust, so they should be sold with a seed pod.
How to pollinate yourself:
- Find the flower's nest and open it. Inside, you'll find pollinia (clumps) stuck together, covered in a thin film.
- Using tweezers (disinfected – this is a mandatory requirement), open the shell.
- Separate a small amount of pollen from the anthers.
- Transfer to the recess of the column of another flower.
- Repeat the procedure in reverse. Specifically, transfer pollen from the second orchid to the first.
If pollination has occurred, the anthers will close within 24 hours, and over time, the flower itself will fade. After the petals fall, you'll discover a developing capsule.
Also watch a video about orchid pollination, which clearly shows the process:
Next, you'll need to open the seed pods and pour out the planting material. Afterwards, disinfect it:
- Dissolve 15 g of bleach in 100 ml of water.
- Place the seeds.
- Mix thoroughly for 10 minutes. Shaking the bottle is best.
- Filter the liquid.
Now prepare the germination container. A glass flask or jar is suitable. Sterilize the container.
A mandatory requirement is – nutrient mediumThis could be:
- special mushrooms - they are used in laboratory conditions;
- soil is a bad option;
- A sterile environment is ideal for home use.
Sterile formula is available in stores, but you can also make it yourself. The best option is:
- In 400 ml of boiled water, add 1.5 teaspoons of granulated sugar, 4 g of honey, a pinch of any complex fertilizer, 25 g of banana puree and 80 g of starch.
- After mixing thoroughly, add 1 crushed tablet of activated charcoal.
- Stir again and return the saucepan to the heat. Cook on low until a thick mixture forms.
- Cool and check for acidity. The pH should range from 4.8 to 5.2. Test with litmus paper. If the pH is higher, add a little lemon juice; if lower, add some soda water.
- Pour the mixture into a sterile glass container (the layer should be 2-3 cm).
- Close the lid.
- Place in a water bath to sterilize for 20-30 minutes.
- Immediately use a syringe to extract the seeds along with the remaining liquid.
- Transfer them to a nutrient medium.
- Place the jars in a warm and bright place, where the temperature should be between +25 and +28 degrees.
A variant of the nutrient medium is also presented in the video below:
Classic pot planting
This technique is the most common due to its simplicity—a gardener simply needs to perform the same steps as when planting any indoor flowers. However, it does have its own unique characteristics:
- The main thing is to position the cutting so that the upper root shoots are located slightly above the surface of the substrate or are slightly covered by it, as required by the planting rules for a particular type of orchid.
- Fill all empty spaces in the pot to avoid any air pockets. If the bark doesn't flow easily between the roots, gently push it in.
- Place the bush in the center, if necessary (usually) provide support for a couple of weeks.
- If the stem is climbing, do not support it.
Also watch a video from an experienced gardener on planting orchids:
Features of care for classic planting
The most important thing when growing orchids in traditional pots is watering. Keep in mind that pots with few holes retain moisture longer, so water less frequently. If holes are located at the bottom and sides, water more frequently.
Another requirement is container transparency, so choose pots made of foam glass – you will be able to monitor the condition of the roots and moisture.
Advantages and disadvantages of a classic landing
Among the advantages, orchid growers note the following:
- ease of planting and care;
- visibility of roots;
- speed of growth of both roots and green mass.
There's also a downside: uneven drying of roots within a pot. Specifically, drying occurs quickly near the walls, but slowly inside.
What orchids is it suitable for?
The classic method is used for planting absolutely all types and varieties of indoor orchids. The main thing is to strictly adhere to the varietal rules.
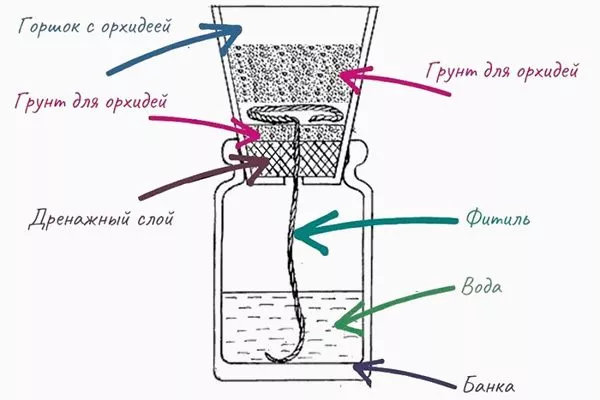
Planting on a wick
This method involves planting the flower almost in the traditional way. The difference is that during planting, a wick is pulled from top to bottom, allowing for wick watering of the plant, which is the best form of irrigation.
The principle is as follows: the rope (it protrudes from the bottom of the pot) is lowered into water and remains there forever. The roots absorb the required amount of liquid on their own.
Similar systems can be purchased or made by yourself:
- Prepare all materials: flowerpot, pot, cord with synthetic additives.
- Make holes in the bottom of the pot, one of which should be in the center.
- Insert the string so that the lower end is threaded through the hole made in the center of the pot.
- Add a drainage layer and a little substrate on top. Lay the wick in a circle, following the diagram.
- Add more soil mixture and plant the flower.
- Pour some water into the flowerpot and insert the pot so that only the string is in the water.
Peculiarities:
- Care when planting on a wick. It consists of adding water to the flowerpot in a timely manner.
- Advantages and disadvantages of wick planting. There are no downsides. The following are noted as pros:
- no need to think about watering;
- You can leave the flower unattended for a long time (it is enough to pour a lot of water into the flowerpot);
- gradual supply of moisture (there will be no excess or drought).
- Which orchids are suitable for wick planting? For absolutely everyone, but especially for those grown in a hot room.
More detailed information about wick planting is presented in the video below:
Planting in a double pot
This is a semi-closed system that involves planting a flower in a double pot. The first, also known as the inner pot, has drainage holes, while the second (upper) pot has no holes. These containers are commercially available, but you can also make your own.
To do this, you need two pots of different sizes, since the principle is that liquid flows from the inner one into the outer one.
Peculiarities:
- Care in a semi-closed system. It's important to water around the edges of the pot, not in the middle. Be sure to leave no more than 2 cm of water in the second container.
- Advantages and disadvantages of planting in a semi-closed system. The main advantage is that the soil dries out slowly, so frequent watering is not necessary. The roots are naturally drawn to water, which accelerates their growth, and the plant can be left unattended for a couple of weeks.
There are few downsides – the room needs to be warm and light. - Which orchids are suitable for a semi-closed planting system? This is a universal system.
The pros and cons of this type of landing are discussed in the video below:
Planting an orchid in a closed system
This is a new method for orchids. It involves planting the orchid in a pot without drainage holes. The idea is that water will sink to the bottom of the container after watering, causing root shoots to grow downwards, which in turn promotes faster growth of roots, leaves, and flower stalks.
Important details:
- the bottom is equipped with expanded clay;
- large-grained bark is placed on top, then medium pieces;
- Charcoal is required and moss is prohibited.
Peculiarities of care in a closed system
Closed planting has its own care requirements:
- the temperature regime should vary exclusively from +20 to +24 degrees;
- daylight hours – from 10 to 13 hours;
- pot – mainly made of plastic or glass (can be replaced with foam glass);
- If the container is glass, then placing it on a windowsill during cold and warm seasons is prohibited (the material transfers cold and heat to the roots).
Pros and cons of a closed system
This method has only three advantages:
- no need to water often;
- development of roots and aboveground parts occurs quickly;
- the flowering period is extended.
There are also disadvantages:
- should not be used on varieties that are highly susceptible to rot diseases;
- you will have to change the soil frequently, as mold and algae will quickly form in the lower part of the pot (due to stagnant liquid);
- Not all orchids can tolerate waterlogging.
What types of orchids can be grown in a closed system?
Many gardeners claim that all orchids can be planted this way, but the key is to change the substrate frequently and choose pots with a narrow bottom and wide rim. This will ensure adequate airflow, reducing the risk of root rot.
To learn about the mistakes you can make when planting an orchid in a closed system, watch the following video:
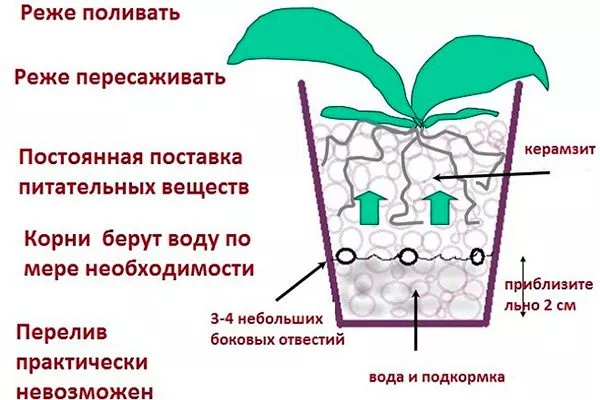
Planting an orchid in expanded clay
This method is attractive because it doesn't require any messy substrate management, and maintenance is quite simple. The goal is to keep the bottom of the plant submerged in water at all times—just a little (2 cm).
Only use a plastic flowerpot with a specific placement of holes on the sides. You can buy one or make your own. The placement principle is the height from the bottom:
- pot with a capacity of 300 to 500 ml – 1 cm;
- from 500 to 1000 ml – 1.5 cm;
- more than 1000 ml – 2 cm.
Step-by-step planting instructions:
- Rinse the expanded clay thoroughly in several changes of water.
- Disinfect the flowerpot.
- Lay down a thin layer of drainage material.
- Place the orchid bush in the center.
- Fill the pot to the brim with expanded clay.
- Pour in water.
What kind of expanded clay is suitable?
Orchids require a moisture-absorbing material. Expanded clay is porous and lightweight, so avoid using heavy or non-porous materials. Medium grain size is optimal, but coarse grain can be used for the bottom layer.
Caring for an orchid in expanded clay
Standard care includes watering from a watering can, but avoid watering around the edges of the pot (otherwise, water will leak out through the holes). Since expanded clay lacks nutrients, you'll need to add them yourself. For this, use Zion (a fine-grained substrate). It can be inserted between the expanded clay pieces.
The pros and cons of planting orchids in expanded clay
Expanded clay substrate for orchids is a lifesaver for root systems that have slowed growth, so its main advantage is the accelerated formation of new shoots and the development of existing ones. Other advantages:
- the risk of overflows is reduced;
- the occurrence and reproduction of pests is excluded;
- ease of care and planting;
- affordable cost of materials;
- light weight of the pot, etc.
There's one drawback: you need to water it with specific water. Only filtered water should be used, as the porous stones quickly accumulate salts and other substances.
Which orchids are suitable for planting in expanded clay?
Not all orchis are suitable for stones, so only Vanda, Cymbidium, Phalaenopsis, Dendrobium, Cattleya, Phragmipedium and Paphiopedilum are allowed to be planted in them.
Finally, watch a video about growing orchids in expanded clay:
Planting orchids in an open system
An open-air system is a natural environment for orchids, as this is how flowers grow in the wild (on the surface of trees, etc.). The plant's structure allows them to cling to bark, rocks, and other materials using rhizoids.
Planting an orchid without soil in water
Glass pots are suitable for growing in water, but other types of pots are also acceptable (glass pots look best). To ensure the plant adapts exclusively to aquatic conditions, acclimate it gradually:
- Remove the orchid from the pot and thoroughly wash the root system (there should be no substrate residue).
- Immerse the roots in water so that the root collar is located above the liquid level.
- Leave for 2 days.
- Drain the water so that no more than 1 cm of depth remains at the bottom.
- Keep it like this for 7 days.
- Next, add water again and leave for 5 days. Drain again to a 1 cm level and leave for 1 day.
- Add water to the required level and leave for continuous cultivation.

Caring for an orchid without soil in water
Caring for this flower without soil is easy. All the steps are as follows:
- water temperature – from +22 to +25 degrees during the day, from +18 to +22 degrees at night;
- daylight hours – about 10 hours;
- complete fluid replacement – every week;
- If the water evaporates a lot within 7 days, add more water along the walls of the vase;
- liquid quality - after filtration (you can use peat instead of household filters for this), but it is best to use rainwater.
Pros and cons of water farming
This method has both advantages and disadvantages, so weigh the pros and cons before making a decision. Advantages:
- no need to mess around with the substrate and replant frequently;
- no pests appear;
- there is no oxygen starvation;
- the plant does not dry out;
- unusual appearance.
The disadvantages include:
- the need to add a nutrient medium (fertilizers);
- root rot;
- strict temperature control.
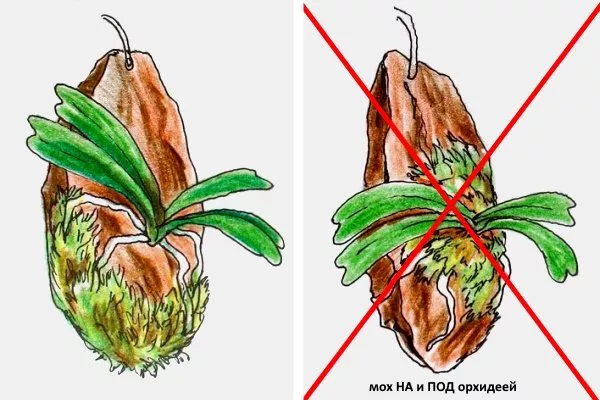
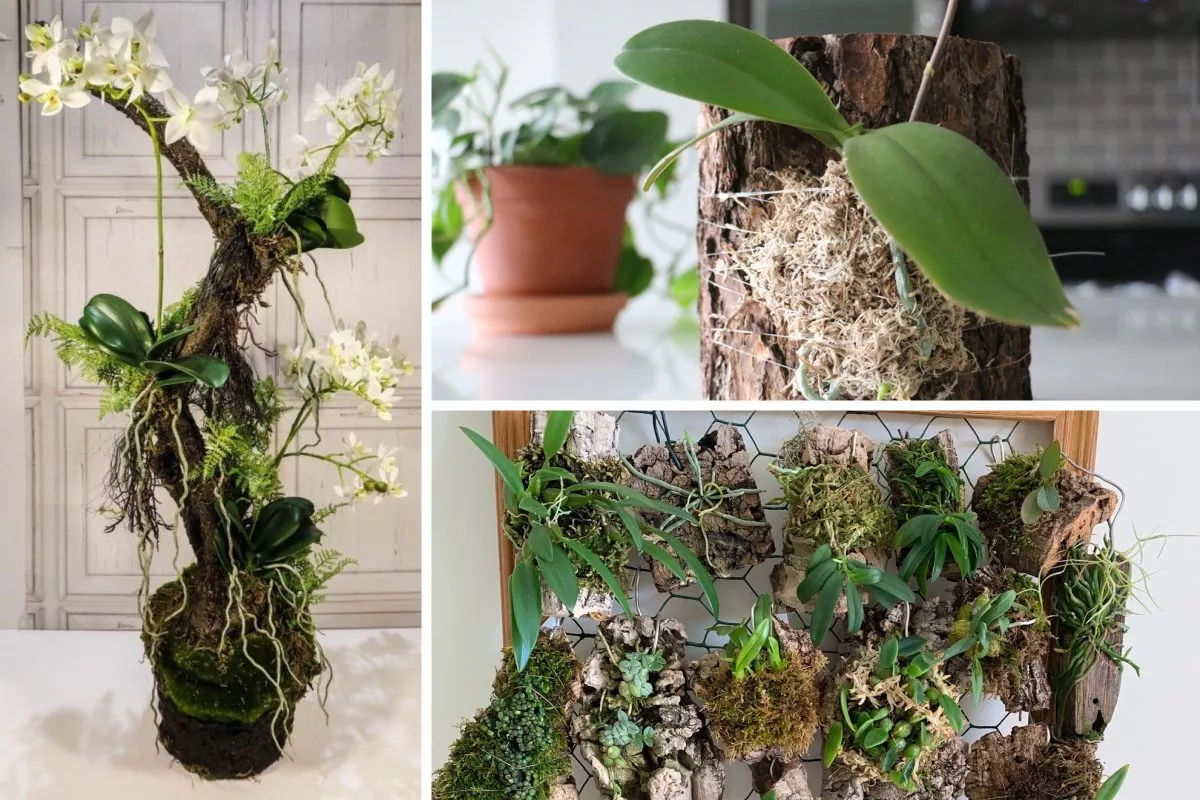
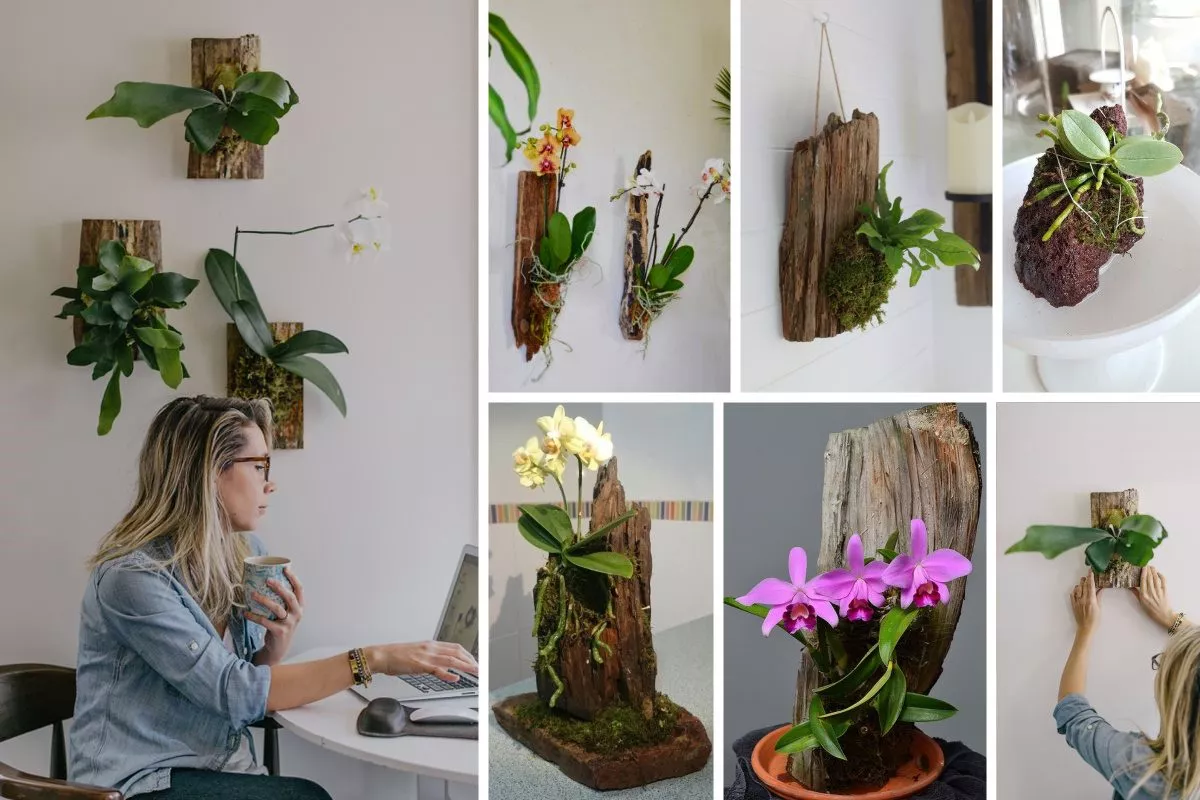
Planting an orchid on a block
Another original way to grow orchids at home. A "block" refers to a simple structure lined with tree bark and sphagnum moss. A simple piece of driftwood, a piece of log, or even foam can be used as a base. The main thing is that the surface has bark.
The best tree species for this purpose are pine, spruce, oak, quebracho, cork, and mangrove.
What do you need to know when planting and growing on a block?
Before planting, if you're making your own base, it's important to select bark that's 15-20 mm thick and then boil it several times to disinfect it. Next steps:
- Attach the plant to the block using thick synthetic thread, mesh or wire.
- Tie the moss to the surface of the bark. Experienced orchid growers recommend covering only the roots with moss.
When growing, it's important to monitor the root system's moisture level. It should be sprayed as it dries. The temperature should be between 20 and 25 degrees Celsius.
Pros and cons of block planting
Main advantages:
- looks very original, gives the overall interior a natural look;
- these are the best conditions for the plant roots;
- there is no over-watering and therefore no rotting;
- excellent air circulation;
- ease of care;
- there is no need to replant often (only to replant the babies);
- the ability to control the condition of the roots.
Florists report no drawbacks. Just look how beautiful this flower looks in an interior:
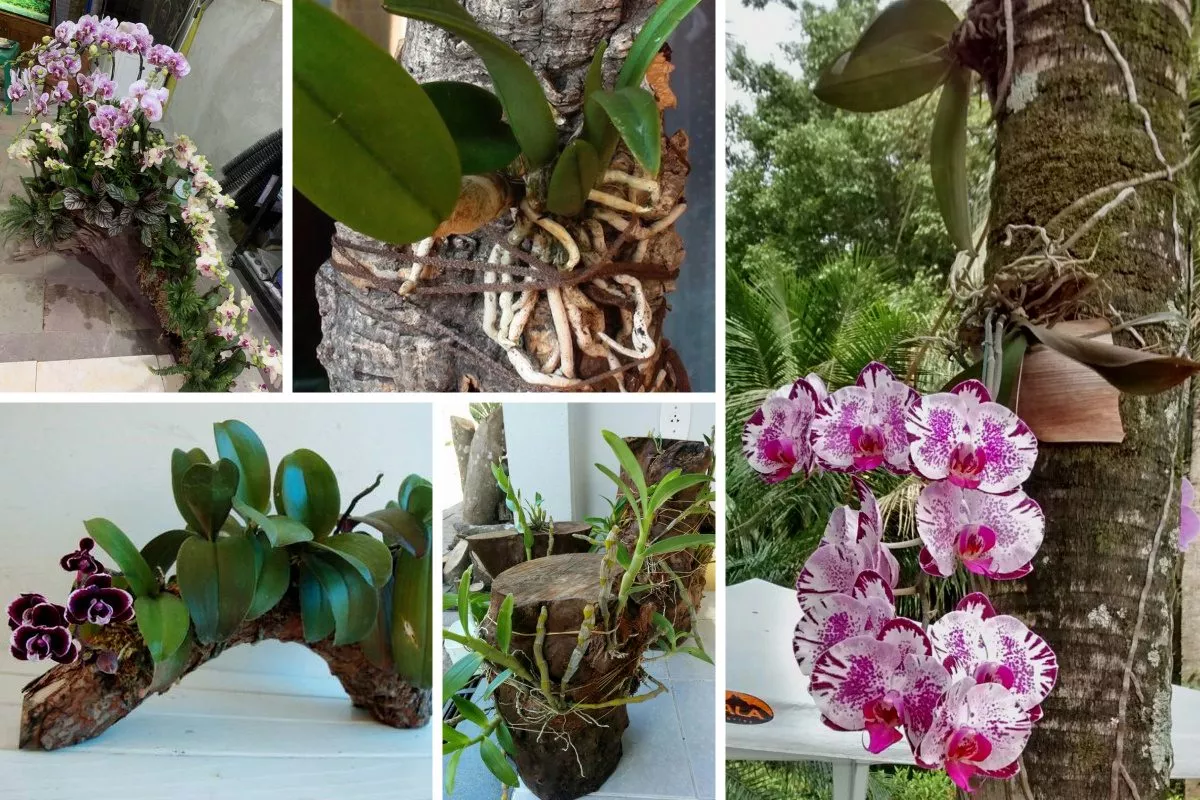
What types of orchids can be grown without soil?
Epiphytes feel best in water and on blocks – Phalaenopsis, Cattleya, Oncidium, Dendrobium, Vanda.
Planting orchids in open ground
Orchids can be grown not only indoors but also in flower beds. In this case, it's important to properly prepare the soil mixture and follow the planting guidelines for garden orchis. Site and soil requirements:
- side - north, but without drafts;
- shade or partial shade, as sunlight causes burns;
- neighbors - hostas, peonies, ferns;
- soil moisture is moderate, so it is important to create drainage;
- acidity – neutral, alkaline (pH from 5.5 to 6.5);
- type – breathable, loose.
Step-by-step planting rules:
- Dig holes about 15-20 cm deep and 40 cm wide.
- Place expanded clay on the bottom up to half the hole.
- Prepare the soil mixture. To do this, combine 1 part each of turf, perlite, and limestone, 0.5 parts each of charcoal and river sand, and 2 parts of peat.
- Place the substrate on 1/3 of the hole to form a small mound.
- Place the flower, spreading the roots to the sides.
- Sprinkle with the remaining soil mixture.
- Compact and water lightly with settled water.
There are many ways to plant and grow orchids, so gardeners can choose the most suitable one. The key is to strictly follow the instructions and properly care for the flowers. Care procedures include just a few steps: watering, fertilizing, and maintaining temperature and humidity.
Interesting article, thank you.
I have never heard of either the expanded clay method or the water method.
I use a soil mixture of bark, moss, and charcoal.
Just before repotting, it's also recommended to water the plant thoroughly, especially moistening the aerial roots. Water will make them more resilient and less likely to be damaged during repotting, especially if they need to be placed in a pot.