Orchid propagation is carried out in accordance with established requirements and conditions. There are various methods, each with its own characteristics, advantages, and disadvantages. Learning these methods allows for error-free propagation, ensuring problems and complications do not arise after planting.
Peculiarities of orchid propagation at home
Orchidaceae are native to the tropics and subtropics, so they prefer a moist environment, but not one that is overwatered. They grow on stumps, tree trunks, and rocks, but do not parasitize on their support structures. They thrive on abundant moisture, which washes away and draws out all the nutrients from natural materials.
- ✓ The lighting level should be diffused, without direct sunlight, lasting at least 12 hours a day.
- ✓ The concentration of fertilizers in water for irrigation should be reduced by 2 times compared to the usual feeding of adult plants.
Leaves also participate in development and growth, so propagation is accomplished by both root and foliar methods. Each method has its own subtleties and nuances, which determine the success of the crop's cultivation.
There are rules that apply to all methods:
- For propagation, use only sharp and necessarily disinfected floral tools - otherwise the risk of infection increases;
- dust the areas of each cut with crushed activated carbon tablets or wood ash;
- During the procedure, handle the roots and the above-ground part of the plant with care, as they are very fragile and break easily;
- If you are planting in a purchased substrate, make sure that the packaging is labeled as being suitable for orchids;
- strictly adhere to the terms and conditions;
- The mother plant should be strong and healthy, and if it has recently suffered from a disease, postpone propagation for about 3-6 months.
How does a flower reproduce?
To know exactly how to propagate a plant, it's important to understand its nature as a plant. This means understanding the characteristics of the growing point depending on the orchid species and the parts of the flower.
Features of the plant structure
Orchis, as orchids are also called, contains a main stem, roots, leaves and flowers, which are characterized as follows:
- Roots. The root system is considered massive. It is also covered with a protective film. The shoots are used for attachment to the substrate (which does not contain soil), photosynthesis, and the absorption of water and nutrients from the bark and air.
The root system is divided into primary and secondary. The more secondary roots, the better the survival rate after propagation. - Pseudobulb. Not all orchids have a bulb. It's a pseudobulb responsible for storing nutrients in case of adverse conditions. It's formed by one or more internodes (commonly known as clumps).
- Leaves. The type of foliage depends on the growing conditions. For example, drought-tolerant plants have thickened and compacted leaf blades, while those that tolerate only shade have softer ones.
All green mass has the ability to absorb moisture, thanks to which the plant can go for some time without watering (due to tissues such as xylem and phloem). - Stem part. The most diverse, depending on the species and variety of orchid - creeping or erect, long or short.
- Flowers. They also facilitate reproduction, as they contain the seeds. A flower consists of three sepals and two petals (sepals and lateral petals).
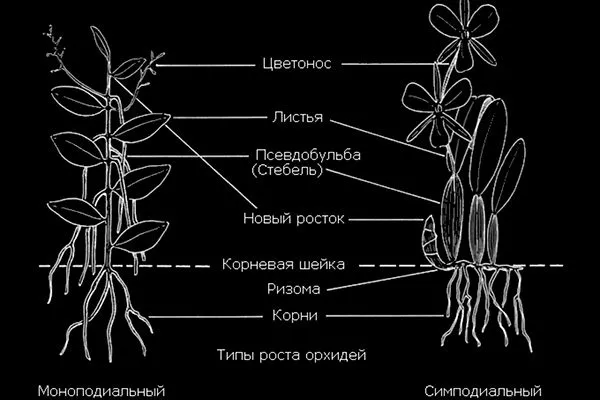
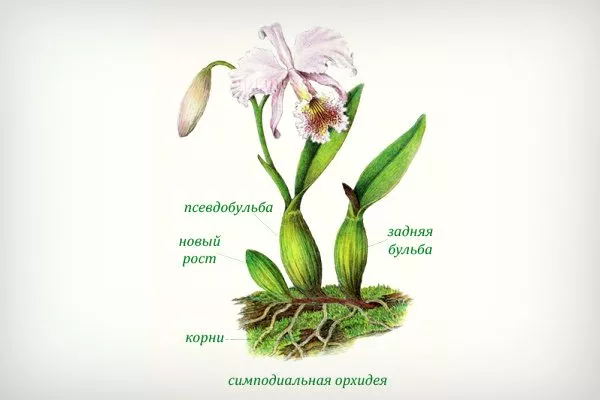
Growing point of sympodial species
This orchid species is characterized by the presence of a rhizome—a rootstock that grows exclusively horizontally. After each shoot matures, growth ceases, allowing the rhizome to produce frequent and numerous new stems. Other characteristics:
- direction of growth vector – upward, sideways;
- pseudobulb is always present;
- Flower stalks are formed from the upper shoot or bulb.
The most striking representatives of the sympodial type are Cattleya, Cymbidium, Cambria, and Oncidium.
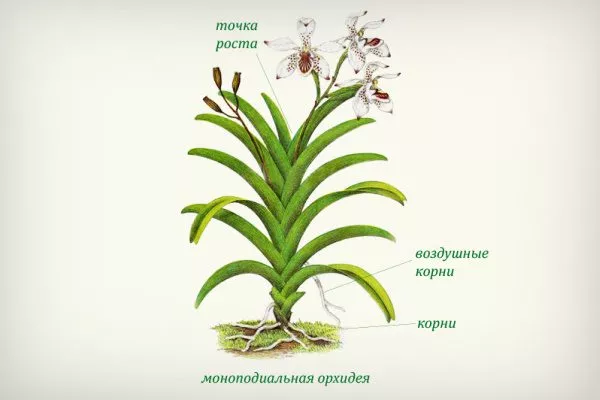
The growing point of monopodial species
The main characteristic of the monopodial type is vectorial, upward growth with constant renewal of green mass, primarily at the stem tip. Moreover, new leaves grow larger than the previous ones. The root system develops chaotically, eventually forming on the trunk.
This type includes orchid species such as Phalaenopsis, Vanda, Aerangis, and Agreccum.
- 2 weeks before the planned propagation, increase the frequency of watering to 3 times a week to saturate the plant with moisture.
- Stop all fertilizing 1 week before propagation to reduce stress on the plant.
- Three days before the procedure, treat the plant with epin to increase stress resistance.
Breeding conditions
Propagation requires adherence to a number of conditions. This is the only way to ensure rapid rooting and a high survival rate of the young plant. Here's what to consider:
- Time. It's not advisable to propagate orchids during the active flowering period or during dormancy. It's best to do this in early spring, when the plant is just waking up, or after flowering has finished.
- Humidity. The optimal level is from 50 to 80%, but much depends on the specific variety.
- Temperature. Since orchids thrive in warm conditions, they should be propagated at temperatures between 28 and 30 degrees Celsius. At lower temperatures, cell division does not occur.
- Age. The mother bush must be at least 2 years old.
- General condition of the orchid. These must be completely healthy and strong specimens, without signs of the presence or transfer of diseases or pest infestations.
Working methods
There are many techniques for propagating orchids, each good in its own way, so the gardener must decide for himself which method to use.
By dividing the bush
Dividing orchid bushes for propagation is permitted only for sympodial orchids, as only these have root shoots on each above-ground element. This method is especially common on plants with pseudobulbs. Some specialists also divide monopodial orchids.
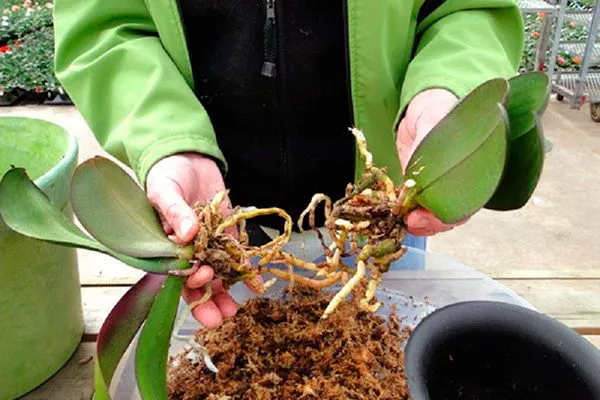
Dividing an orchid step by step:
- Remove the plant from the pot. To do this, first moisten the soil and gently pull the stems. Next, clean any remaining soil from the root system. If this is difficult, simply soak the roots in warm water for 30-40 minutes.
- Place the flower on a table surface. Divide it into several sections. Keep in mind that each section should contain at least three false bulblets and root shoots.
- Cut the orchid and dust the cut areas with activated charcoal powder.
- Leave the future seedlings at room temperature for a couple of hours. During this time, prepare the substrate (standard for orchids and the specific species or variety).
- Plant the bushes in a pot, water them, but only lightly.
Leave the flower alone for 3 days, only lightly misting the green mass. If you have an unplanted seedling, moisten some peat moss (sphagnum), place it in a plastic bag, and insert the cut off part of the flower into the center. Leave it like this for about 7-10 days. The same procedure is used if the part of the plant has few roots.
Features of dividing monopodial flowers:
- the presence of at least 10-12 leaves and aerial roots on top is required;
- cut the bush only into 2 parts and according to a different principle - not parallel to the trunk, but across;
- Spray the upper part of the plant with Kinetin (750 ml per 1 liter of water) twice a week.
Basal babies
This method is best used for monopodial varieties, as they form basal offshoots. The best orchid varieties are Vanda, Phalaenopsis, Brassavola, and Vanilla. Keep in mind that offshoots only appear in two situations: when the mother plant is about to die or when it requires rejuvenation.
How to do it right:
- Remove the plant from the container, inspect the roots, and mark the cut location between the baby plant and the root stem.
- Make a cut and treat with activated carbon.
- Transplant the baby plant along with its roots in the standard way.
- Return the mother plant to its original pot or throw it away (if it is dying).
See also a video about separating a root ball from a mother plant:
Stem babies
Buds form on the peduncle, from which offspring can be produced for propagation. The process looks like this:
- To stimulate the production of offspring after flowering, stop fertilizing completely and reduce watering by half. Daytime temperatures should be between 26 and 27 degrees Celsius, and nighttime temperatures between 15 and 17 degrees Celsius.
- Continue this for 30 days, after which the buds will begin to open. Now, create warmer conditions (increase by 5 degrees), resume watering, and apply foliar fertilizer.
- When the roots (aerial) form, leave them for about six months, then carefully cut off the baby plant and leave it in the air for 3 hours.
- Plant the seedlings, covering them with a plastic or glass cup while they root. Remove the covering once they begin to grow actively.
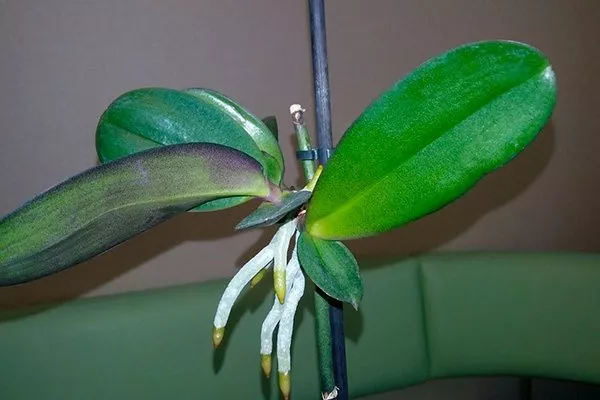
Orchid baby on a peduncle
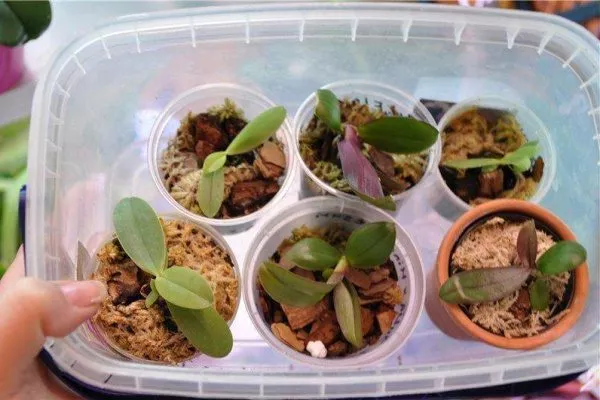
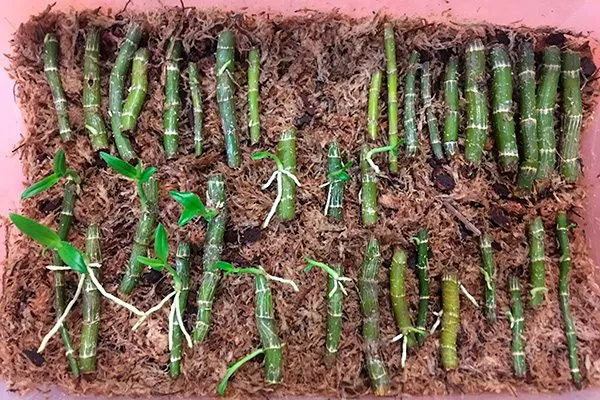
Cuttings
This technique is equally suitable for both orchid types, with the difference that monopodial varieties use flower stalks, while sympodial varieties use pseudobulbs. Keep in mind that the cutting should be taken from a healthy bush; it should be 9-11 cm tall and have at least a couple of buds.
What you will need for propagation:
- plant;
- a sharp knife or scalpel;
- a plastic container that will serve as a mini-greenhouse;
- sphagnum moss;
- spray;
- water.
The reproduction process looks like this:
- Using a sharp tool, make a smooth cut on the peduncle or cutting with a pseudobulb after flowering.
- Dry the flower stalk for a couple of hours, and if using false bulbs, treat them with Fitosporin (you can dip them in warm paraffin).
- Prepare the substrate – moss. You can also add tree bark.
- Moisturize.
- Place the cuttings horizontally in the greenhouse and cover with plastic or a lid. Monitor the humidity level by misting the substrate with a spray bottle. The temperature in the greenhouse should be between 23 and 25 degrees Celsius.
Seeds
The seed method is rarely used due to the labor-intensive nature of the process and the time it takes to obtain a flower. Germination takes approximately three months, the formation of shoots takes six months, and the time it takes to repot in a pot takes one to one and a half years.
The first thing to do is pollinate the flowers and wait for the seed pod to form. It contains an average of 4 million seeds, which take over six months to mature. When the ripening process is complete, the pod bursts, and microscopic, dust-like seed material spills out.
The following video explains how to pollinate an orchid:
Growing from seeds is difficult because:
- sterile conditions are required;
- It is important to maintain humidity and temperature levels;
- it is difficult to obtain a flower with varietal characteristics;
- Careful care is required, since the seeds are not covered with an endosperm protective layer.
Despite this, it is possible to grow flowers from seeds. To do this, the planting material is placed in test tubes or other sterile containers that are hermetically sealed. A nutrient medium is essential, as seed propagation is impossible without it.
Nutrient substrate options:
- Take 15 to 20 grams of agar-agar powder and add warm water to it to swell. You should get a gelatinous mass. Add 200 ml of boiling water, 10 grams of fructose (can be substituted with glucose), and a pinch of calcium carbonate and phosphoric acid.
- Combine 100 ml of natural tomato juice with 1 tablespoon of banana pulp, 1 teaspoon of granulated sugar, 2 drops of any orchid fertilizer, 2 tablets of activated charcoal, and 1/3 teaspoon of liquid honey. After mixing, pour in 400 ml of distilled water.
Also watch a video about preparing a nutrient medium for sowing orchid seeds:
Next, follow the instructions:
- Disinfect the seeds. To do this, make a 1% bleach solution, place the seedlings in it, and let them sit for 15-30 minutes, shaking the contents occasionally.
- Use a syringe (since the seeds are very small) to suck the seeds out of the disinfectant solution and transfer them to a sterile nutrient medium. The optimal amount of seeds and liquid for one flask is 40 ml.
- Cover with lids, place in a greenhouse, keep for 6 months.
- Once germination occurs, prepare 50 ml of warm water for each flask. Pour the seeds into this water along with the nutrient mixture, adding a couple of drops of Fundazol (1%). Continue soaking for about 20 minutes.
- Prepare the planting containers by filling them with a mixture of bark, sphagnum moss, and activated charcoal (the composition depends on the orchid variety and type).
- Sow the seeds, spreading them over the surface. Cover with the same substrate and lightly moisten.
- Leave for six months. During this time, monitor the substrate's moisture and temperature.
- When sprouts with one leaf are formed, pick them out.
- After 2 leaves have formed, transplant again.
- When 4 full leaves appear, replant again, but this time in permanent pots.
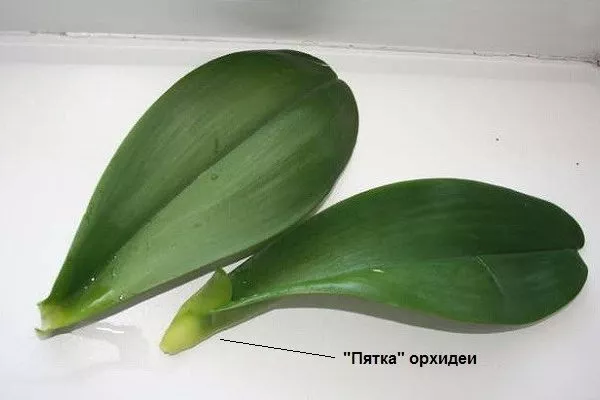
Leaf
Orchid propagation using leaves is not recommended, as they quickly begin to rot. But this isn't the main issue; the key is that root shoots don't form in the leaf blade due to the lack of a growth point. However, this method is possible provided the "heel"—a small piece of the stem from which the leaf grows—remains on the leaf.
Using hormonal paste
This method uses a cytokinin paste, which is sold not in regular pharmacies but in flower shops. The product is based on cytokinins, phytohormonal substances that accelerate root growth and formation.
Peculiarities:
- plants must be mature and healthy;
- The period of application of the paste is the end of winter - beginning of spring.
How to propagate:
- Make a scratch on the peduncle using a knife or needle.
- Apply a hormonal ointment to the scratch (1.5-2 mm thick). Don't apply a thinner layer, otherwise a flower stalk, not a bud, will develop.
- Leave it like this for 10 days, after which germination will occur (sometimes it takes 3 weeks).
- When at least 3 leaves and roots of about 4 cm have formed, transplant into a pot in the standard way.
The process is shown in the video below:
Transplantation and further care
The optimal time to repot a plant after propagation is when the roots reach 5 cm in length. Even if this doesn't happen, repotting is sometimes necessary for other reasons, such as a cramped pot or improperly prepared soil.
Transplant rules:
- First, prepare the substrate. For this, use pine bark (note that the grain size should be approximately 10 mm), sphagnum moss, and charcoal in a ratio of 5:1:1.
- Disinfect the pot, especially if you're reusing it.
- Place vermiculite, perlite, or expanded clay on the bottom. Layer 3 to 4 cm.
- Pour in the substrate and moisten it.
- Insert the planting material.
- Sprinkle the substrate on all sides and press it with your palms to better secure the sprout.
Further care is standard, that is, you need to water, maintain the temperature, moisturize, etc., but strictly in accordance with the requirements for a specific variety.
Basic mistakes
It's not always possible to successfully propagate an orchid on the first try, so pay attention to the most common mistakes made by novice florists:
- the mother bush is too young – it is not yet capable of reproduction, therefore root growth and survival are not observed;
- a sick plant - replanting is always a strong stress for the plant, therefore, if it is sick, the situation is further aggravated and the orchid quickly dies;
- lack of sterilization of sections – this leads to infection, which is the cause of illness and death;
- the influence of direct sunlight - orchids do not like this type of sun exposure, and after replanting and propagation procedures they take it even harder;
- too low or too high temperature – cell division is impossible in this case.
Before attempting to propagate orchis yourself, carefully research all the methods, consider the variety's characteristics, and acquire all the necessary tools, substrate materials, containers, etc. in advance. Be sure to strictly follow all instructions, and don't be discouraged if you fail the first time. Remember, experience comes with time.
Thanks for the information. I hadn't heard of propagating by cuttings before.
I also know that you can "rejuvenate" a mature plant. That is, you can divide the trunk end-to-end and replant the upper part, and a baby plant should appear from the stump. I'm waiting for my lilac orchid to finish blooming and try this method. I'll also try cuttings then; the flower stalk was large this time. If it works out, I'll let you know.