Orchid roots differ significantly from the root systems of other houseplants, but they are equally vital to the plant, providing nutrition and reproduction. Therefore, it's important to understand the structure, functionality, and other characteristics of this part of the plant.
The importance of healthy roots for a plant
By understanding the root system's needs, it's possible to quickly determine the plant's current health, especially since the orchid system allows for this. Orchids never grow in soil, as their roots always wrap around some material with root shoots. In the wild, this includes tree trunks, rocks, stumps, and so on.
The roots are essential for the growth of the entire plant, as nutrition and moisture are also provided through the roots. If the root system is fully viable, it is capable of performing its intended functions. For example:
- keep the entire bush in the correct position;
- promote photosynthesis along with green mass;
- absorb moisture;
- saturate the entire bush with nutrients;
- help in reproduction.
What kind of roots should a healthy orchid have?
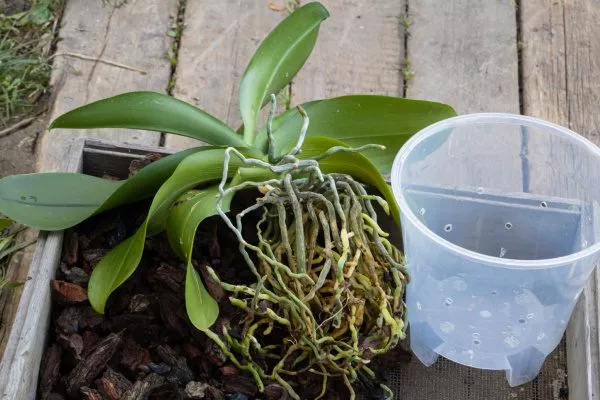
To ensure your orchid quickly adapts after purchase and takes root after planting/repotting, the root system must be as healthy as possible. This condition can be determined visually and palpated.
Healthy Phalaenopsis Roots
Indicators of healthy roots – generalized for different types of crops:
- tip - growing type;
- the velamen shell in a humid environment is light green in color;
- aerial root shoots - white or cream;
- texture – elastic;
- pot filling level – full;
- the plant is firmly fixed in the container.
- ✓ Check that the root tips are of the growing type, which indicates active growth.
- ✓ Make sure that the velamen sheath is light green in a humid environment and the aerial roots are white or cream.
- ✓ Assess the texture of the roots: they should be elastic, without dents when pressed.
The health of the roots should also be judged depending on the type of epiphyte:
- Dendrobium. White roots always have a velomen wax layer. It's medium thick, and at the very beginning of growth, the tips are purple-orange or greenish, but as the roots develop, the color fades.

- Cambria. It has delicate, thread-like white roots. Due to their thinness and lack of strength, they wrap tightly around the potted substrate, making the plant stable.
- Wanda. The roots are very strong, dense, and powerful. The shoots have a gray-green tint and a layer of porous, dead, and dense cells.
- Cattleya. The root system is snow-white, smooth, and thickened. The velamen layer is visible. Rhizomes should grow from the creeping root.

- ✓ Dendrobium: roots with a velomen wax layer, tips purple-orange or greenish at the beginning of growth.
- ✓ Cambria: thin, thread-like roots of white color, tightly wrapping around the substrate.
- ✓ Vanda: strong, dense roots with a grey-green tint and a porous cell layer.
- ✓ Cattleya: snow-white, smooth and thickened roots with a noticeable layer of velamen.
Features of roots
Orchid roots are divided into primary and secondary roots. Secondary roots can form not only on the lower part of the plant but anywhere, even on the stem (these are aerial roots typical of monopodial flowers, while in sympodial flowers they are located on the primary roots).
Structure
A distinctive feature of the structure of the orchis root system is that all shoots are covered with a velamen layer to protect them from negative factors, allowing the roots to thrive without substrate or moisture.
Epiphytes consist of the following elements:
- root tip (usually apical);
- conductive threads;
- parenchyma;
- velamen (instead of rhizoderm).
How does a plant's specific lifestyle affect its roots?
Orchids never root in the soil layer—their roots grow only on the surface of natural materials or in a special, very loose substrate (pieces of bark, expanded clay, moss, etc.). Therefore, this plant's lifestyle is considered unique.
Peculiarities:
- Under normal conditions, all plants draw their nutrients from the soil, but orchids obtain water from the air, which must be humid (as in the tropics, their native habitat). They obtain their food from litter (bark, humus, insect remains, leaves, and the like).
- Because of this, velamen consists not of a thin cell layer, but a thick one (up to 15-19 cells). Since the cells are dead, they are no longer suitable for osmosis, so the nutrition process is different.
- Velamen has special pores that allow microalgae and fungi to penetrate. These fungi help process potassium and phosphorus salts for future flowering.
Photosynthesis
Orchids are typically planted so that their root system receives sufficient sunlight. This can be done outdoors (on slabs) or indoors (in pots made of transparent materials such as glass or fiberglass). The substrate used is bark and moss, which are both highly permeable. This is essential for photosynthesis.
The process of obtaining moisture
The concept of "absorbing" nutrients implies the movement of vital products into plant cells, but not through muscle action, as many beginners believe. Because the latter are simply absent.
Any vegetation carries out this process through osmosis:
- water molecules from the soil (high moisture concentration) pass to the roots (low concentration), that is, they share their substances and distribute them evenly;
- then, at the molecular level, moisture penetrates through the membrane into the rhizoderm (the upper layer of the root system);
- then into the exoderm and inner layers of the root.
In the case of orchid roots, the process looks like this:
- during rain, fog, dew and other precipitation, moisture falls on the velamen layer of the exposed roots of the orchis;
- cell membranes swell due to increased humidity;
- this leads to the formation of water stripes, called lamellae, on the walls of the cavities of the velamen substance;
- since water droplets create gravity, the lamellas reunite;
- This helps to draw the liquid in, while at the same time the air comes out.
Conventionally, the diagram looks like this: air → velamen → exoderm → axial cylinder.
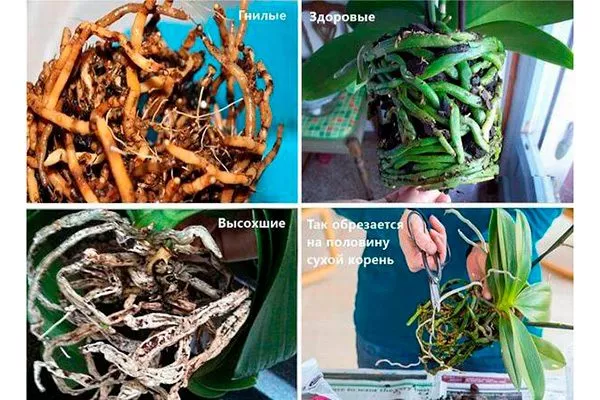
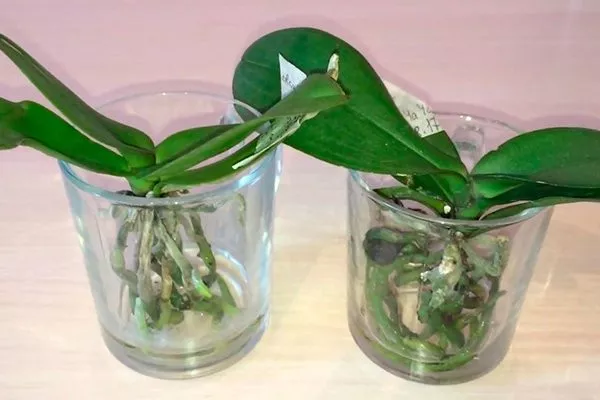
How to distinguish a diseased root from a healthy one?
When purchasing an orchid, special attention should be paid to the health of the roots. transplant and during the growing process. A healthy root system differs from a diseased one by the following signs:
| Root condition | Healthy specimens | Unsuitable specimens |
| Color | If the root is in a moist substrate, it is green; if on the surface, it is whitish, with a silvery or light brownish tint. | Brown, black, yellowish with a bloom. |
| Structure | Elastic, hard, fleshy - does not form dents when pressed. | Flabby, soft—pressing leaves a pit and oozing juice. The roots appear dry. |
| Smell | Absent. | Unpleasant, putrid, especially when broken or pressed. |
| Tip growth | A growing type, which is evident at the very tip by a changed hue (pink, purple, white). If the flower has been exposed to sunlight, the tip may be reddish. | Missing, end dry or rotten. |
| Presence of spots | They are absent, since the surface is always uniform. | Present along the length of the root shoots, the inclusions can be of different shades, depending on the type of disease. |
Problems with roots
Beginner orchid growers often encounter root problems when growing orchids. However, this doesn't always mean the plant needs saving—sometimes it's not even a problem. Nevertheless, if something bothers a grower, it's essential to find out what's wrong with the root system and how to help the plant.
They are crawling out of the pot
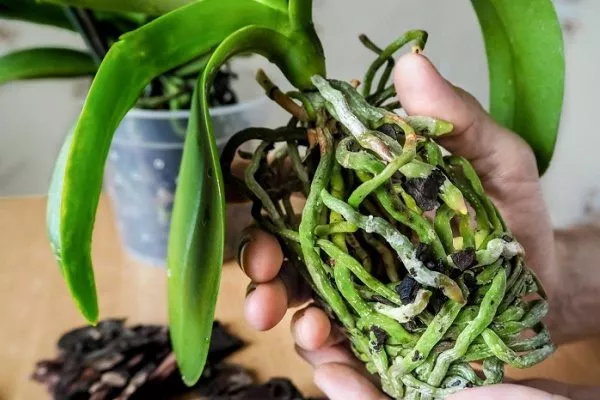
There's nothing abnormal about this, as the orchid root system always "exposes" its root shoots. In some varieties, these can be either adventitious basal roots or aerial roots. However, if the color and texture change, or the growth is excessive, consider the following:
- The plant is too hot. This causes the substrate to dry out, and the roots to move upward in search of moisture and cooler conditions. This growth is very intense, directed in all directions. To remedy this, simply lower the room temperature and moisten the substrate.
- Incorrect watering. It can be either excessive or insufficient. In the former case, the roots "run away" from such an abundance of water after the reserve "reservoir" in the roots is filled, as a significant lack of oxygen is felt (an additional sign is rotting).
In the second case, the plant tries to reach for moisture, and the roots become dry.
- Substrate compaction. Poor ventilation can lead to oxygen starvation (hypoxia), and water stagnation after watering (which then leads to rotting). To save the situation, replace the soil immediately.
- Lack of light. The minimum daylight hours are 10 hours. If plants don't get enough light, their immune system weakens, and their roots become unable to absorb and transfer beneficial minerals to the green mass.
In this case, the roots try to get used to such conditions, so as a defensive reaction they release auxiliary shoots. - The pot is too crowded. In this situation, the root system extends far beyond the edges of the pot. There's only one solution: repot or divide the bush.
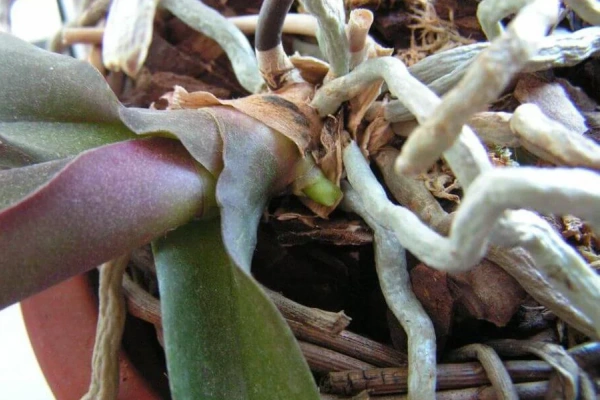
Aerial roots have formed
If an orchid develops excessive aerial shoots, the problem is a lack of water. In search of water, the orchid sends out roots to absorb water from the air (a genetically determined ability is triggered). In this case, water the plant and move it away from heat sources (a window in the summer, a heating device in the winter).
Healthy roots change color
Roots in damp soil have a green tint; when moisture levels drop, they lighten, which is the first sign that watering is needed. However, if the roots become dark, spotted, etc., these are symptoms of disease.
Too big roots
The root system becomes overgrown and thickened due to improper care and unsuitable soil. To correct this, adjust watering, temperature, fertilizing, etc.
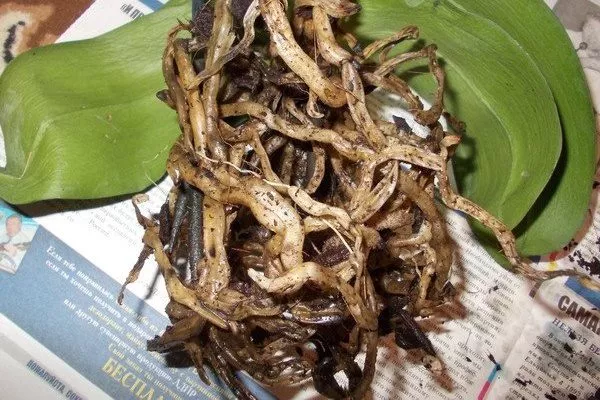
The roots rot and mold appears.
The main cause is over-watering of the substrate or infection, which leads to rot diseases of the root system. Pay special attention to the odor emanating from the lower part of the plant and additional signs - dark spots or dots, necrosis, changes in structure, etc. (each diseases its own specific symptoms).
Another negative factor is substrate depletion. This occurs when the plant is not fertilized or replaced regularly. The soil should be changed at least once every two years, but ideally once a year.
What to do in all situations:
- Water the substrate.
- Remove the bush.
- Rinse the roots under running water.
- Trim off any rotten or moldy areas with sharp, disinfected pruning shears.
- Rinse again.
- Sprinkle the cut areas with crushed activated carbon.
- Transplant the plant into a clean pot with new soil.
Drying of roots
As with all problems, the cause is the same: failure to comply with agricultural practices. Negative factors:
- lack of moisture;
- too high air temperature;
- exposure to direct sunlight;
- placing the pot near heating radiators in winter and glass heated by the sun in summer;
- burn from excess fertilizer or its application without watering.
Yellowing
This is a dangerous sign, as yellowing, for example, along with rotting processes, leads to the death of the plant. The main causes are:
- excessive deepening of the root system into the substrate during transplantation;
- lack of light (if the pot is in the shade);
- poor quality soil (too compacted, depleted);
- overwatering;
- lack of oxygen;
- infection.
Roots fall off or break off
Root shoot breakage is most often associated with putrefactive processes—rootlets fall off at sites of necrosis (cell and tissue death). The main cause is excessive root moisture and increased soil density, which contribute to the development of putrefactive pathological processes.
The appearance of spots on the roots
The formation of lesions on the root system is a sign of disease. These lesions are most often:
- Viruses. These diseases are untreatable, so the plant is destroyed by burning. Root spots vary in color and may appear as stripes.
- Bacteria. Bacterial diseases are easily treated with antibiotics and fungicides. In addition to spots, you may notice watery ulcers and softening of the shoot structure.
- Mushrooms. Fungal diseases contribute not only to spotting but also to the formation of plaque on the roots and rotting processes, which increases the risk of death. Fungicides are used for treatment.
The roots turned white
This is normal for roots that are not in a moist substrate, so there's no need to take any action or even worry. However, if you notice roots turning white due to a white coating, the cause is soil salinity. This happens when watering with hard water.
Orchid without roots or few of them
If your orchid's roots suddenly stop growing or disappear completely, look for improper care as the cause. What contributes to this:
- Water shortage. Because of this, the root system dries out and no longer grows. Water hardness also plays a role.
- Overheat. Most often, this happens if the pot is too close to the glass in summer, and to heaters in summer.
- Frostbite. This happens in winter when there are drafts or the window is open for 15 minutes.
- Pests. They actively eat root shoots and do not allow new ones to grow.
- Incorrect application of fertilizers. Roots quickly "burn out" and fail to form if fertilizers are added to the substrate in pure form or in excessive quantities. How to do this correctly is written here. Here.
- Soil compaction. Rotting occurs.
How to root an orchid?
To speed up root establishment, use special rooting stimulants. They are applied before root growth or immediately before landingSometimes rooting is done with already planted plants.
There are a huge number of preparations, but orchid growers particularly highlight the following:
- Radipharm. Simply dilute 1 drop of the product in 1 liter of warm water. Leave it on the roots for about 20 minutes.
- Etamon. Available in ampoules. One ampoule is enough for 1 liter. Soak for 30 minutes.
- Ribav-Extra. Dissolve 2 drops of the liquid preparation in 1 liter of water. Let the roots steep for 25 minutes.
- Zircon. Add 4 drops of the product to 1 liter of water at 30 degrees and leave for half an hour.
- Fitosporin for indoor floriculture. It's used to prevent disease, but it also promotes rapid rooting. Therefore, add 100 drops to 100 ml of water and water the substrate with the plant.
- Succinic acid. Spray the green mass and the surface layers of the substrate. The proportions are: 1 liter of water and 4 tablets of the product.
- Kornevin. It is used like this:
- pour 6 liters of water into a basin;
- add 3 g of the product;
- place the orchid pot in the solution;
- recommended time: 30-40 minutes;
- Be sure to let the liquid drain.
- Glucose. It is used for weakened immunity - by wiping the stems and foliage, not only the immunity is strengthened, but also the root system, which begins to grow actively.
Orchid root extension
If there's a problem with the roots, they're growing poorly, they've been diseased, or the shoots are too small for planting, it's recommended to extend them. This can be done in a variety of ways, each with its own advantages.
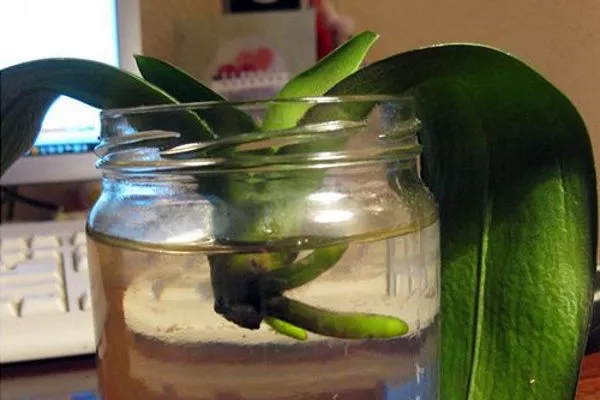
In the water
This method is effective when there are no root shoots at all, but the root collar with leaves is essential. Follow these steps:
- Boil water or prepare filtered water.
- Cool to room temperature, pour out 500 ml.
- Grind 1 tablet of succinic acid into powder.
- Add to water, mix thoroughly.
- Pour the solution into a glass jar with a narrower neck (so that it holds the bush at the desired level).
- Place the flower in water so that the neck is in the liquid, but the base of the leaves is not.
Change the water every day at the same time. Repot the plant into the substrate when the roots reach 2 cm. Keep in mind that adaptation to the soil will take time, so pay close attention to care and be patient.
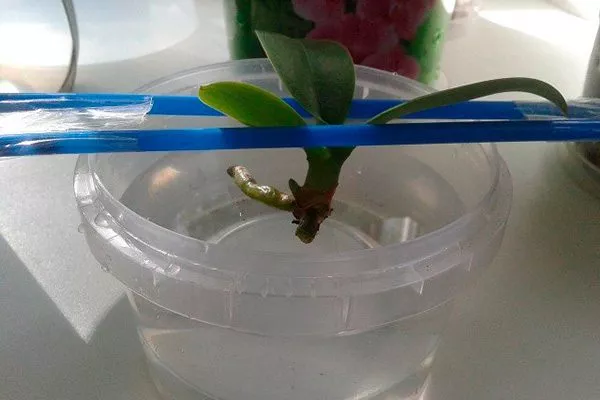
Above the water
This method eliminates rooting issues in the substrate, making it recommended for all beginning orchid growers. Rules:
- Filter the water and pour it into a transparent container.
- Position the flower so that the stem doesn't touch the liquid. If the neck of the flower doesn't allow this, use wooden chopsticks or regular drinking straws.
- Transplant into substrate when the roots reach 5 cm in length.
Monitor the water level in the jar—top it up as needed, and as the plant grows, replace it with larger containers. Additionally, clean the green mass daily with a solution of one succinic acid tablet and 500 ml of water.
By dipping and drying method
This method is time-consuming, but considered highly effective. The root growth process is as follows:
- Take a transparent flowerpot and treat it with an antiseptic.
- Separately prepare another jar, but with boiled water.
- Insert the orchid so that the cutting touches the water by 0.7-1 cm.
- Let it sit for 6 hours, then transfer the plant to a pot. Position it so that the petiole doesn't touch the bottom, that is, in a suspended position.
- Leave for 12 hours to dry.
Repeat these manipulations twice a day until the roots reach a length of 3 cm. To speed up the process, add either Kornevin or succinic acid.
Using the "Roots Up" method
This unusual technique is used when roots are completely absent. Its main advantage is rapid root growth and easy adaptation and establishment in the substrate.
Step by step actions:
- Disinfect a transparent container.
- Place the flower in it with the leaves facing down and the part where the roots should grow facing up.
- Pour boiled water to the height of half the leaves.
- Add activated carbon powder (1 tablet per 1 liter).

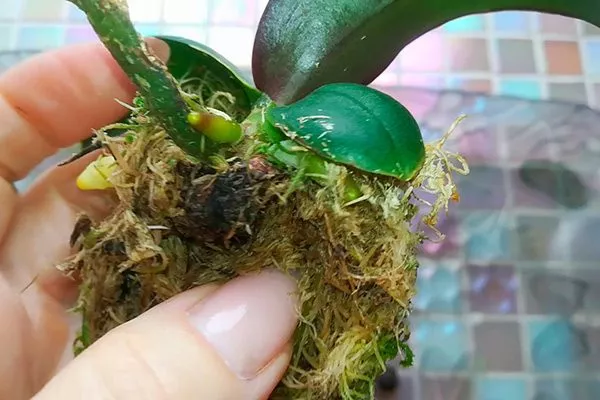
On the moss
It's advisable to grow roots on sphagnum moss when resuscitation is required. The algorithm is as follows:
- Disinfect the plastic container (aquarium, etc.).
- Place expanded clay or perlite on the bottom.
- Place fresh sphagnum moss on top and immediately moisten it thoroughly.
- Place the bush on the moss.
- Cover the mini-greenhouse with plastic or a lid.
Check the moisture content of the moss daily – water should not leak from it and it should not be dry.
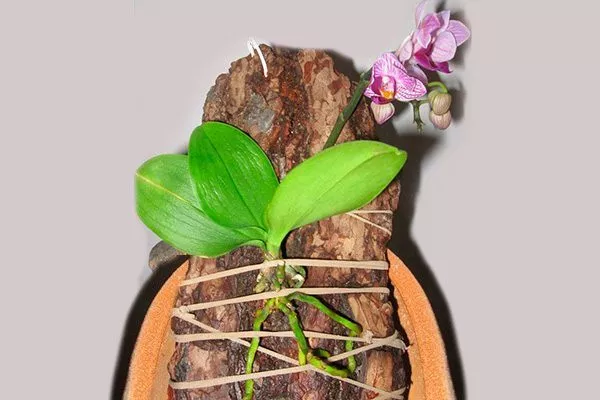
On a piece of bark
Another effective method for root extension, this time on tree bark. It's best to use material from pine or spruce. Follow these step-by-step instructions:
- Place a piece of bark in water for a couple of days.
- When the wood is saturated with moisture, remove it from the liquid.
- Place the orchis on the bark from the front side.
- Secure with soft rope.
- Hang the improvised structure on the wall.
You can replant after about 3 months, but only if you periodically moisten the bark, not the plant.
Root propagation options
Root propagation of orchids is a great way to enrich your indoor flowerbed with new plants. This method allows for rapid rooting, and the orchid retains its varietal characteristics. For this purpose, choose plants with healthy roots, free of breaks, lesions, or other defects.
Please keep some points in mind:
- Always disinfect instruments, which should be very sharp and have a thin blade;
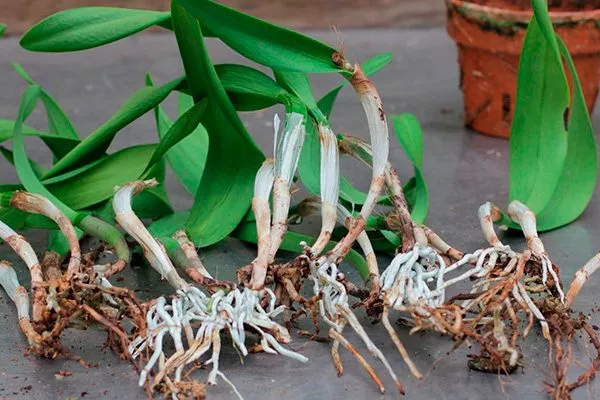
- Sympodial orchids reproduce best by roots;
- each transplanted root must contain at least 2 pseudobulbs (if provided by the variety);
- the age of the mother bush is from 2-3 years to 9-10, but the younger the better;
- the breeding period is spring (after emerging from dormancy).
Methods of root propagation of orchis:
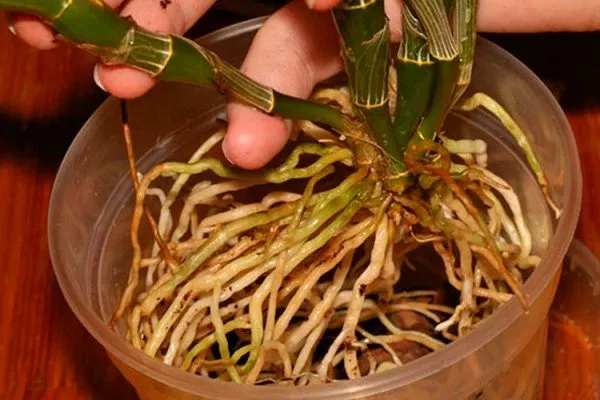
- Roots that are in the substrate. A very simple method that uses bush division. The process is simple:
- Water the soil, leave it until it is completely absorbed, then remove the flower.
- Inspect the roots. Trim off any unsuitable parts if necessary.
- Rinse under running water, if you have filtered water, it will be even better.
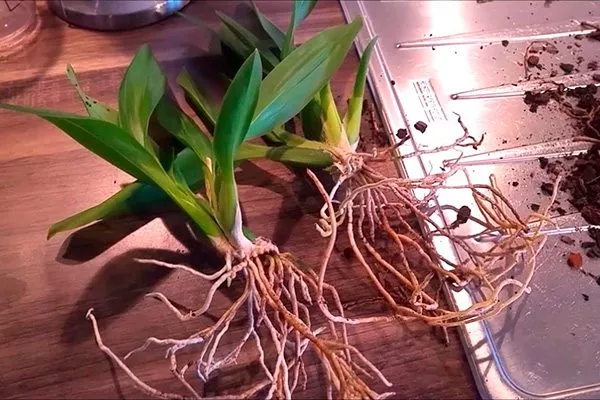
- Cut the bush into 2 or more parts (depending on the size, number of bulbs, etc.).
- Treat with powdered ash and let dry in the open air for a couple of hours.
- Plant the roots in pots with substrate.
- Aerial roots. This method is very different from the previous one. First, select the strongest shoots and trim them off completely. Then follow the instructions:
- Place a layer of moistened sphagnum moss into the container.
- Place the aerial root horizontally on the moss.
- Make a light cut in one or more places.
- Immediately cover it with a hormonal paste (available in flower shops - Cytokinin, designed to stimulate root growth).
- Once the roots have formed, cut this section back so that there is approximately 1 cm on each side of the roots.
- Plant in a pot, but it is better to first grow roots in water, etc.
How to properly care for roots and common mistakes
Experienced orchid growers already know how to avoid mistakes when growing orchis, but beginners can sometimes find it very challenging, as this plant is considered a unique and capricious one. To make things easier for novice gardeners, consider these orchid care guidelines and helpful tips from experienced growers:
- The root system is sensitive, even despite the protective covering. Therefore, handle it carefully to avoid mechanical damage, which in turn leads to disease.
- Always use disinfected instruments and containers – this will protect against infection.
- Ensure the roots have constant access to oxygen by making the substrate loose. Additionally, use pots with holes on all sides and in the bottom.
- Do not overwater, as the roots will rot quickly.
- Aerial roots also need nutrition and water, so spray them periodically, but be careful not to get it on the leaves, and especially not on their axils.
- It is not advisable to remove root shoots, but if they hinder the growth of the bush, cut them off with a sharp blade and immediately dust with ash.
Orchid roots play a crucial role in the development and nutrition of the entire plant, so don't ignore any signs of trouble. Care for root shoots the same way you would the leaves, stems, and flowers. If any problems arise, immediately determine the cause and take the necessary measures to save the plant.