The Cora Louise peony is a popular variety, characterized by its attractive appearance and low maintenance. This perennial plant attracts gardeners with its large, vibrant flowers, which come in a variety of shades, from white to pink. It requires proper care to thrive and grow.
Who developed the variety and when?
Cora Louis was created by American breeder Anderson. The variety, first introduced in 1986, is an American selection. Over the years, the plant has won several prestigious awards, including the APS Gold Medal in 2006 and the APS Landscape Merit Award in 2009.
Description of the peony Cora Luis
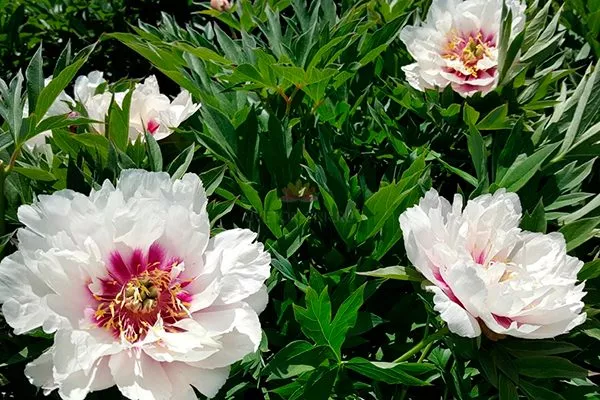
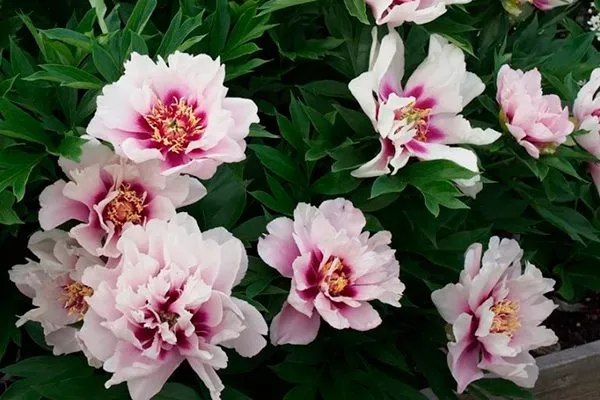
Reaches up to 1 m in height. Its strong and resilient shoots produce abundant dark green leaves that remain decorative until the first frost. In summer, the shrub is adorned with large semi-double flowers, reaching up to 25 cm in diameter.

The flowers have a varied coloring, including shades of white-cream, pale lilac, and white-pink. A lavender-violet pigment is present at the base, creating a bright accent in the center of the bud. Numerous yellow stamens are located in this area of the flower.
Timing and characteristics of flowering
It blooms in June. The bush is considered a mid-season variety. In a short period of time, it produces 10-20 buds. The blooming process is a profuse and lush affair. The aroma is subtle and delicate, with notes of sweetness, including honey-vanilla accords.
Use cases
Cora Louise easily combines with various garden crops, allowing you to create amazing flower arrangements both in summer cottages and parks.
Options for using culture in the landscape:
- The bushes are planted both individually and in groups.
- They are often used to decorate green lawns, mixborders, flower beds and borders.
- When mixed planting, the location is taken into account - the peony should not interfere with neighboring plants.
- Combines well with low-growing daisies, primroses, alchemilla and bergenia.
- It is possible to create floral arrangements among delphiniums, bells and foxgloves.
- Against the backdrop of evergreen conifers such as thuja, juniper and fir, the peony looks especially attractive during flowering.
- This hybrid is prized by landscape designers for its unusual coloring and low maintenance. It is often grown for cut flowers, as its fragrant flowers on long stems resist the weight of the buds. They remain fresh in a vase for 14-15 days.
Advantages and disadvantages
The plant's strengths include strong stems, allowing it to be grown without support. The flower stalks easily support the weight of abundant buds thanks to the robust stems. It is highly frost-resistant, withstanding temperatures down to -39°C.
With the right location, a peony can delight you with vibrant flowers for 20 years without requiring replanting, except for bush rejuvenation procedures.
How and when to plant?
The optimal time for planting is mid- to late September. Before planting, carefully inspect the roots, trim them slightly, and soak them in a weak solution of potassium permanganate.
Prepare the soil a year before planting. When digging, add organic fertilizer. A month before planting, dig the area again and add mineral fertilizer. Dig a hole measuring 60 x 60 x 60 cm. Line the bottom of the hole with a drainage layer and top it with potting soil.
Plant the seedling deep enough so that the buds are 3-4 cm below the soil surface. This is essential for successful future flowering. After planting, water thoroughly and cover with mulch.
Outdoor care
Care includes a number of standard procedures that, if followed, help the plant stay healthy and maintain its decorative appearance. Follow these procedures:
- Watering. It's not fussy about waterlogged soil, but regular watering is necessary. Its root system isn't very deep, so overwatering isn't necessary. It can tolerate short periods of drought, but avoid them during flowering and budding.
- Top dressing. Fertilize the plant thoroughly for the first 2-3 years after planting. If the hole was dug without fertilizer, this process is especially important. After the fourth year, more intensive feeding is required, given the rapid growth of flowers, stems, roots, and foliage.
- Mulching and loosening. Regular loosening of the soil throughout the growing season, removing weeds, maintains the plant's health. Mulch in the fall, covering the soil with compost or peat before the onset of frost. Remove the mulch in the spring.
- Pruning after flowering. To maintain the plant's decorative appearance, remove faded flower buds promptly, not leaving them on the stem. This helps conserve nutrients. Before winter, shorten shoots to 5-10 cm.
Following these care steps will ensure the necessary conditions for healthy growth and beautiful flowering.
Preparing for winter
When caring for ITO peonies, unlike herbaceous varieties, it is recommended to trim the stems only to the woody part. This is because this is the area where buds for the following year form. After pruning, water and fertilize the plant thoroughly.
Despite its winter hardiness, partial shelter is required in northern regions. This should be done when frost sets in. Cover the root zone with a layer of compost or humus at least 20-25 cm thick. For better insulation, cover the soil with pieces of cardboard.
In regions with insufficient snowfall, it is recommended to cover the bushes with spruce branches for additional protection from the cold.
Diseases and pests, methods of control
Cora Louise doesn't have high disease resistance, so careful cultivation practices and preventative measures are essential to avoid potential problems. Diseases and pests include:
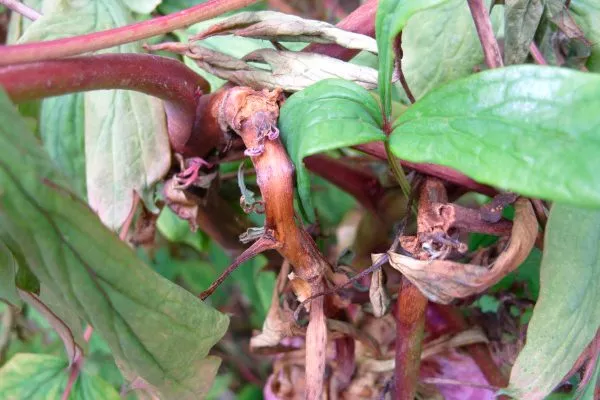
- Botrytis (gray rot). Affects various parts of the plant, often appearing in the spring when few stems are yet developed. It can also appear in the summer. A gray coating at the base and the formation of rot lead to brittleness and the fall of stems. Flower buds may wilt.
Avoid watering in cold weather, prevent overcrowding, and avoid overloading the soil with organic matter. Remove affected areas and treat with Bordeaux mixture, copper oxychloride, or Fundazol. Use Topaz or Hom, and replace the topsoil with fresh soil. - Root rot. It often appears in summer, when the bush begins to wilt. Affected roots become soft and emit an unpleasant odor. Destroy the affected bush and treat the soil with a fungicide.
- Rust. It is accompanied by the appearance of brown spots on the leaves, which, as the disease progresses, may curl and dry out. Timely fertilization with potassium-phosphorus preparations and pruning of the affected areas will save the plant.
- Ring mosaic of leaves. The formation of ring-shaped and semi-ring-shaped yellowish patterns between leaf veins are the main signs of the disease. Use sterile instruments for treatment.
- Bronze beetles. They pose a serious threat because they feed on the lush inflorescences, which can negatively impact the bush's ornamental appearance. These pests are most active in sunny weather, and on cloudy days they hide in the soil.
To control pests, use chemicals or collect them by hand and then destroy them. To prevent larvae, treat with Force or Regent. Avoid spraying pesticides during flowering.
Methods of reproduction
It is not recommended to propagate the Cora Louise hybrid by seed, as plants grown from seed lose the unique characteristics and traits of the mother plant. Instead, other methods are used to propagate the Itoh hybrid.
By dividing the rhizome
The best time to divide a peony rhizome is early fall or late spring, when the plant is dormant or actively recovering from winter. Step-by-step instructions:
- Prepare sharp and sterile gardening tools.
- Choose a mature bush that has been growing in the same place for several years and produces abundant flowers.
- Before starting the procedure, water the plant so that the soil around it is moist.
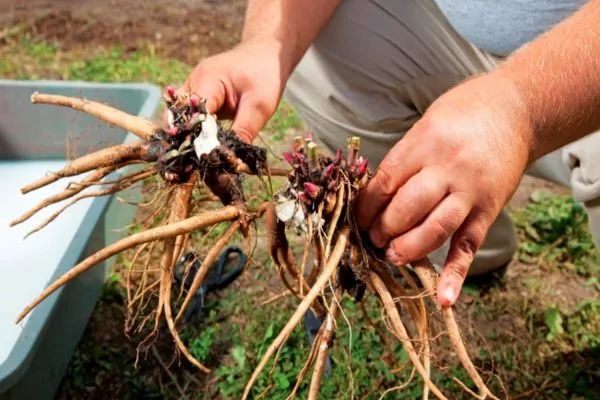
- Carefully dig up the rhizome, being careful not to damage it.
- Clean the rhizome of soil and carefully separate it from the ground. Carefully inspect it for damage or disease.
- Divide the pods into sections so that each section contains at least one bud. Use a sharp knife or shovel for this.
- After dividing, treat the cuts with charcoal or antiseptic to prevent infection.
- Plant each section in prepared planting holes in open ground. Make sure the buds are located at a depth of 3-5 cm.
Water the planted sections and surrounding soil thoroughly.
Stem cuttings
Begin preparing planting material in midsummer. Once the flowers have finished blooming, follow these instructions:
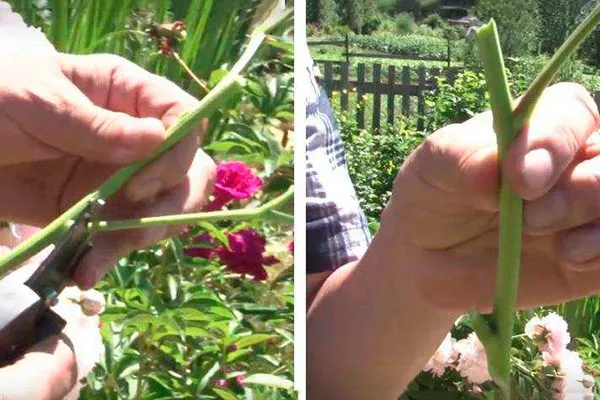
- From the center of the bush, select a strong shoot with an undeveloped pea-shaped bud.
- Shorten the selected shoot, cut off the leaf blades by 2/3.
- Make a diagonal cut at the bottom and powder it with a rooting stimulator, such as Kornevin.
- Plant the prepared cutting at an angle in a pot with nutrient substrate.
- Cover with a glass jar or cut-off plastic bottle to create a greenhouse effect.
Tips and recommendations for growing
When choosing a site, it's preferable to choose areas where other peonies or perennials haven't been grown before, as they can deplete the soil. If no other options are available, use fertile soil to fill the planting hole.
Helpful tips:
- To improve survival, fill the planting hole with a soil mixture supplemented with autumn fertilizer (primarily potassium and phosphorus) and limestone powder. Add 200 g of each component to a hole 45 cm deep.
- Before planting, soak the roots in a weak solution of potassium permanganate for 30 minutes.
- To prevent root rot, fungal, and bacterial infections, use biofertilizers based on soil bacteria. They promote strengthening.
- The optimal method for applying fertilizer is to place it in a furrow equal to the diameter of the crown. After this, it's important to water thoroughly.
- To prevent diseases in the spring, when the soil begins to thaw, sprinkle the center of the bush with ash.
- For the first spring fertilizing, use Kemira. Apply it after most of the snow has melted. Apply 60-80 g per square meter.
- It's not recommended to propagate flowers that haven't yet bloomed. Even if a plant is 3-4 years old, it's not suitable for propagation.
Peonies can brighten up any garden. Cora Louise is particularly attractive with its lush buds, pleasant fragrance, and decorative foliage.
Reviews of the Cora Louise peony
The Cora Louise peony is easy to maintain and blooms reliably with proper care. This variety boasts many positive qualities, making it popular with both novice and experienced gardeners. Adherence to proper cultivation practices helps grow a plant with a strong immune system.