Propagating hydrangeas is not only a fun process but also a rewarding one, as you can get numerous seedlings for free and decorate your garden with beautiful, spherical blooms. Hydrangeas are considered a versatile plant when it comes to propagation, as there are many methods available.
Hydrangea cuttings – general rules
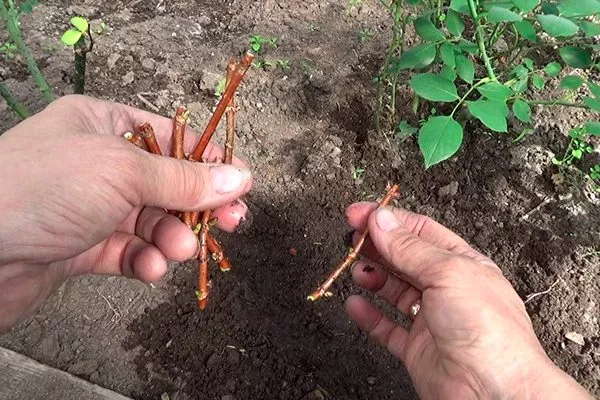
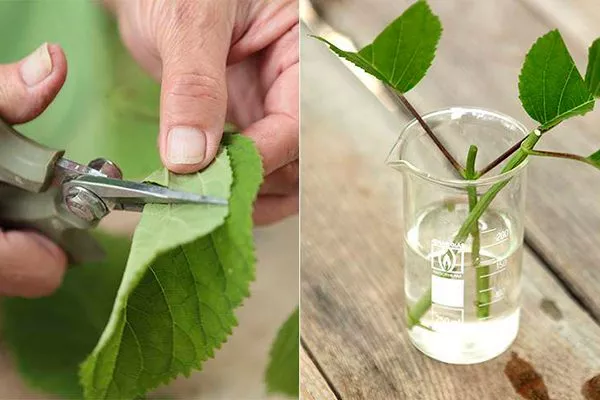
First, you need to select cuttings. They should be taken from a completely healthy bush. The optimal length is 10 to 15 cm, depending on the planting time and, most importantly, the hydrangea variety. Low-growing plants require the shortest length, while taller plants require the longest.
- ✓ Cuttings should be taken from bushes that have not been exposed to stressful conditions (drought, waterlogging, disease) during the last year.
- ✓ The optimal cutting diameter is 5-7 mm, which ensures a balance between stability and rooting ability.
What are the rules for preparing cuttings:
- young one-year-old branches - green or semi-woody - are suitable for cuttings;
- maximum age of a bush is 9 years;
- the presence of at least 2 green leaves is required;
- shoots are taken from the sides, and not from the middle of the bush;
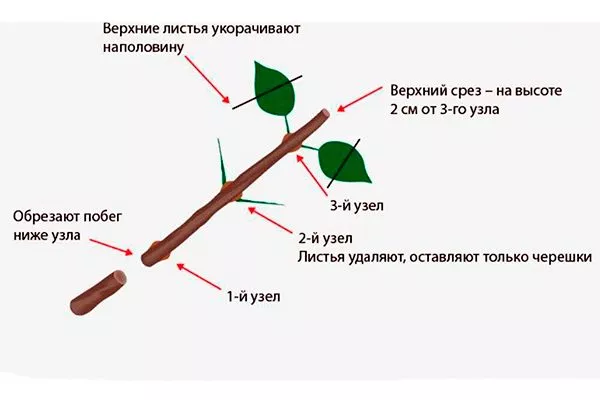
- the cut must be made exclusively at an angle from below and straight from above, for which sharp and disinfected garden tools are used;
- It is advisable to cut 1-2 cm below the location of the node;
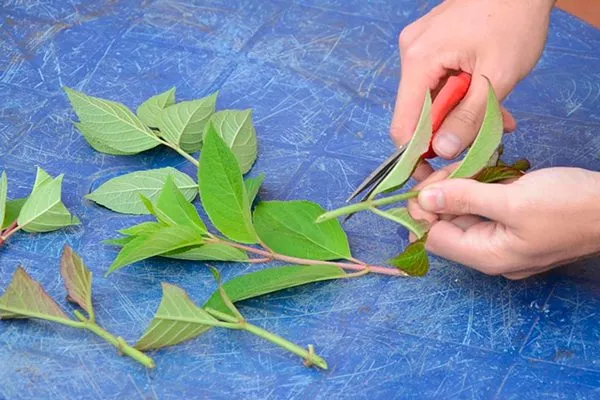
- the lower leaves are removed from the shoots to the middle, and the upper ones are shortened to half the length of the leaf;
- It is best to cut the cuttings on the day of planting and immediately place them with the lower cut in water until rooting begins;
- If the planting time is delayed, then the cut shoots must be completely immersed in water, but the maximum duration of such storage is 3-4 days;
- The shoots that take root best are those that have small leaves but already large buds;
- if there are buds, which usually happens in summer and autumn, the inflorescences must be removed;
- the cuts must be cauterized with brilliant green or powdered with wood ash/activated carbon;
- To speed up the rooting process, root-forming stimulants are used - Epin Extra, Heteroauxin, Kornevin, etc.
When is the best time to propagate hydrangea by cuttings?
Cuttings are the most popular and sought-after method among all gardeners. This method is used in all seasons except winter. Each season has its own characteristics and nuances that are important to understand.
| Name | Cutting period | Optimum temperature for rooting | Recommended substrate |
|---|---|---|---|
| Propagation of hydrangea by summer cuttings | June 10 – July 15 | +20…+25°C | Peat + sand |
| Propagation of hydrangea by spring cuttings | Before the sap starts to flow | +15…+20°C | Peat + sand |
| Autumn cuttings | 1-2 weeks before the cold snap | +10…+15°C | Peat + sand |
Propagation of hydrangea by summer cuttings
Summer is the most convenient time to propagate hydrangeas by cuttings—the shoots will have time to root, so they can be transplanted into the ground as early as fall. However, during this period, hot weather causes too much moisture to evaporate, so the work should be done quickly, with more frequent waterings and water changes.
Features of summer cuttings:
- the optimal period is from June 10 to July 15;
- the best time is morning, the weather is cloudy;
- in summer, you can root directly in the garden, not in a container;
- the rooting site should be located in the shade or partial shade, but so that the air temperature is not higher than +25 degrees;
- In summer it is important not only to water the soil, but also to spray the cuttings;
- Young shoots need to be covered for the winter.
Propagation of hydrangea by spring cuttings
Spring is another preferred time for propagating hydrangeas by cuttings. However, keep in mind that scheduled pruning should be done before the sap begins to flow, and it's important to use cuttings only at the beginning of the sap flow—when the buds begin to swell. Therefore, when shaping the bush, you'll need to leave the shoots you'll use for cuttings intact.
Features of spring reproduction:
- tree-like hydrangeas are propagated first by cuttings, followed by paniculate hydrangeas, because their awakening periods are different;
- For tree hydrangeas, shortening to a ring is not performed, since at least 3 lower nodes must be formed for the growth of new branches;
- for paniculate varieties, the shoot is cut by 1/3;
- In spring, cuttings can be rooted in a greenhouse, but monitor ventilation and humidity levels;
- the place in the greenhouse should be extremely sunny;
- Transplantation to a permanent location is carried out in the fall, since the cuttings already grow into a full-fledged seedling.
As in the previous case, shelter for the winter is required.
Autumn cuttings
Winter-hardy varieties of large-leaved hydrangea are most often propagated by cuttings in the fall. The optimal time is 1-2 weeks before cold weather sets in. This allows the bushes from which the cuttings were taken to recover before winter.
Other features:
- the formation of cuttings is carried out as in summer cuttings;
- rooting is carried out only in indoor conditions;
- cuttings are transplanted to a permanent location in the spring;
- the rooting place is a cool room or windowsill, since excessively rapid growth of roots and green mass should not be allowed;
- You should not water the cuttings frequently, only as the soil in the upper layers dries out (that is, you can allow the surface of the substrate to dry out - this is unacceptable for summer and spring cuttings);
- Before spring planting, hardening of seedlings is carried out - the containers need to be placed outside.
Options for growing cuttings
After the preparatory work, the cuttings are sent for rooting, but this doesn't always apply to summer cuttings. However, for rooting in the garden, a substrate designed to create favorable conditions should be placed in the hole. Cuttings are germinated in two ways: in the substrate or in water.
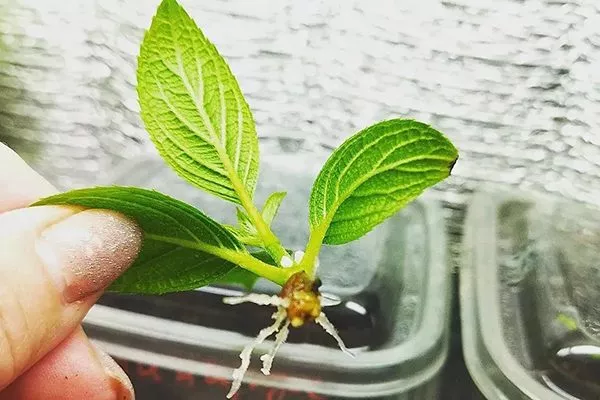
In the water
This is the most cost-effective and simplified option for rooting hydrangeas, as all you need is a container and water. Roots grow quickly, as the water promotes this, and adding a growth stimulant will speed up the process even more. Other advantages:
- you can see how long the roots have reached and how they are developing in general;
- light penetrates through glass or plastic, which stimulates development;
- The root length of 4 cm is achieved in just 20 days.
- ✓ Water should be at room temperature and changed every 2-3 days to prevent the development of pathogens.
- ✓ Adding 1 tablet of activated carbon per 500 ml of water reduces the risk of cuttings rotting.
But the method also has its drawbacks:
- there is no root breathing;
- the lower part of the cutting is easily susceptible to rotting;
- nutrients are not supplied.
Despite this, if you approach the procedure responsibly, you can get healthy hydrangea seedlings. How to germinate roots in water – step-by-step instructions:
- Take a clean container – a glass, a cut plastic bottle, a jar, etc.
- Pour settled water at room temperature into the container.
- To protect the plant from rotting and the water from pathogenic microorganisms, add 1 tablet of powdered activated carbon to the liquid.
- To saturate the shoots with nutrients, treat them with any rooting agent. Alternatively, add a small amount of succinic acid to the water.
- Place the cutting in water so that the liquid reaches half the length of the shoot.
- Cover the cutting with plastic wrap and place it in a warm, bright place.
- When the first roots appear, remove the covering.
- As the plant takes root, add water periodically as it evaporates.
In the ground
This method is subdivided into different types depending on the substrate used. Most often, gardeners use a mixture of peat and sand. It has the following advantages:
- budget-friendly compared to other substrates;
- excellent breathability;
- drainage of the composition;
- uniform distribution of water during irrigation;
- availability of nutrients for the plant.
There's one drawback: peat is highly acidic, but for hydrangeas, which prefer highly acidic soil, this isn't a problem. The key is to add sand to it in the right concentration.
There are other types of substrates, such as vermiculite, hydroponics, and the like. They offer many advantages, but they also have disadvantages, such as the high cost.
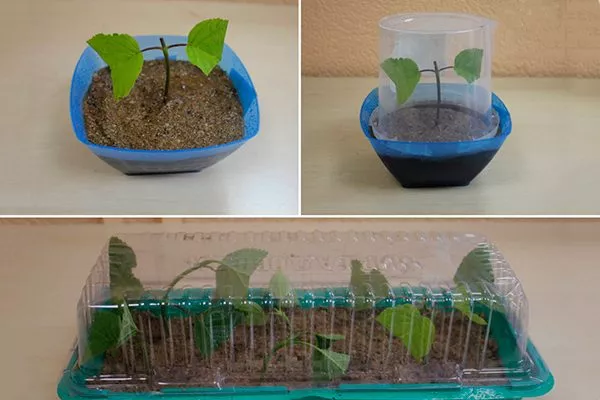
How to germinate cuttings in a substrate of sand and peat:
- Make a mixture. To do this, take 2 parts high-moor peat and 1 part coarse sand.
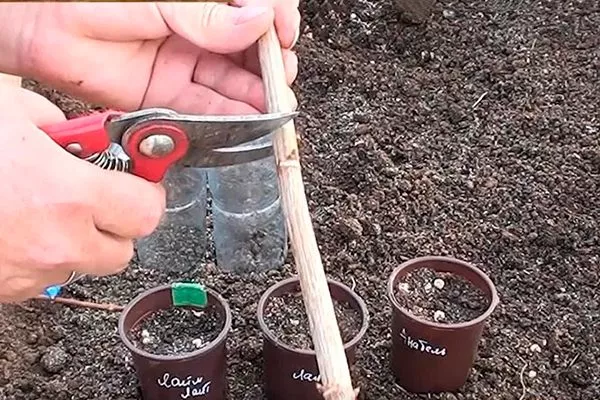
- Pour the substrate into the containers.
- Moisturize thoroughly.
- Sprinkle with a 2 cm layer of pre-moistened sand.
- Place the cuttings at a depth of about 3 cm and a distance of at least 5 cm.
- Cover with a transparent cap or regular polyethylene, or a plastic bottle.
- Place the container or pot in a warm place.
Water and ventilate periodically, and after 2 weeks, remove the cover completely.
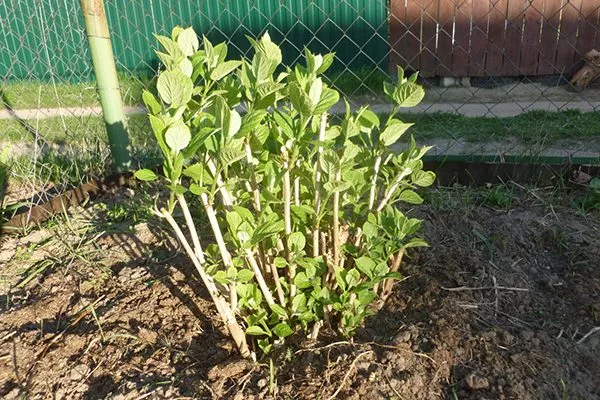
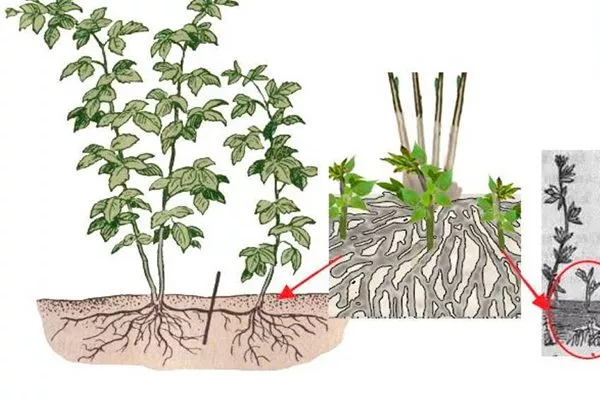
Propagation by shoots
The suckers appear primarily in tree-like hydrangea varieties, growing between shoots on all sides and within the bush. They are much lower than the mature trunks.
The process of reproduction is quite simple:
- In the spring, when full-fledged leaves have appeared on the shoots, select young shoots for yourself.
- Carefully dig up the sucker shoot, being careful not to damage the mother plant or the shared root system.
- Inspect the shoots. If the roots are intact and well-developed, plant them immediately in their permanent location. If not, bury them in a container with growing medium or in a greenhouse for further growth.
- Water generously and mulch. Use straw, manure, or sawdust.
Dividing the bush
This technique is best used when replanting hydrangeas to avoid unnecessary trauma to the plant. Tree-like and large-leaved varieties are best suited for dividing the bush. The procedure is performed in spring, summer, or fall.
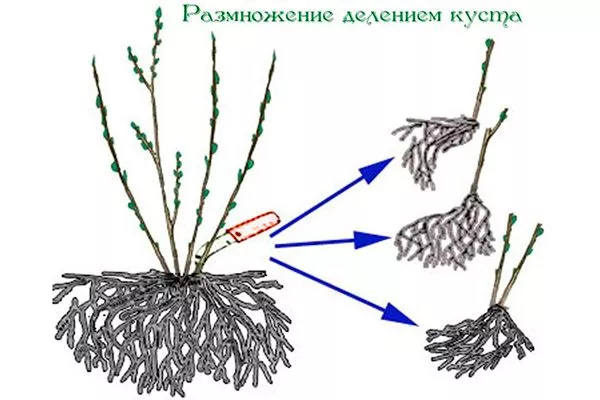
The process of reproduction is as follows:
- Choose a healthy bush that has not been diseased in the previous year.
- Prepare the planting site immediately. To do this, dig a hole about 50 cm deep and prepare a suitable substrate: add 2 parts garden soil, 1 part compost, and 1 part sand and peat moss to 2 parts compost. Mix well.
- Water the mother plant. Use at least 15 liters of water, as the soil must be well-moistened.
- Wait until the water is completely absorbed, and then remove the bush.
- Inspect it and divide it into several sections. Each section should contain shoots with growing points and roots.
- Straighten the roots on the divisions (they usually get tangled up).
- Plant all the parts in the planting holes. Keep in mind that when propagating, it's best to leave the root collar 2 cm above the soil level.
- Fill with prepared substrate.
- Water generously and be sure to mulch.
How to propagate a hydrangea bush by layering?
This is an excellent option for many hydrangea varieties whose shoots bend easily. Therefore, this method is not suitable for paniculate varieties. The optimal time for this procedure is from April to early June, to ensure proper rooting by fall.
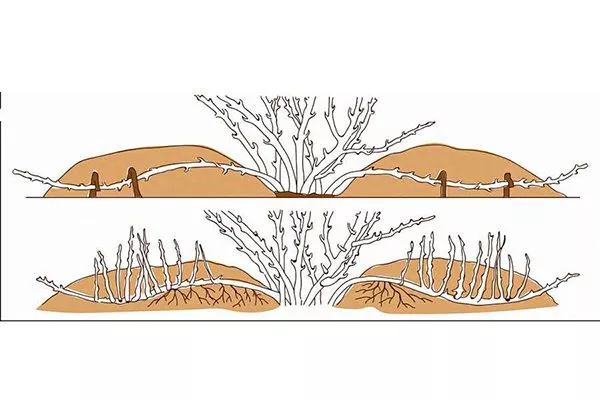
The event looks like this:
- Loosen the soil around the bush.
- Select branches growing from the side from which the cuttings will be obtained.
- Around these shoots, form grooves about 3-4 cm deep. The length should be equal to the height of the branch.
- Make cuts on the shoots near the buds with a sharp, disinfected knife on the side that will face the sky after bending. Don't forget to remove any foliage from these areas.
- Bend the stems down to the soil surface along the furrow and insert them into it.
- Pin with garden staples and fill with soil.
- Water it.
- In the fall, separate the cuttings that formed over the summer and bury them together under a thin layer of soil. Then, insulate them for the winter, and in the spring, transplant them to their permanent location.
How to propagate hydrangea by budding?
Another name for this technique is propagation by green shoots. The optimal time is from early July to mid-August, but it can also be done in the spring during sanitary pruning. However, in this case, the cut branches should be placed in a container with water and growth stimulant and waited until new shoots form.
The event looks like this:
- Determine the location of the shoots. Each should have three pairs of leaves.
- Cut them with a knife at a 45 degree angle.
- Remove the lower leaves and shorten the remaining ones by 2/3.
- Place the bottom side down in the growth stimulator and keep it there for 10-12 hours.
- Remove from the solution and let dry slightly (1-2 hours).
- Prepare a substrate from equal parts peat, soil and sand.
- Pour it into a glass and set the increment.
- Cover with a transparent cap.
Rooting takes 30-45 days. After the root system has developed, the finished cuttings are placed in a cool room and transplanted to their permanent location in the spring.
Offspring
Sometimes shoots called suckers appear near the bush. This is typical for arborescent and large-leaved hydrangeas. Suckers emerge from strongly overgrown root shoots.
Propagate as follows:
- Prepare planting holes in advance as for propagation by layering.
- Remove a few centimeters of soil around the shoot, which will allow you to examine the roots and separate the shoot.
- Using a knife or spatula, separate the shoot from the roots of the mother bush.
- Untangle the roots and transplant to a new location.
Accelerated reproduction
This method is useful when you need to quickly obtain a large number of seedlings. Typically, bushes that have bloomed at least once are used. They can be removed from the ground or purchased in a pot at a flower shop. This procedure is suitable for autumn propagation.
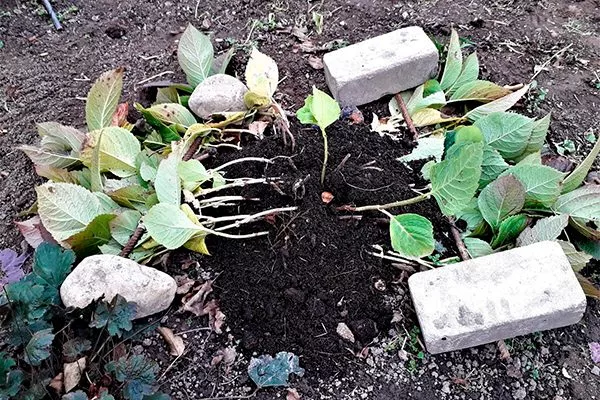
Next, proceed according to the following scheme:
- If the bush is in a pot, remove it from there.
- Dig a large planting hole (the size of the entire bush).
- Place the bush and cover it with soil.
- Lay out all the branches and cover them with soil. Make sure the shoots are spaced apart and don't touch each other.
- Water generously.
- Cover for winter.
- In spring, dig up the bush and carefully remove it.
On each shoot, you'll find numerous ready-made cuttings with normally formed root systems. All that's left to do is divide them into sections and plant them in their permanent locations.
Propagation by seeds
Growers rarely use seed to propagate hydrangeas. The main reason is that the entire process takes at least a year. Furthermore, it's not always possible to preserve the parent plant's characteristics, but it is possible to create a new variety. Therefore, it's worth trying for the sake of experimentation.
How to propagate by seeds:
- Buy seeds or collect them from your own flowers.
- Select the most suitable ones - not overdried, not empty, without signs of rot or mold.
- Find containers with sides at least 20 cm high.
- Place drainage material at the bottom of the containers, then add the prepared substrate. Its composition is as follows: 4 parts leaf mold, 1 part sand, and 2 parts peat.
- Spray thoroughly with water and allow it to soak in completely.
- Place the seeds so that the distance between them is at least 1-1.5 cm.
- Sprinkle sand on top and spray again.
- Cover with glass or plastic wrap.
- Place the container in a warm room.
- Until seedlings emerge, remove the covering daily for 10-15 minutes to allow air to air out, and water periodically with a spray bottle. Use warm, settled water.
- After about 15 days, when the sprouts appear, remove the covering completely. Continue standard seedling care, including watering and loosening the soil.
- When 2 true leaves are formed, transplant them into separate containers.
- When the bushes reach a height of 30 cm, transplant them to a permanent location.
Propagating hydrangeas is easy, and even fun. You can try several different methods to determine the one that works best for you. It's important to strictly follow all recommendations from specialists and experienced gardeners to ensure quick and successful rooting.