Numerous methods have been developed for propagating violets. Each has its own characteristics, subtleties, and nuances. Since this plant is considered very capricious, it's important to strictly adhere to established requirements, select the right containers and planting material, and undertake preparatory work.
Necessary conditions for the propagation of violets
The violet, or Saintpaulia (indoor Saintpaulia), is demanding when it comes to growing conditions and especially transplanting, so keep these important points in mind:
- Breeding time. Violets can be planted year-round, thanks to the ease of use of artificial lighting, heating devices, and other modern conveniences. However, experienced specialists still recommend propagating Saintpaulias during the active growing season, that is, in the spring and summer.
In autumn, plants prepare for hibernation, and in winter they simply rest, which is why the growth and development of the root system slows down. This means that rooting will take a long time. - The level of humidity in the room. Violets are sensitive to air humidity, as their stems and leaves are sensitive. Optimal humidity levels are between 50 and 60%.
- Temperature indicators. For intensive root formation, a temperature of 25 to 28 degrees is required; otherwise, the process slows down or stops altogether.
- Type of soil for propagation. Inexperienced gardeners are advised to purchase universal substrates from specialized stores. However, if you're confident in successfully preparing your own potting mix, do it yourself. The key requirements are loose, breathable soil, and a slightly acidic pH.
Charcoal and turf soil (to maintain the required humidity), sphagnum, etc. are added without fail. Homemade substrate options:- 2 parts leaf humus, 1 part perlite (can be replaced with vermiculite or sand), peat, plus 1/3 part charcoal;
- 1 part turf soil, 2 parts peat, 1 part loosening material (sand, perlite, etc.), 1/2 part coal;
- 4 parts soil mixed half and half with peat, 2 parts sphagnum moss, 1 part sand, 1/3 part violet store-bought substrate, the same amount of charcoal;
- 4 parts leaf humus, 2 parts coniferous humus, 2 parts each of peat and sphagnum moss, the same amount of turf soil, 1 part sand.
Depending on the acidity level, dolomite flour, lime, etc. are added to the composition.
- Container for landing. The container is selected to ensure the plant feels comfortable, but most importantly, to ensure the root system has enough room to grow. At the same time, containers that are too large are also unacceptable, as this will cause the substrate to compact and become sour in the empty spaces. The average pot/cup size is 4 to 6 cm in diameter.
- ✓ Optimum temperature for rooting: 25-28°C.
- ✓ Air humidity level: 50-60%.
- ✓ Using activated carbon in water for rooting leaves prevents rot.
Methods of reproduction
Regardless of the propagation method, violets can vary in age. However, experts advise against using plants that are too young (the mother plant will have difficulty with such propagation) or too old (they lack sufficient nutrients, which will delay rooting).
Leaf
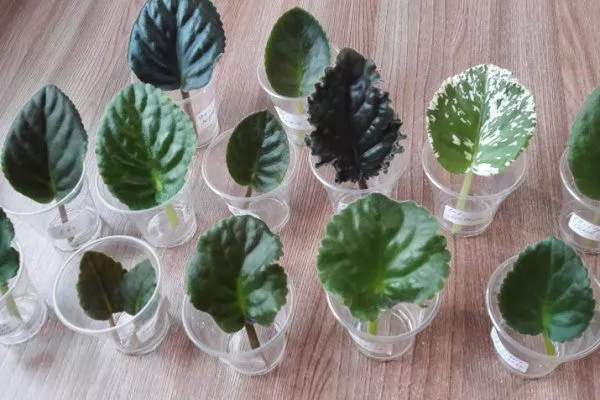
The most popular method due to its ease and simplicity. Planting for rooting is done in two ways: in water or in substrate. What leaves are needed:
- mainly from the 3rd or 2nd tier of the plant - they are the most nutritious, so you get a lot of babies;
- young ones from the top - quickly take root, but the mother bush suffers;
- old ones from the lower part of the plant - the chances of rooting are 50%, so it is better to refuse such planting material;
- quality – juiciness, rich green color, density.
- ✓ The leaf should be from the 2nd or 3rd tier – they are the most nutritious.
- ✓ Rich green color and leaf density are signs of health.
Please note the leaf pruning requirements:
- use a scalpel (can be replaced with a blade or a very thin knife);
- shorten the stem to ensure leaf stability (leave 1.5 to 2 cm)
- cutting angle – 45 degrees.
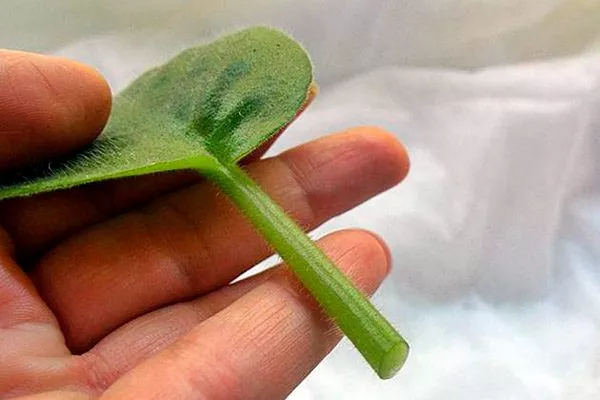
Before rooting, leave the planting material in the room for 30-60 minutes – this will allow it to dry slightly and a protective film to form over the cut. It is believed that rooting violet leaves in a substrate is easier – it reduces the risk of rot, and there is no need to transplant the seedlings from water to soil.
How to propagate Saintpaulia in soil – step-by-step instructions:
- Prepare a container. Poke several holes in the bottom of a glass to drain excess liquid (you can buy ready-made plastic cups at a gardening store).
- Prepare the substrate and moisten it with a spray bottle, but not too much. If you decide to use peat pellets, soak them according to the instructions.
- Place the soil mixture into the pots.
- Cut off the leaves.
- Make a small depression in the soil in the central part of the container with a stick or your finger, approximately 0.8-0.10 cm deep.
- Insert a leaf with a stem into the soil.
- Sprinkle with soil and press lightly. This will provide additional stability.
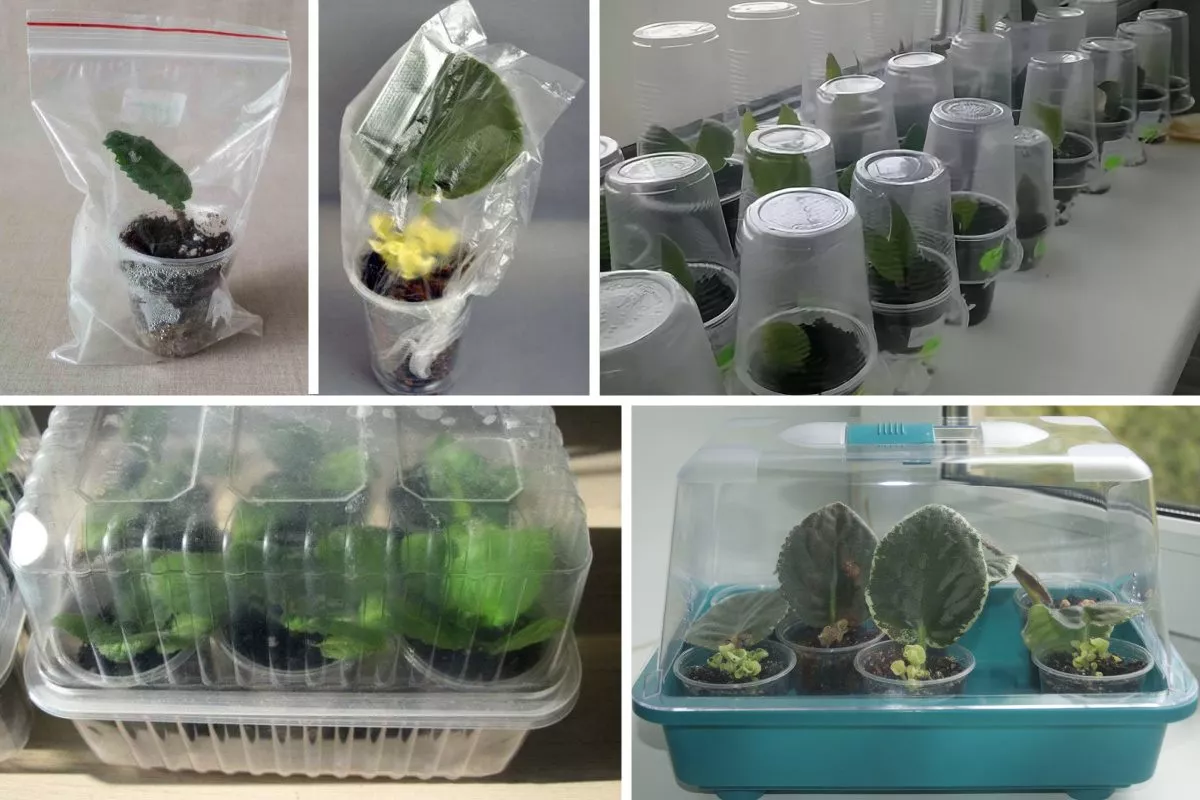
- Place the pots in a greenhouse, if available. If not, simply cover them with a plastic bag, making sure it doesn't touch the violet's foliage.
- Leave it there for a period of 30 to 60 days (the period depends on various factors - the conditions created, the age of the mother bush, etc.).
Ventilate the plantings daily, otherwise the leaves will simply rot. Moisten the soil mixture to prevent a dry crust from forming on the surface. Transplant to a permanent pot when three true leaves have formed. To avoid this, plant the leaves directly in peat pots.
Learn about leaf selection and rooting techniques in the following video:
Watch this video to learn how to properly treat cuts and plant leaf cuttings:
Planting leaves in a glass of water is also common. This eliminates the need to prepare the substrate immediately, which is especially helpful if you're short on time or the cuttings accidentally break.
How to root in water:
- Prepare plastic cups, vials, etc. Keep in mind that the best option is a dark-colored container with a narrow neck, which will allow the seedling to maintain balance.
- Boil the water and let it cool. Pour it into a glass. Grind one tablet of activated charcoal into a powder and dissolve it thoroughly in the water.
- Insert the leaf into the container so that the short stem is in the liquid and the leaf itself is exposed to air.
- Move the plantings to a warm place (the kitchen is the best solution).
The first roots will appear in 1-2 weeks (the warmer the room, the faster). Formed roots can be detected 3-4 weeks after planting. This is the time to repot. Monitor the water level—it should cover the stem throughout the rooting period.
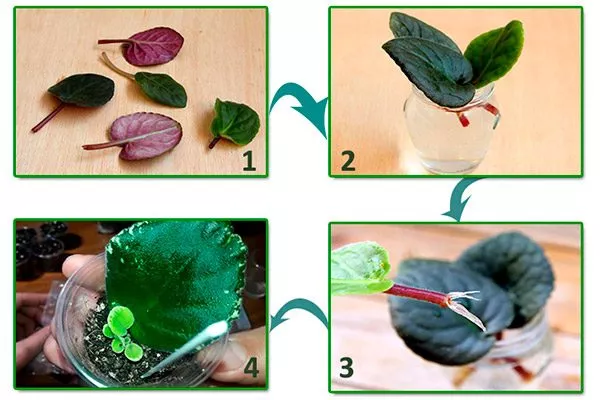
Repotting a seedling is simple: prepare a pot with the substrate, plant it in the standard way (as with leaf propagation in soil), but make the hole appropriate for the size of the roots. That's the whole process!
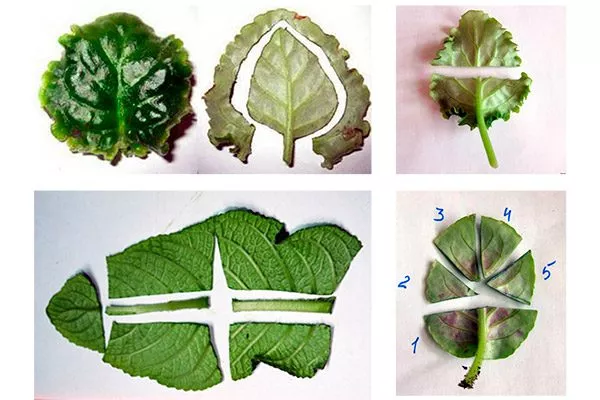
Leaf fragments
This is a profitable method in terms of increasing the number of offspring. The key is to cut the planting material correctly. There's just one rule: each element must have a vein, from which the roots will form.
A selection of photos of leaf cutting options:
Other nuances:
- planting is carried out only in substrate;
- there should be an edge with a vein in the soil;
- the sheet must be cut with a blade;
- the apical leaves take root the fastest;
- After cutting, allow time for the cuts to dry;
- treat these areas with crushed activated carbon;
- compact the soil mixture around the leaf fragment thoroughly – the contact should be tight;
- cover with plastic wrap;
- transplant to a permanent location when 3 leaves form.
To learn how to propagate using leaf fragments, watch the video below:
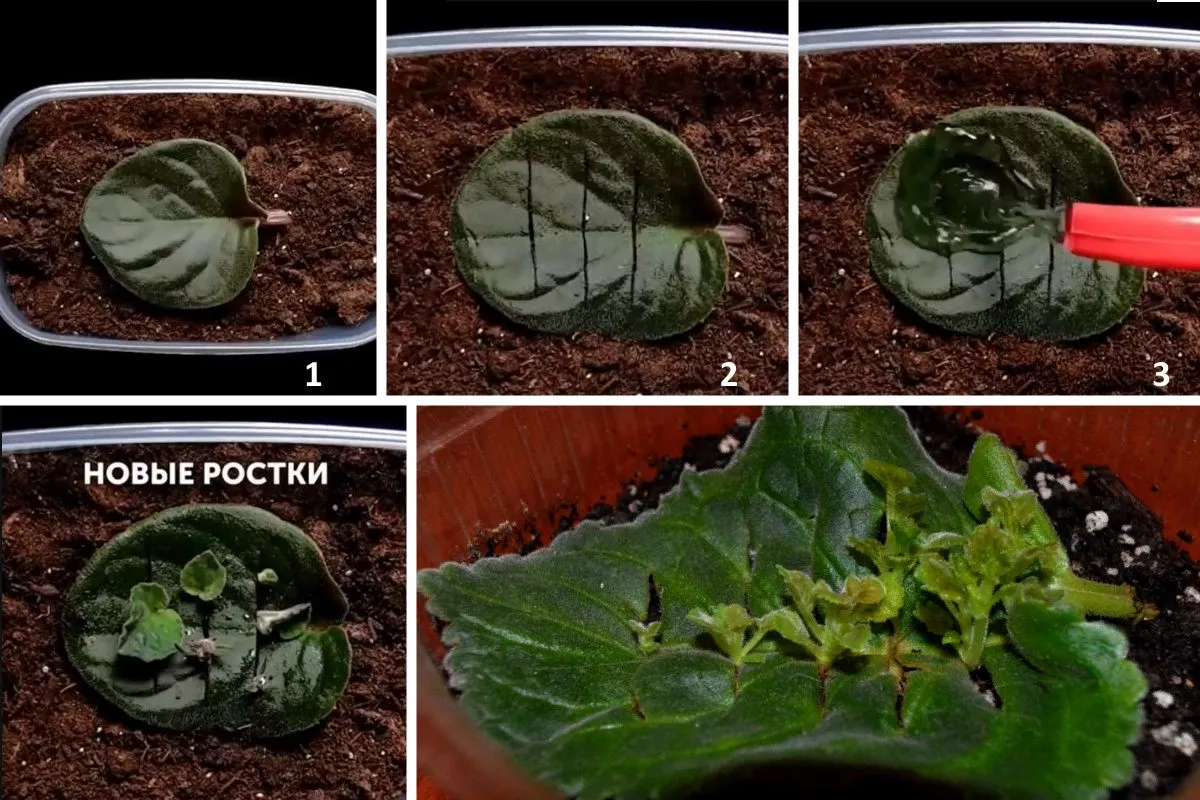
There is another unusual way to propagate violets:
- Cut off a large, healthy violet leaf. Place it on the prepared soil.
- Make cuts on the sheet (the gap should be wide, about two centimeters).
- Water it.
After a while, stepsons will appear on the leaf, which can be carefully separated and transplanted into pots.
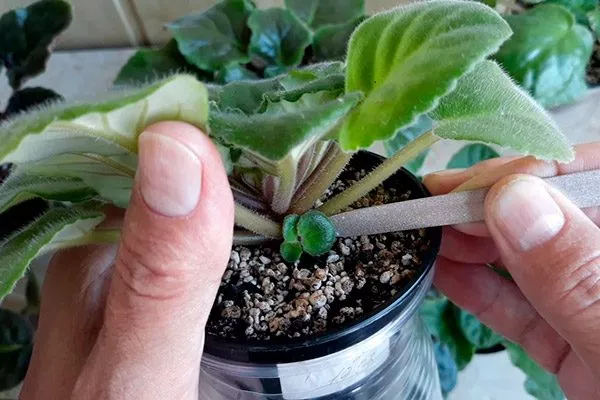
Stepchildren
If a violet is grown in a container that's too large, it will produce numerous side shoots. If not, you can encourage them to form by pinching off a growing point on the violet. This propagation method is advantageous because it fully preserves the varietal characteristics and, most importantly, the flower color, something that's impossible with other methods.
For side-sonning, select shoots that already have about 5 leaves (+/- 1 leaf). Then proceed as follows:
- Select the healthiest shoot with leaves.
- Carefully cut it at a 45 degree angle.

- Prepare the soil mixture in a pot (a permanent one, since there is no need to replant the flower).
- Make a hole in the middle, 1-2 cm in size and depth.
- Insert the stepson, sprinkle with soil on all sides, and compact it.
- Provide warmth – place in a greenhouse, cover with plastic film or a plastic container, a cut bottle, etc.
Watch the video below to see how experienced gardeners prune violets:
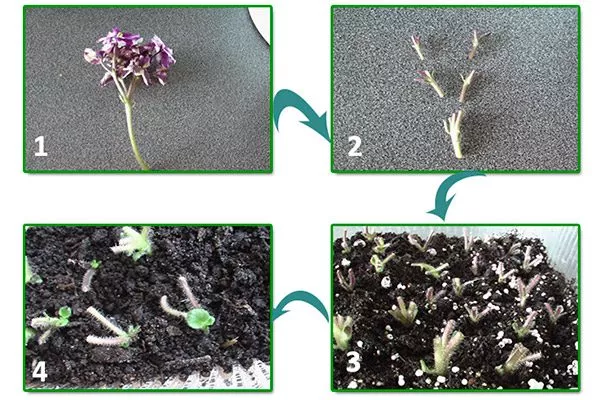
Peduncles
Flower stalks are also used for propagation, especially if other methods are unsuitable or undesirable for the grower. There are several important considerations:
- planting should be carried out only in prepared substrate, not water;
- the flower stalk must be healthy, without signs of disease or rot;
- you can cut into pieces at a right angle;
- Use sphagnum moss or potting soil as a substrate.
Step-by-step instructions for rooting a flower stalk:
- Cut it from the bush. Choose a fragment that already has large stipules.
- Cut the flower stalk into pieces, leaving about 2 mm to the base on each.
- Plant the base in the soil mixture.
- Move the pot to a warm place or cover with plastic.
To get a visual idea of the event, watch the following video:
Seeds
This method is considered complex and time-consuming, but it offers the chance to grow a completely new violet variety, making it the most commonly used method by breeders. Keep in mind that seed propagation does not preserve varietal characteristics. If you encounter such offers (for the sale of seeds of a particular variety) online, decline the offer.
What you need to do to get seeds:
- Select a pair of "parents" with male and female flowers.
- Pollinate by hand. To do this, collect the hard pollen and apply it to the pistils with a brush. Pollinate about 3-4 flowers at a time to increase the chances of seed pods forming.
- Once the capsule has formed, break it open over a sheet of paper and remove the seedlings. It's easy to tell when the seeds are ready to harvest—the capsules turn yellow and dry.
- Leave the seeds for 2-3 days at room temperature.
The planting process is as follows:
- Prepare the substrate and the common container. Place vermiculite or perlite on the bottom and the potting mix on top. Moisten.
- Scatter the seeds over the soil surface and lightly cover with soil. Alternatively, make shallow furrows (2-3 mm deep) and plant the seeds by hand.
- Spray with warm water from a spray bottle.
- Cover with plastic wrap or glass.
- Place in a warm room or greenhouse.
- When the sprouts grow to 5 mm in diameter, transplant them into permanent pots.
Also watch a useful video about seed propagation:
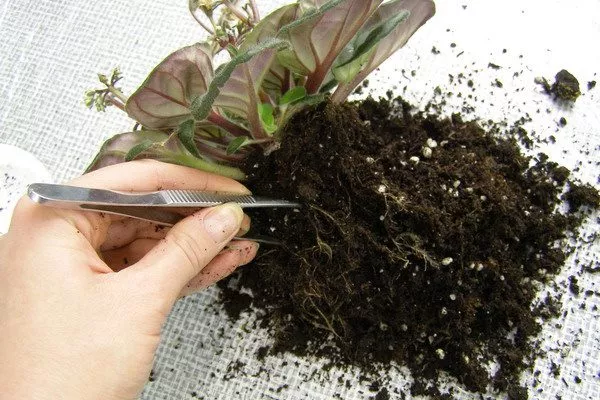
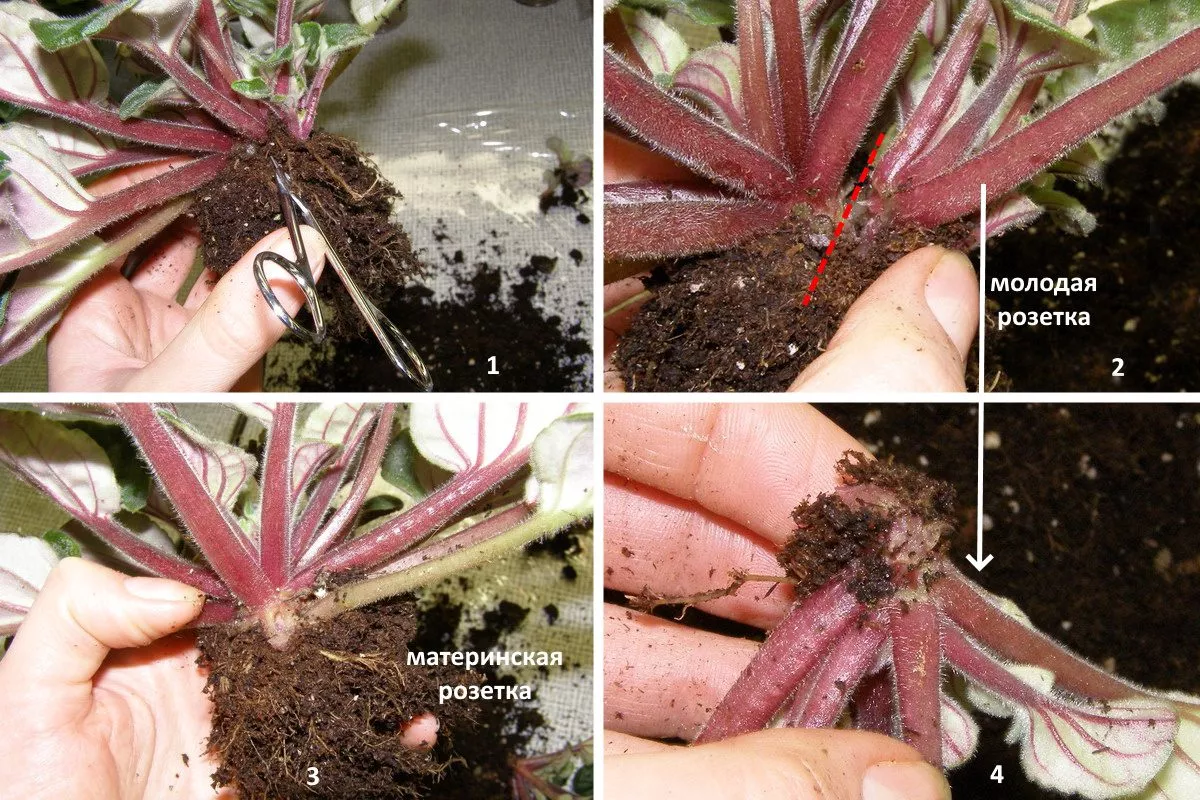
Rosette (dividing the bush)
Rosettes refer to basal formations, or pups. To ensure the mother plant can easily recover its strength, propagate only in early summer (throughout June). Only mature, dense violets with visible young rosettes with growing points are suitable for this propagation method.
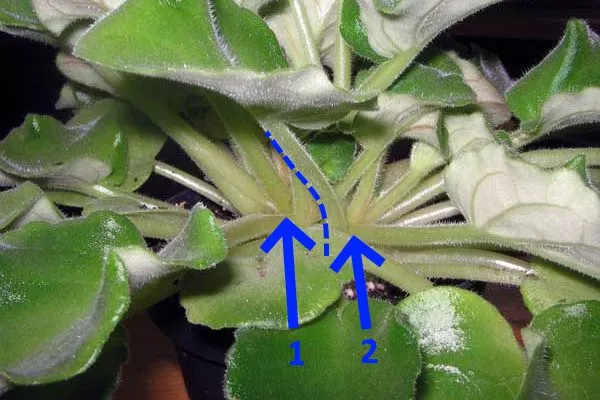
How to do it right:
- Water the plant 2-3 days before the procedure.
- Tilt the pot to the side and dump its contents onto a flat surface. Shake gently to remove the flower and its soil.
- Crumble the root ball, leaving it intact around the main roots.
- Use manicure scissors to separate the young rosette from the mother bush.
- Remove flower stalks (if any) and excess leaves.
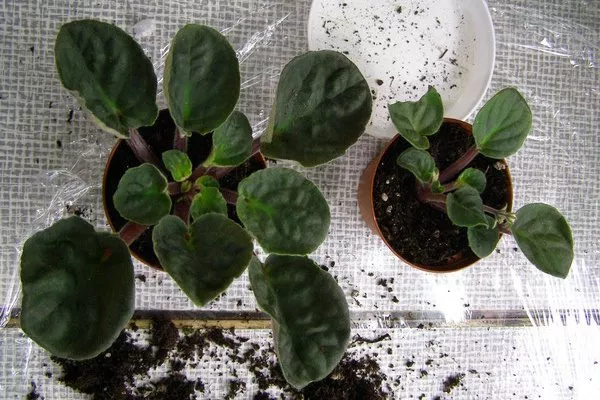
- Plant the mother bush and the separated young rosette in the standard way in new containers.
- Water the bushes.
Rules for caring for young sprouts
Regardless of the method used to propagate and plant such a delicate and sensitive plant as the indoor Saintpaulia, care procedures are combined into general requirements and rules:
- Moisturizing. Watering should be generous, as moisture is essential for rapid root growth. However, keep in mind that frequent soil spraying should only be done during the first 10-14 days; after that, the frequency and amount of watering should be reduced by half. Otherwise, rotting will occur.
Watering features:- the water must be settled and at room temperature;
- the best way to moisten is with a tray (to do this, place a tray under the pot, pour water into it and keep the flower there for exactly 60 minutes);
- if there is no tray, spray the soil (not young shoots) from a spray bottle;
- The water requirement is determined simply: the substrate must remain loose and moist (waterlogging and dry soil crust are unacceptable).
- Fertilization. During the first two weeks, seedlings with already formed leaves don't need to be fed. After that, apply a complete violet fertilizer once every ten days, but at half the recommended dosage for mature plants.
- Measures to protect against diseases and insects. Even in infancy, violets have a strong immune system, but despite this, it is important to strictly adhere to agricultural requirements:
- do not allow overwatering - this is the main reason for the development of all diseases of Saintpaulias;
- do not dry out the air too much, as this will encourage spider mites to appear;
- For prevention, treat with insecticides and fungicides;
- During greenhouse cultivation (under film cover, etc.), open the pots every day for ventilation for at least 15-30 minutes;
- Place the containers on the windowsill so that the sprouts are not exposed to direct sunlight, but the plants are warm.
- Transfer. Only carry out this procedure when the plant is completely healthy. If it shows signs of disease, treat it first and only then transfer it to a new pot.
Which method is the easiest and fastest?
Experienced gardeners and novices alike believe that the easiest propagation method is rooting a leaf. It doesn't matter whether the leaf is placed in water or directly into soil. Despite popular belief, every violet grower has their own preferred method. Therefore, experts recommend experimenting with the method.
How to stimulate and speed up rooting?
To accelerate root development and improve adaptation and survival rates, three techniques are used:
- Use of drugs. These are rooting stimulants or activators. They are sold in gardening stores. Some are ready-to-use, but others need to be diluted with water. They are applied to cuts (using the foliar method) and directly to the roots.
The most popular drugs are Kornevin, Zircon, Fitosporin, Heteroauxin. - Folk remedies. They are used by gardeners who are averse to the use of chemicals. Options:
- The most popular solution is considered to be 1 part freshly squeezed aloe juice and the same amount of water;
- potato - a hole is drilled inside the peeled root vegetable, into which a part of the flower is inserted for rooting (it is enough to keep it like this for 3-4 days);
- pre-soaking in honey liquid for 12 hours (for one and a half liters of water you need to add 1 teaspoon of honey);
- willow water - it is used to water plantings or insert leaves for rooting (it is easy to prepare - place the shoots in a saucepan, add water 5 cm higher, boil the willow branches in water for 30 minutes, let it steep);
- soaking in amber water - 1 tablet of succinic acid per 500 ml (keep for 20 minutes);
- soak in yeast for 24 hours (100 g of fresh yeast per 1 liter of water).
- Creating a mini greenhouse. Many beginners ignore the requirement to cover their plantings with plastic film, glass, a plastic bottle, or a container. However, this allows you to create greenhouse-like conditions, thereby providing favorable conditions for planting material of any shape.
The required humidity and temperature play a role in accelerating root formation.
How long does it take to get a blooming violet?
The exact time violets begin to bloom when propagated indoors depends more on the specific flower variety than the method used. This typically occurs 8-12 months after planting, with the exception of the seed method, which takes about two years.
Common Mistakes in Propagation – Advice from Experienced Gardeners
It's always difficult for beginners to achieve stunning success the first time they try propagating the capricious violet. Therefore, experienced gardeners share their secrets – what mistakes can be made, what problems can be encountered, and how to correct the situation:
- Quite often, planted leaves or other parts of the bush (especially in the ground) lose turgor, droop, and wilt. This is due to a lack of moisture in the plant's internal structure. This happens if the seedling is sent by mail or if the grower has left the cut seedling outdoors for too long.
This is comparable to human dehydration. What to do: remove the plant from the container, soak the roots in warm water (keep them there until the green mass is restored, saturated with moisture), let it dry slightly, and replant. - Incorrectly selected planting material. For example, if the leaf is very old or young. In the former case, it lacks the strength to form roots, while in the latter case, the young plant fragment will only provide itself with nutrients. Once it reaches vegetative maturity, it will begin to develop roots.
- If the substrate is too dense (heavy), roots will not be able to form. Remember, the soil mixture should not just be loose, but very fluffy.
- If you plant a leaf too deep, it will take too long to break through to the surface. The reason for this is simple: daughter rosettes tend to form primarily at the tip, which is planted in the soil.
- Inappropriate planting conditions lead to the plant freezing, which completely stops root formation.
- If mini-greenhouses are not ventilated, plant rot will develop.
- A seedling won't root if it's placed near a heating unit or a window with hot glass from containers. A cold windowsill in winter has a similar negative effect—insulating material should be placed under the pot.
The violet is a delicate and sensitive plant that can be propagated in a variety of ways. The key is to strictly adhere to all preparation, planting, and care guidelines. If done correctly, in just eight months you'll have a profusely blooming bush of your favorite flower on your windowsill.