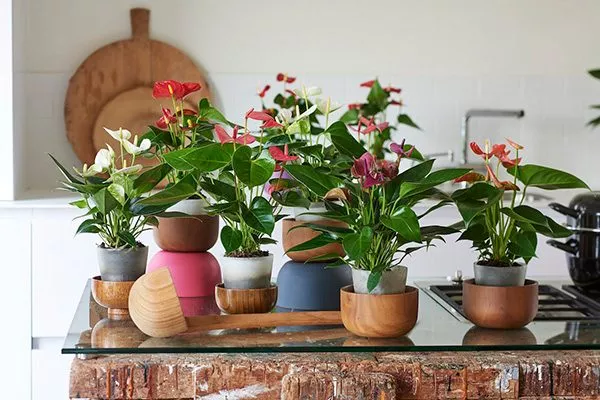
Anthurium, commonly known as "male happiness," can be propagated using a variety of methods, each with its own unique characteristics and application depending on the situation. Being a capricious plant, it doesn't always take root, so it's important to strictly adhere to all requirements and pay attention to subtleties and nuances.
Features of anthurium propagation
Anthurium This plant is a poisonous houseplant. Its sap causes mild burns when in contact with the skin, and can be poisonous if consumed in very small quantities. Therefore, handling it should be done exclusively with rubber medical gloves.
Preparation
The first thing you need to prepare is a flowerpot. Pay particular attention to the material it's made from. Suitable materials include:
- For permanent use:
- plastic;
- glass;
- clay, but only if the inside of the pot is glazed (if not, the root shoots will grow into the walls).
- For temporary planting:
- peat pots;
- disposable cups;
- plastic containers;
- cassettes.
Pots that are too wide are not suitable for anthuriums, as the root system won't be able to immediately occupy the entire space. In this case, you won't achieve flowering because all your energy will be spent on root growth. This also encourages the development of pathogens.
Other features:
- Be sure to wash the pots in soapy water;
- rinse under running water;
- treat with an antiseptic to disinfect;
- Make drainage holes at the bottom.
The soil also requires preparation. You can purchase a ready-made substrate for Araceae (such mixtures are manufactured). Orchid-specific substrates can be used, but with a pH of 4.5-6.5. However, the mixture won't be ideal, so you'll need to add other components.
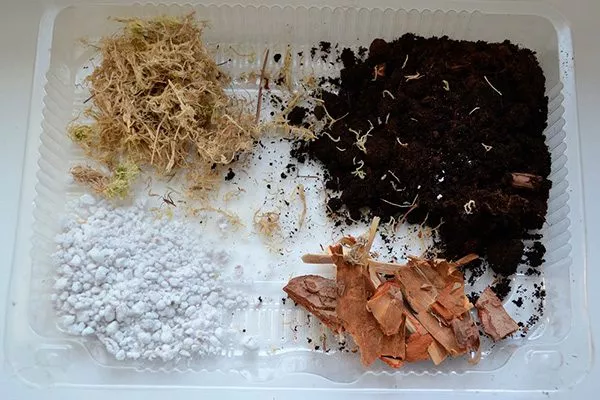
Experienced florists recommend making your own potting soil. The key requirements are looseness, water retention, and breathability. There are several different potting mixes available:
- 1 part each of coniferous and leafy soil, peat, 0.5 parts of river sand;
- 1 part sphagnum and leaf soil, 2 parts leaf soil;
- in equal proportions – pine bark, peat, expanded clay pebbles;
- in one proportion - bark, moss, peat, perlite;
- 3 parts peat, 1 part each of sphagnum and leaf soil;
- in equal parts – substrate for rhododendrons (or azaleas), pine bark, sphagnum moss, peat, expanded clay.
Charcoal must be added to each container - for a pot with a volume of 500 ml, 50 g of ash is enough.
If some component is not available, you can replace it like this:
- perlite – coarse sand;
- sphagnum - coconut fiber or marsh moss;
- wood ash - pumice or chalk.
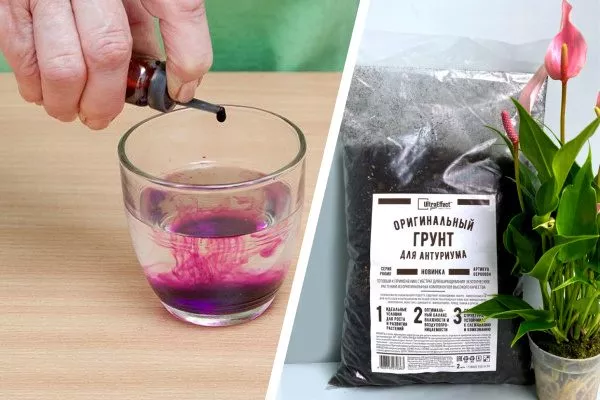
Disinfection of the components is considered the most important preparatory step. This applies to any soil, sand, expanded clay, and similar materials. This procedure eliminates all pathogenic microorganisms, ensuring that the transplanted plants are not susceptible to infection.
There are different ways to disinfect:
- Roasting. Do this in the oven at 200 degrees Celsius. Cooking time is 20 minutes.
- Ferry. You will have to place the soil in a cloth and place it on a grate located over a boiling pan.
- Frost. There are two options: in the freezer or outside. Freezing time is 4-5 days.
- Strait. There are 3 options for this:
- boiling water;
- pink solution of manganese;
- fungicides (Integral, Fitop, Agat, Trichodermin, Fitosporin).
What will you need?
In addition to the substrate and pot, you'll need a few additional materials and tools. These will depend on the method you're propagating your anthurium, but in general, prepare the following:
- drainage material – expanded clay, perlite, vermiculite and the like;
- root formation stimulants – Heteroauxin, Kornevin, Epin;
- knife;
- disinfectants – manganese, iodine, alcohol;
- wooden stick;
- spray;
- rubber gloves.
Cuttings with aerial roots
Like Saintpaulias, anthuriums can also produce aerial roots, which can be used for propagation. However, their main purpose is to extract nutrients and oxygen from the surrounding atmosphere and to attach to various surfaces (the plant can use its roots to support the bush).
How to propagate by cuttings?
Not every plant species, and not always in indoor conditions, develops aerial roots. But if you're lucky, take advantage of this opportunity and increase the number of plants.
To do this, it is enough to carry out a number of activities:
- Find cuttings with aerial roots on a healthy, mature plant. Make sure they have leaves (at least three) and at least a couple of internodes.
- Cut the shoot so that the root remains on top, treat all areas with activated carbon.
- Remove all the leaves. Failure to do so will result in rooting taking longer.
- Plant the area with aerial roots. Remember: the growing point should be left above the soil/water surface, and the aerial roots below.
- Cover the top with a plastic bag or glass jar.
- Grow the plants in this mini-greenhouse until the roots grow. Then transplant them to their permanent location.
How to root a cutting without roots?
If aerial root shoots are absent, you can use the familiar propagation method of cuttings. For this, select any shoots that are free from damage and disease. Roots also grow quickly—in 10-20 days.
The advantage of this method is that it completely preserves the parent (varietal) characteristics. Rules for propagation by cuttings:
- Using a sharp knife, cut the stem to a length of about 10-12 cm, but for dwarf bushes, 6-8 cm is enough.
- Treat the cut areas of the bush and cuttings with wood ash. You can also use iodine, brilliant green, colloidal sulfur, powdered chalk, or crushed activated charcoal.
- Let the shoot dry for half an hour.
- Place the cutting in water or plant it in a potting medium. You can use a mixture of equal parts sand and peat, or you can chop up sphagnum moss and place the cutting in it.
When using water rooting, ensure the water isn't too hard. It's important to use room-temperature, settled water, and to prevent fungal growth, it's best to disinfect the water. - Cover the pot with plastic wrap or a plastic bottle to create a greenhouse effect.
Also watch a video on how to propagate anthurium by cuttings (in this example, the mother plant dies, so cuttings are an excellent way to save the plant):
Rooting in water
Any part of a flower can be rooted in water—leaves, cuttings, aerial roots, and pups. The main thing is to strictly adhere to the following parameters:
- the water must be settled or filtered (it can be additionally boiled to get rid of all salt compounds and other harmful substances);
- Be sure to add 1 tablet of activated carbon per 200 ml of liquid (it will disinfect and help the plant to grow roots faster);
- water temperature – 1-2 degrees higher than room temperature;
- if the moisture in the glass evaporates, add water of the same quality to the required level;
- Replace the liquid with fresh liquid weekly;
- there must be at least 2 leaves on the stem;
- Place the stem in water so that the growth point is above the surface by a maximum of 3 cm.
- ✓ The water temperature for rooting should be 1-2 degrees higher than room temperature, but not exceed 28°C.
- ✓ Using activated carbon in rooting water (1 tablet per 200 ml) significantly reduces the risk of pathogen development.
The process is standard: pre-treat the planting material, place it in water, and cover it with a plastic bag.
Also watch this video about what to do with an anthurium after cuttings if it doesn't have roots:
Reproduction in soil
Anthuriums aren't limited to a substrate containing moss, soil, and other ingredients. They can also be grown in other materials, such as pure sphagnum moss and even perlite.
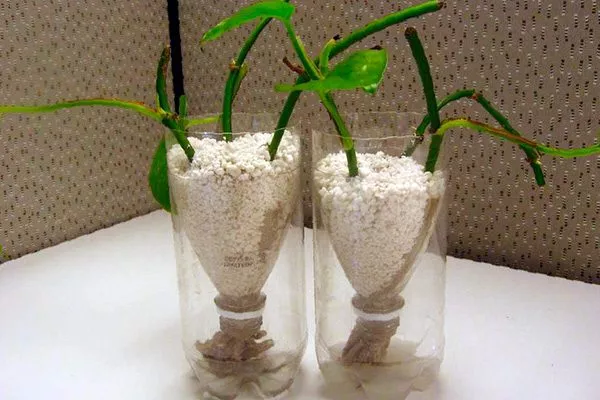
Root growth in perlite
Perlite is a natural volcanic material rich in minerals and microelements. In floriculture, the expanded form is used, which is then fired to kill pathogens. It comes in two varieties:
- for plants - larger fractions;
- agroperlite - smaller pieces.
The appropriateness of using perlite in growing anthurium is based on the physical properties of perlite:
- inertia;
- the ability to absorb nutrients and then transfer them to the roots;
- air permeability;
- water absorption;
- pH neutrality.
Perlite also contains dust particles, which should be removed beforehand, so planting the flower is carried out as follows:
- Rinse the stones under running water. When working with the material, wear protective goggles and a respirator, as dust can easily become inhaled, causing irritation.
- Soak them in a basin for 24 hours.
- Rinse again.
- Place in clean pots.
- Plant an anthurium.
What to do if the cutting does not produce roots?
The first and most important step is to determine the cause. Based on this, you need to choose methods to correct the situation. The most common factors negatively affecting root growth are:
- insufficient watering;
- overwatering (in this case the stem rots);
- lack of lighting;
- low air temperature in the room.
But sometimes, even if all the conditions are strictly met, roots still fail to form. In this case, it's advisable to use rooting stimulants. There are many commercially available, including Heteroauxin, Epin, Kornevin, succinic acid, and others. You can also make a decoction from onion peels, nettles, aloe tincture, and so on.
Lateral shoots
Lateral shoots are called "pups" or "suckers." They form near the plant and have existing roots, eliminating the need for additional rooting.
How to take a shoot?
Under no circumstances should you simply pull out the offspring from the soil. This is because the offspring's root system is connected to the roots of the mother plant. Doing so will damage the main plant, and the offspring's roots may also be torn off. Therefore, remove it according to the following rules:
- Water the substrate lightly.
- Allow the water to soak in completely.
- Remove the bush along with the root ball.
- Using a sharp, disinfected knife, cut off the baby plant so that the bud and roots remain on it.
- Treat the cut areas with charcoal.
- Return the bush to its original pot.
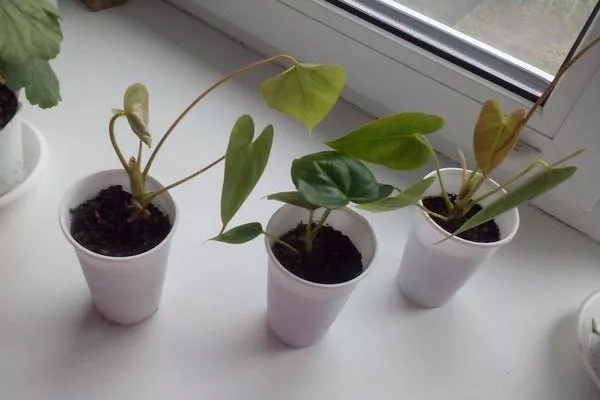
How to plant a baby plant in a pot?
After treating the cut, leave the cutting in the open air until it's completely dry—you can't plant a damp cutting. Next, proceed as follows:
- Prepare a small container to temporarily house the plant. Treat it with an antiseptic and add fine expanded clay to the bottom for drainage.
- Sprinkle a mixture of moss, humus and vermiculite in equal proportions on top.
- Plant the seedling in a disposable cup using the standard method. Place it at the same depth as the shoot.

- Mulch the surface of the potting mix with sphagnum moss. This helps maintain optimal moisture levels for the plant's easy adaptation to the new substrate.
- Spray the green mass with Epin solution.
- Cover with a plastic bag to speed up the rooting process.
- After about 3-4 weeks, transplant it into a permanent pot. The plant will be fully formed.
Is it possible to grow anthurium from a leaf?
Anthurium is a plant that easily propagates from leaf blades, but a small root is required. This method is quite interesting and unusual, as it involves leaf blade rolling.
The reproduction process looks like this:
- On a healthy bush, find the strongest and most vibrant leaves. They should have clearly visible veins.
- Mark the cut point. The petiole length should vary from 3 to 5 cm.
- Make the cut with a disinfected, sharp knife. A scalpel or razor blade is also easier to use.
- Sprinkle the cut area on the plant and petiole with crushed activated carbon.
- Take the sheet in your hands and roll it to form a vertical tube.
- Tie the created "structure" with thread or a thin rubber band. Keep in mind that over-tightening is not recommended, as this will cause the leaf to dry out or rot.
- Prepare the substrate. For rooting, you can use equal parts sphagnum moss and river sand. You can also add vermiculite or perlite. The ratio will then be 1:1:1.
- Place in a disposable glass or a small peat pot.
- Moisten the substrate with a spray bottle, but do not overwater. The soil mixture should be just damp.
- Place the rolled leaf so that 2/3 of the leaf blade is buried. 1/3 should remain above the surface (the length of the petiole should also be taken into account).
- Cover the glasses with transparent jars (alternative options are cut plastic bottles, a plastic bag).
- Move it to a windowsill, as it is important for the leaves to root in full light.
Open the cover daily for ventilation and mist the substrate daily. You can also use solutions containing rooting stimulants. The first shoot will appear near the leaf blade or inside the funnel in about three weeks.
Also watch a video from an experienced gardener on how to properly propagate anthurium from a leaf:
Propagation by seeds
Seed propagation is typically used in laboratory conditions, as the parent plant's characteristics are not preserved. However, it offers the potential to produce a completely new and unique hybrid. This is precisely what attracts gardeners to seed propagation.
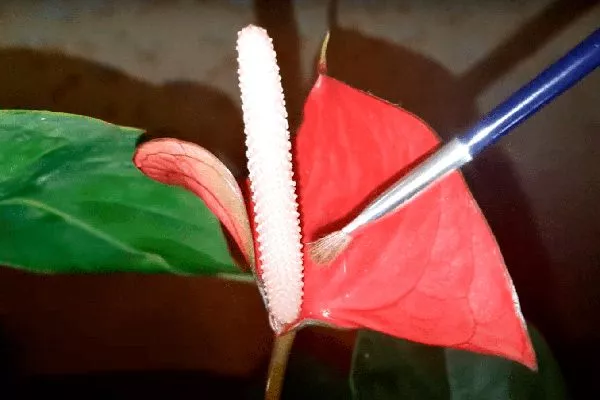
How to pollinate and get seeds?
Planting material can be purchased at a flower shop—the seeds are treated with special substances, eliminating many processes, such as scarification, dressing, and soaking. However, experienced gardeners don't prefer this method. The reason is simple: the packaging indicates a specific variety, but the resulting product is a complete surprise.
It's possible to obtain seeds yourself. To do this, pollination is first carried out:
- Choose two good flowers.
- Immediately after flowering begins, take a brush (the bristles should be very soft) and run it over the cob.
- Transfer the captured pollen to a clean sheet of paper.
- Do this with each flower that has bloomed.
- Pack the collected pollen and store it in the refrigerator.
- After the buds on the other bush have bloomed, remove the pollen from the refrigerator.
- Using a cotton pad, soak it up and transfer it to the flower. Try to distribute it evenly over the entire cob. The direction should be varied.
- Place the flower in a place where the temperature is +24-26 degrees with lighting for 12 hours.
- Repeat the pollination process during the first 5 days.
After a month, if cross-pollination was successful, the cobs will become larger in size. The seed pod will fully mature after 8 to 12 months (depending on the variety and growing conditions).
When the box becomes dark and dry, do the following:
- Cut off the ripe fruits with scissors. To prevent seeds from scattering, place paper under the capsule.
- Remove the top protective shell.
- Shake out all the seeds.
- Place them in a well-ventilated area on paper.
- Dry for 3 days.
Step-by-step landing
It's best to sow the seeds immediately after harvesting—this way, the chances of germination are still high. Here's a step-by-step guide:
- Prepare the substrate in advance. A mixture of peat and sand works best for seeds.
- Prepare containers as well. These can be plastic containers, disposable cups, peat pots, etc. Be sure to disinfect them.
- Place the soil mixture in the boxes and moisten it with a spray bottle.
- Meanwhile, soak the planting material in a light pink solution of potassium permanganate for about 15 minutes.
- Place the seeds on a napkin (preferably made of cloth, because pieces come off with a paper towel).
- Let the grains dry slightly (literally 10 minutes).
- Spread the seeds over the surface of the moistened substrate, trying to spread them as evenly as possible.
- Sprinkle with 2 mm of soil mixture.
- Cover the containers with glass, a lid, or plastic.
- Grow the seedlings at a temperature of 25 degrees Celsius. Ideally, keep the bottom of the seedlings warm as well. Remove the cover for 10 minutes every day, gradually increasing the time. Moisten as needed – the substrate should neither be dry nor excessively wet.
You will notice the first sprouts in 7-10 days, and mass shoots in 2 weeks. - Once the sprouts have three true leaves, remove the covering and transplant. To do this, fill 10-cm-diameter cups with drainage material and a different substrate: equal parts peat, charcoal, and leaf mold.
- Transplant the flowers into permanent pots after six months.
Also watch a video where a gardener shares his experience growing anthurium from seeds:
Caring for a young plant
After planting any part of the plant, strictly adhere to these simple requirements:
- Since plastic covering is almost always required initially, be sure to ventilate the plant. Otherwise, not only will the bush fail to develop roots, but it will also rot due to excessive moisture.
- Open the cover every day. Start with 10 minutes, but increase the time by approximately 5-15 minutes each day. This approach will prevent the young plant from becoming stressed after the film is completely removed and will easily cope with the changes in conditions.
- Before removing the cover, the average room temperature should be 24-25 degrees Celsius. After that, the thermometer readings drop to 20 to 24 degrees Celsius during the day, and 15 to 18 degrees Celsius at night is sufficient.
- To speed up rooting, spray the plantings (both the green mass and the substrate) with preparations such as Epin, Kornevin, and Heteroauxin once every 6-8 days.
- Avoid direct exposure to sunlight – the flower is too delicate and sensitive and will quickly get burned.
- Before removing the cover, the lighting should be bright, but it is better to use fluorescent lamps for this.
- Apply fertilizer for the first time after planting 55-65 days. If using the seed method, apply it after 15 days. Use a fertilizer designed for azaleas.
- Watering Water regularly. Frequency depends on the season: in summer and spring, water 1-2 times a week, and in autumn and winter, water half as often. Avoid stagnant water, as anthuriums tolerate drought better than overwatering.
- Pay attention to the humidity level in the room – optimal values range from 85 to 90%. This is especially important during hot weather. While it's impossible to achieve this naturally, it's quite possible to do it artificially. To do this:
- buy an air humidifier;
- place a jar of water next to the pot;
- hang wet towels nearby;
- Make a mulch layer that will slow down the evaporation of moisture (moistened sphagnum, coconut fibers).
- Replanting is allowed after 12-14 months.
Anthurium propagation can be accomplished using a variety of methods, from the simplest to the most labor-intensive, so gardeners have a wide range of techniques to choose from. Keep in mind that factors such as the variety, the condition of the mother plant, and so on also influence propagation.